Master-Detail Pattern with Flutter
In the world of technology, the importance of frameworks is vast. The frameworks play a crucial role in developing applications. If you have already used many applications, you may notice that most applications used the UX patterns- ‘Master > Detail views’ (Master-Detail Pattern). Many people cannot recognize it by its name.
The UX pattern mainly consists of a list of a few elements. The list contains emails with partial information (title and summary of the content). When you click on an email, it will take you to a page full of content. However, it does not imply that we need to navigate away essentially. Here, we will discuss how to implement this pattern using mock data and the available options.
Project Setup
Now, begin with the new Flutter project setup. So, go to your terminal and run the following code.
$ flutter create ds_master_detail
$ cd ds_master_detail
$ code . (or your favourite editor)
Now, do not open it on the simulator or device because you need to include ‘dartz’ to your ‘pubspec.yaml’ :
dependencies:
  flutter:
    sdk: flutter
  dartz: ^0.9.2
dev_dependencies:
  flutter_test:
    sdk: flutter
Adding the ‘dartz’ will offer access to the ‘Either<x, y>’ type. So, you need to use it inside the ‘stateNotifier’. As you can eliminate it quickly, you can write something similar without it.
The Product Model
Now, you should start with the introduction of the ‘Product’. After that, you must create a ‘List<Contact>’ , which consists of a standard set of products.
import 'package:flutter/foundation.dart';
import 'package:flutter/widgets.dart';

extension PrintDate on DateTime {
  String toNiceString() {
    return "${this.year}/${this.month}/${this.day}";
  }
}

@immutable
class Product {
  final int id;
  final String title;

  final DateTime _dateCreated;
  String get dateCreated => _dateCreated.toNiceString();

  final String _description;
  String description({bool shortened = false}) => shortened
      ? _description.replaceRange(
          _description.length > 150 ? 150 : _description.length,
          _description.length,
          "...")
      : _description;

  const Product({
    required this.id,
    required this.title,
    required String description,
    required DateTime dateCreated,
  })  : _dateCreated = dateCreated,
        _description = description;

  @override
  String toString() {
    return "Product $id: $title";
  }

}
You can always add an extension on ‘DateTime’, enabling you to call ‘toNiceString()’ on any ‘DateTime’ elements. You can use it below the line inside the UI while viewing information about a particular product.
The Product List
final ListkProductList = [ Product( id: 0, title: "Magic Wand", dateCreated: DateTime(2020, 11, 16), description: "Bacon ipsum dolor amet ham hock turducken t-bone, pork chop brisket picanha venison cupim pork meatloaf pig short ribs", ), Product( id: 1, title: "Eye of Newt", dateCreated: DateTime(2020, 11, 17), description: "Ground round venison brisket, swine pork loin turducken rump burgdoggen", ), Product( id: 2, title: "Staff of Power", dateCreated: DateTime(2020, 11, 18), description: "Ham hock cow landjaeger pork loin brisket beef ribs pancetta pastrami tri-tip spare ribs chuck kevin porchetta picanha sausage. Pork chop turkey leberkas rump, ground round ham boudin short loin capicola"), Product( id: 3, title: "Crystal Ball", dateCreated: DateTime(2020, 11, 19), description: "Ribeye biltong boudin venison meatloaf rump fatback cow prosciutto strip steak pork loin burgdoggen. Ham hock chuck shoulder jowl. Drumstick salami shoulder pork chop short ribs kielbasa sirloin frankfurter. Leberkas drumstick kielbasa, jowl chicken pork chop frankfurter prosciutto fatback shankle shoulder buffalo sirloin swine beef", ), Product( id: 4, title: "Magic Cloak", dateCreated: DateTime(2020, 11, 20), description: "Ribeye biltong boudin venison meatloaf rump fatback cow prosciutto strip steak pork loin burgdoggen. Ham hock chuck shoulder jowl. Drumstick salami shoulder pork chop short ribs kielbasa sirloin frankfurter. Leberkas drumstick kielbasa, jowl chicken pork chop frankfurter prosciutto fatback shankle shoulder buffalo sirloin swine beef", ), ];
You can always define a specific product list that contains reasonable defaults. Then, it can be used inside of your next ‘ProductService’.
ProductService
You can use it easily inside your ‘ProductService’.
import 'dart:math';
import 'package:master_detail_pattern/product.dart';
class NetworkException {
  final String message;
  NetworkException(this.message);
}
class ProductService {
  Future> getProducts() async {
    try {
      await _shouldError("Couldn't fetch product list.");
      return kProductList;
    } on NetworkException catch (e) {
      return Future.error(e.message);
    }
  }
  Future getProductById(int id) async {
    try {
      await _shouldError("Couldn't fetch product by ID.");
      return kProductList.firstWhere(
        (element) => element.id == id,
        orElse: () => throw NetworkException("Product List"),
      );
    } on NetworkException catch (e) {
      return Future.error(e.message);
    }
  }
  Future _shouldError(String errorMessage) async {
    final random = Random();
    final error = random.nextBool();
    return error
        ? Future.delayed(const Duration(seconds: 1),
            () => Future.error(NetworkException(errorMessage)))
        : Future.delayed(const Duration(seconds: 1), null);
  }
}
It mocks the API call as the chances of error are 50%. However, you can set it to ‘false’ if you are happy that the UI manages all errors appropriately and efficiently.
Master: Product List Page
Now, you need to begin with the fundamental product list page, which will help you receive the product list from the ‘ProductService’. You can do it by using the ‘FutureBuilder’.
import 'package:flutter/material.dart';
import 'package:master_detail_pattern/error_message.dart';
import 'package:master_detail_pattern/loading.dart';
import 'package:master_detail_pattern/product.dart';
import 'package:master_detail_pattern/product_list.dart';
import 'package:master_detail_pattern/product_service.dart';
class ProductListPage extends StatelessWidget {
  static const routeName = "/products";
  final ProductService _productService = ProductService();
  ProductListPage({super.key});
  @override
  Widget build(BuildContext context) {
    return Scaffold(
      appBar: AppBar(
        title: const Text("Master Page"),
      ),
      floatingActionButton: FloatingActionButton.extended(
        label: const Text("Direct Navigation"),
        onPressed: () => {
          // Do whatever needed.
        },
      ),
      body: FutureBuilder(
        future: _productService.getProducts(),
        builder: (BuildContext context, AsyncSnapshot> snapshot) {
          if (snapshot.hasError) {
            return ErrorMessage(snapshot.error.toString());
          }
          if (snapshot.hasData) {
            return ProductList(
              productList: snapshot.data,
              onTap: (Product product) => {
                // Do whatever needed
              },
            );
          }
          return Loading();
        },
      ),
    );
  }
}
Before further investigation, you must include other flutter widgets that have been used or imported inside the ‘ProductListPage’.
The ErrorMessages
The widget of the ‘ErrorMessage’ will display some texts in the ‘center’ or middle of the screen. Flutter engineers will help you display the screen’s error messages.
import 'package:flutter/material.dart';

class ErrorMessage extends StatelessWidget {
  final String message;
  const ErrorMessage(
    this.message, {
    Key? key,
  }) : super(key: key);

  @override
  Widget build(BuildContext context) {
    return Center(child: Text(message));
  }
}
ProductList
The widget of the ‘ProductList’ will use the ‘ListView builder’ to showcase the ‘ListTile’. It will display it depending on the passed in the ‘ProductList’:
import 'package:flutter/material.dart';
import 'package:master_detail_pattern/product.dart';
class ProductList extends StatelessWidget {
  const ProductList({
    Key? key,
    required this.productList,
    required this.onTap,
  }) : super(key: key);
  final List? productList;
  final Function(Product) onTap;
  @override
  Widget build(BuildContext context) {
    return ListView.builder(
      itemCount: productList!.length,
      itemBuilder: (BuildContext context, int index) {
        final product = productList![index];
        return Padding(
          padding: const EdgeInsets.symmetric(vertical: 6.0),
          child: ListTile(
            title: Text(product.title),
            subtitle: Text(
              product.description(shortened: true),
            ),
            onTap: () => onTap(product),
          ),
        );
      },
    );
  }
}
Loading
The widget of the ‘Loading’ is a basic centered spinner. However, it is necessary to discuss it using the Master-Detail Pattern using Flutter.
import 'package:flutter/material.dart';

class Loading extends StatelessWidget {
  const Loading({super.key});

  @override
  Widget build(BuildContext context) {
    return const Center(
      child: CircularProgressIndicator(),
    );
  }
}
Update the main.dart
Finally, you have reached the phase where you can easily update the ‘main.dart’. Loading the ‘ProductListPage’ is crucial because of the ‘initialRoute’ for the specific application.
import 'package:flutter/material.dart';
import 'package:master_detail_pattern/product_list_page.dart';

void main() {
  runApp(const MyApp());
}

class MyApp extends StatelessWidget {
  const MyApp({super.key});

  @override
  Widget build(BuildContext context) {
    return MaterialApp(
      title: 'Master > Detail',
      theme: ThemeData(
        primarySwatch: Colors.deepPurple,
      ),
      debugShowCheckedModeBanner: false,
      initialRoute: ProductListPage.routeName,
      routes: {
        ProductListPage.routeName: (context) => ProductListPage(),
      },
    );
  }
}
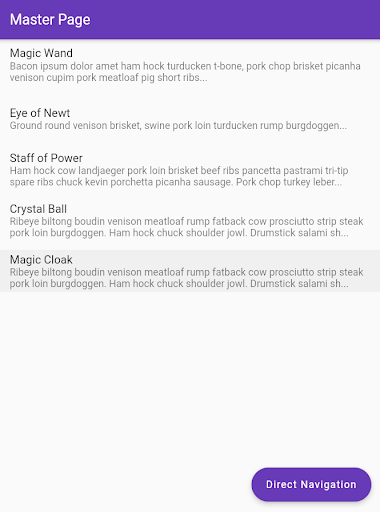
If you have appropriately done this process, then you will be able to notice the list of all your products inside the ‘ListView‘.
Detail View
You must navigate to the ‘ProductDetailPage’ to choose an item from the ‘ProductList’. As for now, you are in a position where you do not have much information. You only have the ‘id’ to proceed further. If not, you can seamlessly send the ‘Product’ to the next page.
When the users navigate using an URL of a web browser, then the users can choose the id of the products with the help of the address bar.
The ProductDetailArges
Here, you will define the ‘ProductDetailArgs’, consisting of a ‘SelectedProductOrId’. It implies that it can be an ‘int’ or a ‘product’. Additionally, it further determines the product’s id.
import 'package:dartz/dartz.dart';
import 'package:flutter/foundation.dart';
import 'package:master_detail_pattern/product.dart';
@immutable
class ProductDetailArgs {
  final Either selectedProductOrId;
  const ProductDetailArgs(this.selectedProductOrId);
}
After creating that, you should update the ‘onTap’ callback, which you will find in the ‘ProductList.’ To do that appropriately, you must pass the ‘Left (product)’ into ‘ProductDetailArgs’ on navigation.
return ProductList(
              productList: snapshot.data,
              onTap: (Product product) => Navigator.of(context).pushNamed(
                ProductDetailPage.routeName,
                arguments: ProductDetailArgs(
                  Left(product),
                ),
              ),
            );
If you wish to send a specific product to the ‘ProductDetailArges’, send the ‘Left (product)’. On the other hand, if you decide to send the ‘int’ to the ‘ProductDetailArges’, then send the ‘Right (product)’. The right and left products both come from the ‘dartz’. Then, it represents the ‘Right’ and ‘Left’ types of your ‘Either<Product, int>’.
Now, it is also time to update your ‘FloatingActionButton‘ to send users to a particular ‘id’ directly. For now, you can use the hardcoded id of ‘2’. But it simulates the direction of navigating by a web URL.
floatingActionButton: FloatingActionButton.extended(
        label: const Text("Direct Navigation"),
        onPressed: () => Navigator.of(context).pushNamed(
          ProductDetailPage.routeName,
          arguments: ProductDetailArgs(
            Right(2),
          ),
        ),
      ),
ProductDetailPage
It is time to wrap up by gathering everything with the ‘ProductDetailPage’. It begins with developing the widget of ‘ProductDetail’. Then, you can use it to display or showcase the complete information regarding your chosen product.
class ProductDetail extends StatelessWidget {
  final Product? product;

  const ProductDetail({Key? key, this.product}) : super(key: key);

  @override
  Widget build(BuildContext context) {
    return Padding(
      padding: const EdgeInsets.symmetric(horizontal: 20, vertical: 6),
      child: ListView(
        children: [
          ListTile(
            contentPadding: EdgeInsets.zero,
            title: Text(
              product!.title,
              style: Theme.of(context).textTheme.headline6,
            ),
            subtitle: Text(
              product!.dateCreated,
            ),
          ),
          Text(
            product!.description(),
          )
        ],
      ),
    );
  }
}
Lastly, you can put an end using the widget of the ‘ProductDetailPage’.
extension ToProductService on int {
  Future toProduct() async {
    final ProductService _productService = ProductService();
    final productId = this;
    return _productService.getProductById(productId);
  }
}
class ProductDetailPage extends StatelessWidget {
  static const routeName = "/products/detail";
  const ProductDetailPage();
  @override
  Widget build(BuildContext context) {
    final ProductDetailArgs args =
        ModalRoute.of(context)!.settings.arguments as ProductDetailArgs;
    return Scaffold(
      appBar: AppBar(
        title: const Text("Detail Page"),
      ),
      body: args!.selectedProductOrId.fold(
        _buildFromProduct,
        _buildFromInt,
      ),
    );
  }
  Widget _buildFromProduct(Product product) {
    return ProductDetail(product: product);
  }
  Widget _buildFromInt(int productId) {
    return FutureBuilder(
      future: productId.toProduct(),
      builder: (BuildContext context, AsyncSnapshot snapshot) {
        if (snapshot.hasError) {
          return ErrorMessage(snapshot.error.toString());
        }
        if (snapshot.hasData) {
          return ProductDetail(product: snapshot.data);
        }
        return Loading();
      },
    );
  }
}
This specific widget has a similarity with the ‘ProductListPage’. Flutter experts will experiment with the extension to identify their potential. It implies that you can call the ‘toProduct()’ on any ‘int’. After that, it will automatically return to the ‘Future<Product>’ for that specific ‘id’.
You can use the ‘fold’ on ‘Either<Product, int>’, a crucial section of the ‘ProductcDetailArgs’. However, it will eventually split the ‘Either’ down the middle and offers access to the ‘Right’ and ‘Left’ callbacks. It is time to update the ‘main.dart’ with your new ‘route’.
return Scaffold(
      appBar: AppBar(
        title: const Text("Detail Page"),
      ),
      body: args!.selectedProductOrId.fold(
        _buildFromProduct,
        _buildFromInt,
      ),
    );
Now, it is time to update the ‘main.dart’ with your new ‘route’.
import 'package:flutter/material.dart';
import 'package:master_detail_pattern/product_detail_page.dart';
import 'package:master_detail_pattern/product_list_page.dart';

void main() {
  runApp(const MyApp());
}

class MyApp extends StatelessWidget {
  const MyApp({super.key});

  @override
  Widget build(BuildContext context) {
    return MaterialApp(
      title: 'Master > Detail',
      theme: ThemeData(
        primarySwatch: Colors.deepPurple,
      ),
      debugShowCheckedModeBanner: false,
      initialRoute: ProductListPage.routeName,
      routes: {
        ProductListPage.routeName: (context) => ProductListPage(),
            ProductDetailPage.routeName: (context) => ProductDetailPage(),
      },
    );
  }
}
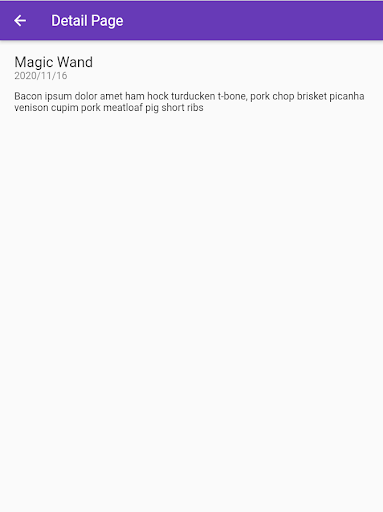
Output
On Clicking on List Tile :

Conclusion
Here, we have elaborately discussed developing the solid Master-Detail Pattern using Flutter. It gives a clear and organized user interface. Users can easily browse via a list of items and view their descriptions without being overwhelmed. But, if you pass an ‘id’, you can get it from the mock database. However, whenever you use the UX pattern to design your application, you must remember that the process is different for every application.
However, it is not suitable for all app development. A different pattern is more suitable if the app has a small pattern of items or products with complicated details that can not be displayed on a single screen. Thus, the Master-Detail Pattern is a practical and effective design for displaying the list of items and their details in Flutter app development.
Frequently Asked Questions (FAQs)
1. Which design pattern is best for Flutter development?
A repository pattern is helpful and useful for all the Flutter engineers and will help them to organize their coding in a manageable way.
2. What makes the Flutter so fast?
A client-optimized dart programming language is used on multiple platforms for fast performance. Dart is AOT compiled to fast, predictable, native code, allowing them to write all the coding in Dart only. Hence, it makes Flutter extremely fast and customizable.
3. How does Flutter handle the layout and rendering of widgets?
In Flutter, widgets are represented by an immutable class, which is utilized to configure a tree of objects. Hence, these widgets are used to manage the separate tree of objects for layout, which is then used to manage separate tree objects for the compositing.

Contemporary ventures
Recent blog


Join our newsletter
Read and share new topics about all things Tech.
ready to get started?
Fill out the form below and we will be in touch soon!
"*" indicates required fields