
What is Flutter Bloc: A Complete Guide To Use It
One of the state management tools for Flutter applications is Flutter Bloc. It may be used to easily manage all the potential states of your application.
In order to make the application code more clear, scalable, and testable, BLoC, or business logic components, tries to separate the program’s business logic from User Interface.
The basic idea behind BLoC is that everything in the Flutter web application development should be visualized as a stream of events, where widgets submit events and other widgets react. BLoC controls the conversation from his position in the center. Even the syntax for working with streams is built right into Dart!
We must understand what events and states are in order to comprehend how bloc functions:
Events :
Events demand that BLoC take action. Anywhere, including a UI widget, can fire an event. external circumstances, such as adjustments to sensor readings or network connectivity.
States :
States in Flutter stand for the data that each widget will process. Depending on the state, a widget alters itself.
Flutter bloc is easy to use because you will quickly grasp the concept, regardless of your level. This library also has excellent documentation with a tone of examples. It is one of the most popular in the Flutter community, so if you have any questions or problems, you can probably find the answer by performing a quick internet search.
Different Types of Widgets in Bloc
Bloc provides you with different types of Flutter widgets .These are the widgets the library offers you to manage all the potential scenarios, such as adding an event, listening to a state, emitting a state, rebuilding the view based on the state, and so on.
BlocProvider:
It is the responsibility of BlocProvider to give its children a bloc. is the process of “initializing” the block before use.
BlocProvider(
      create: (context) => yourBlocClass(),
      child: HomePage(),
    );
RepositoryProvider
Children of RepositoryProvider are given access to a repository. Typically, you’ll use it to create an instance of your repository class, after which you’ll use the BlocProvider to access the repository with the aid of context. read<YourRepository>();
RepositoryProvider(
      create: (context) => yourRepositoryClass(),
      child: HomePage(),
    );
Also, Read This Post:
Explore Flutter Bloc 8.0.1 Design Pattern in Flutter
BlocBuilder
This will enable you to recreate your widgets based on their current state.
BlocBuilder<CounterBloc, int>(
   builder: (context, state) {
      return Text(
         '$state',
         style: Theme.of(context).textTheme.headline4,
       );
     },
BlocConsumer
This widget comes in very handy when you need to travel or display a dialogue box, control the states of your bloc in order to rebuild the widget, etc. You can use this widget in conjunction with others because it has the listener and builder functions.
BlocConsumer<BlocClass, BlocState>(
  listener: (context, state) {
    // do stuff here based on Bloc's state
  },
  builder: (context, state) {
    // return widget here depending on Bloc's state
  }
)
BlocSelector
Developers can use this widget to filter updates by choosing a new value based on the bloc status at the time.
BlocSelector<CubiClasst, int, bool>(
        selector: (state) => state.isEven ? true : false,
        builder: (context, booleanState) {
          return Center(
              child: booleanState
                  ? Text('$booleanState')
                  : Icon(Icons.integration_instructions));
        },
      ),
How Does Flutter Bloc Work?
When using Flutter bloc, you will construct events to start user interactions with the app, and the responsible bloc will subsequently emit the needed data together with a state, as seen in the following example:
- When users do perform anything in the application.
- The user requests for this thing, and for this the event is triggered to tell the block of this.
- The bloc will ask for this information.
- Following the bloc’s determination of whether the data is a Success or an Error, it will emit a state.
- All potential states that the bloc might release in response to them will be heard by the view. For instance, if the block emits the state Success, the view will be rebuilt with a list of games; but, if the block emits the state Error, the view will be rebuilt with an error message or whatever else you want to display.
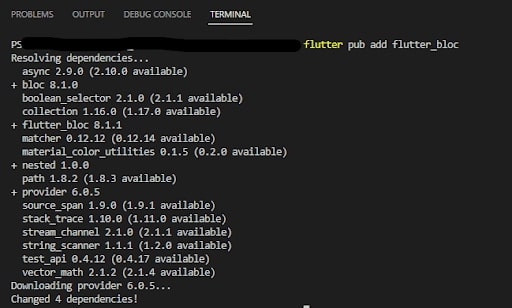
For using Bloc in your application first you have to Bloc library in your project using the below command.
flutter pub add flutter_bloc
Integrate Bloc Into Your Application
We will build a simple app in which we can increment, decrement and reset the counter.
- Add the flutter_bloc package to your application
- Widget configuration in bloc library
Create Bloc
class CounterBloc extends Bloc<CounterEvent, int> {
  CounterBloc() : super(0) {
    on<Increment>((event, emit) => emit(state + 1));
    on<Decrement>((event, emit) => emit(state - 1));
    on<Reset>(((event, emit) => emit(state * 0 + 0)));
  }
}
Create BlocBuilder
BlocBuilder<CounterBloc, int>(
   builder: (context, state) {
      return Text(
         '$state',
         style: Theme.of(context).textTheme.headline4,
       );
     },
    ),
Create BlocProvider
BlocProvider(
      create: (context) => CounterBloc(),
      child: const MaterialApp(
        title: 'Flutter Demo',
        home: MyHomePage(),
      ),
    );
;
Full Code Example
main.dart:
import 'package:flutter/material.dart';
import 'package:flutter_application_bloc/bloc.dart';
import 'package:flutter_bloc/flutter_bloc.dart';
void main() {
  runApp(const MyApp());
}
class MyApp extends StatelessWidget {
  const MyApp({super.key});
  @override
  Widget build(BuildContext context) {
    return BlocProvider(
      create: (context) => CounterBloc(),
      child: const MaterialApp(
        title: 'Flutter Demo',
        home: MyHomePage(),
      ),
    );
  }
}
class MyHomePage extends StatefulWidget {
  const MyHomePage({
    super.key,
  });
  @override
  State<MyHomePage> createState() => _MyHomePageState();
}
class _MyHomePageState extends State<MyHomePage> {
  @override
  Widget build(BuildContext context) {
    final blocVar = context.read<CounterBloc>();
    return Scaffold(
      appBar: AppBar(
        title: const Text("Flutter Bloc Example"),
      ),
      body: Center(
        child: BlocBuilder<CounterBloc, int>(
          builder: (context, state) {
            return Text(
              '$state',
              style: Theme.of(context).textTheme.headline4,
            );
          },
        ),
      ),
      floatingActionButton: Column(
        mainAxisAlignment: MainAxisAlignment.end,
        crossAxisAlignment: CrossAxisAlignment.end,
        children: [
          FloatingActionButton(
            heroTag: "1",
            onPressed: () {
              blocVar.add(Increment());
            },
            tooltip: 'Increment',
            child: const Icon(Icons.add),
          ),
          FloatingActionButton(
            heroTag: "2",
            onPressed: () {
              blocVar.add(Decrement());
            },
            tooltip: 'Decrement',
            child: const Icon(Icons.remove),
          ),
          FloatingActionButton(
            heroTag: "3",
            onPressed: () {
              blocVar.add(Reset());
            },
            tooltip: 'Reset',
            child: const Icon(Icons.refresh),
          ),
        ],
      ),
    );
  }
}
Create one more file called bloc.dart in lib folder
bloc.dart:
import 'package:flutter_bloc/flutter_bloc.dart';

abstract class CounterEvent {}
class Increment extends CounterEvent {}
class Decrement extends CounterEvent {}
class Reset extends CounterEvent {}

class CounterBloc extends Bloc<CounterEvent, int> {
  CounterBloc() : super(0) {
    on<Increment>((event, emit) => emit(state + 1));
    on<Decrement>((event, emit) => emit(state - 1));
    on<Reset>(((event, emit) => emit(state * 0 + 0)));
  }
}
Output
Conclusion
A decent separation of concerns results from a strong BLoC architecture. The BLoC paradigm makes the code more legible, scalable, and testable even though it needs more code than setState.
To demonstrate the advantages of utilizing BLoC for state management in Flutter over the setState approach, we walked through a real-world scenario while covering the fundamentals of using the BLoC pattern in Flutter. I hope you enjoy and understand this article.
You will now completely understand the Flutter BLoC and how it is used in the application. If you want to hire Flutter developer, then connect with us; our experts are always ready to help you. Hence, they will showcase the correct path to meet your requirements with their experience and knowledge.

Frequently Asked Questions (FAQs)
1. What is the use of BLoC in Flutter development?
BLoC stands for Business Logic components, and its objective is to separate an app’s business logic from the user interface and make the app code more unambiguous, testable, and scalable.
2. Is the BLoC architecture in the Flutter framework?
Flutter BLoC is the architectural pattern dependent on the BLoC components. These components consist of only business logic, which can easily share between the various Dart apps.
3. What is the widget in Flutter technology?
Widgets are the central class hierarchy in the Flutter framework. The widget is the immutable description of a user interface. However, widgets are separated into the elements which manage the underlying render tree. Hence, the widgets themselves have no mutable state.

Contemporary ventures
Recent blog


Join our newsletter
Read and share new topics about all things Tech.
ready to get started?
Fill out the form below and we will be in touch soon!
"*" indicates required fields