Explore Flutter Bloc 8.0.1 Design Pattern in Flutter
The most recent iteration of the bloc structure would be the Flutter Bloc 8.0 Programming Model. The current version contains various upgrades over the earlier ones. The Flutter bloc layout has become significantly more durable than version 7. The Flutter Bloc 8.0 sequence diagram provides a better method of managing the states through events. This design pattern aids in separating stored procedures from appearance. Testability and reuse are facilitated by using the BLoC design.
By abstracting the reactive components of the pattern, this module frees programmers to concentrate on creating the business strategy. The event handler is a new feature in Flutter Bloc 8.0 that manages the states. Here, we use the Bloc 8.0 design for the reverse update project.
Overview
This program aims to simplify the BLoC Design Pattern implementation (Business Logic Component). This object-oriented design aids in separating core functionality from appearance. Testability and reuse are facilitated by using the BLoC design. By abstracting the reactive components of the design, this package frees developers to concentrate on designing the business strategy. Remote Flutter programmers are a good option for creating user-friendly, accessible, efficient, and visually striking mobile apps.
What is Cubit?
Cubits are classes that extend BlocBase and can manage any state. The condition before emission is therefore called the impulse response for Cubit. A cubit’s current state may be obtained using the state getter, which can be altered by executing emit with a separate state.
Cubit state updates start with calls to specified functions that can produce new states using the emit method. OnChange, which contains the present and next states, is called just before a condition change occurs.
How to design a Cubit?
/// A `CounterCubit` which manages an `int` as its state. class CounterCubit extends Cubit{ /// The initial state of the `CounterCubit` is 0. CounterCubit() : super(0); /// When an increment is called, the current state /// of the Cubit is accessed via `state` and /// a new `state` is emitted via `emit`. void increment() => emit(state + 1); }
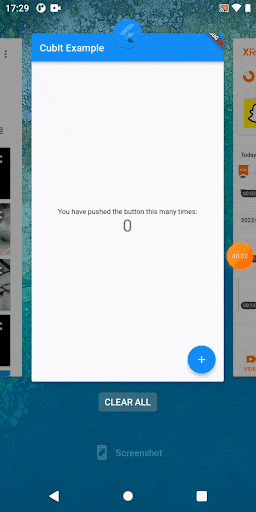
How to use Cubit?
import 'package:flutter/material.dart';
import 'package:flutter_application_1/cubit/example_cubit.dart';
import 'package:flutter_bloc/flutter_bloc.dart';
void main() {
  runApp(const MyApp());
}
class MyApp extends StatelessWidget {
  const MyApp({super.key});
  // This widget is the root of your application.
  @override
  Widget build(BuildContext context) {
    return MaterialApp(
      title: 'Flutter Demo',
      theme: ThemeData(

        primarySwatch: Colors.blue,
      ),
      // Create a Instance for the cubit
      home: BlocProvider(
        create: (context) => ExampleCubit(),
        child: HomePage(),
      ),
    );
  }
}
class HomePage extends StatelessWidget {
  HomePage({super.key});
  @override
  Widget build(BuildContext context) {
    return Scaffold(
      appBar: AppBar(
        title: const Text("Cubit Example"),
      ),
      body: Center(
        child: Column(
          mainAxisAlignment: MainAxisAlignment.center,
          children: [
            const Text(
              'You have pushed the button this many times:',
            ),
            // Add the bloc builder to rebuild the state
            BlocBuilder(
              builder: (context, state) {
                return Text(
                  state.toString(),
                  style: Theme.of(context).textTheme.headline4,
                );
              },
            ),
          ],
        ),
      ),
      floatingActionButton: FloatingActionButton(
        //Call the increment function from the cubit class it will update the bloc builder
        onPressed: () => context.read().increment(),
        tooltip: 'Increment',
        child: const Icon(Icons.add),
      ),
    );
  }
}
How to Observe a Cubit?
onChange can be overridden to observe state changes for a single cubit.
onError can be overridden to observe errors for a single cubit
class CounterCubit extends Cubit{ CounterCubit() : super(0); void increment() => emit(state + 1); @override void onChange(Change change) { super.onChange(change); print(change); } @override void onError(Object error, StackTrace stack trace) { print('$error, $stackTrace'); super.onError(error, stackTrace); } } BlocObserver can be used to observe all cubits. class MyBlocObserver extends BlocObserver { @override void onCreate(BlocBase bloc) { super.onCreate(bloc); print('onCreate -- ${bloc.runtimeType}'); } @override void onChange(BlocBase bloc, Change change) { super.onChange(bloc, change); print('onChange -- ${bloc.runtimeType}, $change'); } @override void onError(BlocBase bloc, Object error, StackTrace stack trace) { print('onError -- ${bloc.runtimeType}, $error'); super.onError(bloc, error, stackTrace); } @override void onClose(BlocBase bloc) { super.onClose(bloc); print('onClose -- ${bloc.runtimeType}'); } } void main() { BlocOverrides.runZoned( () { // Use cubits... }, blocObserver: MyBlocObserver(), ); }
What is Flutter Bloc?
A Bloc represents a more complex class that uses events rather than methods to start state changes. Bloc also extends BlocBase, which has a comparable open API to Cubit. However, Blocs accept occurrences and transform the incoming occurrences into leaving states rather than invoking a procedure on a Bloc and immediately emitting a new state.
When events are introduced, onEvent is triggered, which starts state changes in the Bloc. After that, an EventTransformer is used to convert the occurrences. Each event is handled continuously by default, but a custom EventTransformer can be offered to modify the inbound incident stream.
The arriving event subsequently calls all specified EventHandlers for that data item. In reaction to the incident, each EventHandler must emit zero or more values. Last but not least, transition, which includes the current situation, event, and next condition, is invoked shortly before the condition is modified.
Building a Block
/// The events which `CounterBloc` will react to.
abstract class CounterEvent {}
/// Notifies bloc to increment state.
class Increment extends CounterEvent {}
/// A `CounterBloc` which handles converting `CounterEvent`s into `int`s.
class CounterBloc extends Bloc {
  /// The initial state of the `CounterBloc` is 0.
  CounterBloc() : super(0) {
	/// When an `Increment` event is added,
	/// the current `state` of the Bloc is accessed via the `state` property
	/// and a new state are emitted via `emit.`
	on((event, emit) => emit(state + 1));
  }
}
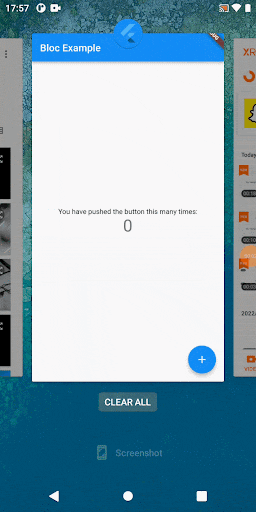
Using a Bloc
void main() {
  runApp(const MyApp());
}
class MyApp extends StatelessWidget {
  const MyApp({super.key});
  // This widget is the root of your application.
  @override
  Widget build(BuildContext context) {
    return MaterialApp(
      title: 'Flutter Demo',
      theme: ThemeData(

        primarySwatch: Colors.blue,
      ),
      // Create a Instance for the Bloc
      home: BlocProvider(
        create: (context) => ExampleBloc(),
        child: HomePage(),
      ),
    );
  }
}
class HomePage extends StatelessWidget {
 const  HomePage({super.key});
  @override
  Widget build(BuildContext context) {
    return Scaffold(
      appBar: AppBar(
        title: const Text("Bloc Example"),
      ),
      body: Center(
        child: Column(
          mainAxisAlignment: MainAxisAlignment.center,
          children: [
            const Text(
              'You have pushed the button this many times:',
            ),
            // Add the bloc builder to rebuild the state
            BlocBuilder(
              builder: (context, state) {
                return Text(
                  state.toString(),
                  style: Theme.of(context).textTheme.headline4,
                );
              },
            ),
          ],
        ),
      ),
      floatingActionButton: FloatingActionButton(
        //Call the increment function from the cubit class it will update the bloc builder
        onPressed: () => context.read().add(Increment()),
        tooltip: 'Increment',
        child: const Icon(Icons.add),
      ),
    );
  }
}
How to Examine a Bloc?
All Blocs implement BlocBase, just like Cubits do. Therefore, a Bloc can also override onChange and onError. Blocs can, however, take the place of onEvent and onTransition. Every time a brand-new occurrence is introduced to the Bloc, onEvent is invoked. Transition is a similar concept to onChange, but in combination with the current state and next state, it also provides the event that caused the sequence.
abstract class CounterEvent {}
class Increment extends CounterEvent {}
class CounterBloc extends Bloc {
  CounterBloc() : super(0) {
	on((event, emit) => emit(state + 1));
  }
  @override
  void onEvent(CounterEvent event) {
	super.onEvent(event);
	print(event);
  }
  @override
  void onChange(Change change) {
	super.onChange(change);
	print(change);
  }
  @override
  void onTransition(Transition transition) {
	super.onTransition(transition);
	print(transition);
  }
  @override
  void onError(Object error, StackTrace stackTrace) {
	print('$error, $stackTrace');
	super.onError(error, stackTrace);
  }
}
BlocObserver can be used to observe all blocs as well.
class MyBlocObserver extends BlocObserver {
  @override
  void onCreate(BlocBase bloc) {
	super.onCreate(bloc);
	print('onCreate -- ${bloc.runtimeType}');
  }
  @override
  void onEvent(Bloc bloc, Object? event) {
	super.onEvent(bloc, event);
	print('onEvent -- ${bloc.runtimeType}, $event');
  }
  @override
  void onChange(BlocBase bloc, Change change) {
	super.onChange(bloc, change);
	print('onChange -- ${bloc.runtimeType}, $change');
  }
  @override
  void onTransition(Bloc bloc, Transition transition) {
	super.onTransition(bloc, transition);
	print('onTransition -- ${bloc.runtimeType}, $transition');
  }
  @override
  void onError(BlocBase bloc, Object error, StackTrace stackTrace) {
	print('onError -- ${bloc.runtimeType}, $error');
	super.onError(bloc, error, stackTrace);
  }
  @override
  void onClose(BlocBase bloc) {
	super.onClose(bloc);
	print('onClose -- ${bloc.runtimeType}');
  }
}
void main() {
  BlocOverrides.runZoned(
	() {
  	// Use blocs...
	},
	blocObserver: MyBlocObserver(),
  );
}
So please follow the above steps and if you have any issues or suggestions you can leave your message in the comment section. We will try to solve this.
Conclusion
In this article, we have explained the Flutter Bloc 8.0.1 design pattern structure in the Flutter development; you can change the code as per your choice. It was a small introduction to the Flutter Bloc 8.0.1 design pattern on user interaction and its work with Flutter.
Connect with us to build your own feature-rich Flutter mobile application. Flutter Agency is leading Flutter development company that can be your trusted app development partner.
Frequently Asked Questions (FAQs)
1. What is the distinction between the BLoC and Flutter BLoC?
The ‘bloc’ package consists of things you will utilize in the Bloc layer, such as the Bloc class. It is not dependent on Flutter; it is only the logical architecture of your application. The ‘flutter bloc’ package has the elements you will use in your UI layer.
2. Why should we make use of the BLoC pattern in the Flutter?
This pattern is perfect for almost all kinds of applications. It helps to improve code quality and will handle the manageable app state in Flutter. It is difficult for those who have just started to use Flutter as it uses advanced techniques such as Stream and Reactive programming.
3. What is the use of BLoC in Flutter?
BLoC makes use of streams or reactive programming. When the stream of events is built, a subscriber can hear it on the stream of events. Subscribers will get a notification of the new data when it has been emitted into the stream. Widgets in Flutter will use the stream for conversation and transferring data.

Contemporary ventures
Recent blog


Join our newsletter
Read and share new topics about all things Tech.
ready to get started?
Fill out the form below and we will be in touch soon!
"*" indicates required fields