
What is GoRouter and How to Redirect Routes using GoRouter in Flutter??
An app’s routing is an essential component. You should devote enough time to perfecting your application’s routing, just as you would when managing its state or creating its user interface to use GoRouter in Flutter. Users can traverse your app more easily and the user state can be handled effectively by an optimized routing system.
There are various routing strategies. GoRouter, a declarative and simple routing system built on top of Flutter’s Router API, is one of them. A handy URL-based API for switching between screens is offered by GoRouter.
We’ll show you how to utilize the GoRouter in Flutter in this tutorial. We’ll go over using route parameters, using named routes to navigate, dealing with 404 problems, and much more. Make sure you read this article all the way through for maximum benefit.
Introduction of GoRouter in Flutter
The GoRouter package aims to make using the Router in Flutter as defined by the MaterialApp.router constructor as simple as possible. It is necessary to implement the RouterDelegate and RouteInformationParser classes by default.
The definition of a new type to store the Flutter state management that powers the development of the Navigator is implied by these two implementations alone. However, the Flutter developer can implement a variety of routing and navigation policies at the expense of complexity thanks to this division of labor.
The go router reduces complexity by assuming three simplifications:
1. The app will only use schemaless absolute URI-compliant names for all routing.
2. The concept of “back” in your app is “up” the stack of pages.
3. Therefore it is possible to create a full stack of pages just from the position.
Regardless of the platform you’re targeting, GoRouter can offer a more straightforward implementation of the custom router in your app thanks to these presumptions. GoRouter is specifically made to be able to handle arbitrary locations while still offering an easy-to-use coders experience because web users can enter arbitrary places to traverse your app.
Get started with the implementation part
Open the terminal in your Flutter project. The GoRouter package can then be added to your Flutter project by running the following command. click here.
flutter pub add go_router
The most recent GoRouter version is installed in your project with this command. Simply replace the version number in the pubspec.yaml file and run flutter pub get to obtain the required version if you wish to install a different one.
GoRouter’s constructor allows you to specify a collection of routes that regulate GoRouter:
class Temp extends StatelessWidget {
  ...
  final _router = GoRouter(
    routes: [
      GoRoute(
        path: '/',
        builder: (context, state) => const Page1Screen(),
      ),
      GoRoute(
        path: '/page2',
        builder: (context, state) => const Page2Screen(),
      ),
    ],
  );
}
We’ve specified two routes in this instance. Every route path will be compared to the place the user is navigating to. No matter how your routes are listed, only one route can be matched, specifically the one whose path fits the full site. The case of the parameters will be kept, but the path will be matched without regard to the case.
Each route will often have a builder function in addition to the path. This function is in charge of creating the Flutter widget that will fill the entire screen of your app. Depending on the sort of app you’ve placed at the top of your widget tree, such as the use of, the default transition will be utilized between pages.
How to handle GoRouter’s 404 error?
An exception is raised whenever a user accesses a screen that isn’t specified in the GoRouter configuration. However, GoRouter offers a very simple method to deal with these problems, and you can supply a unique page to display to the user whenever this kind of exception occurs.
To handle these 404 errors, we can define an ErrorBuilder argument in the GoRouter object. Let’s create an error screen page with a link to return to the home page.
class ErrorScreen extends StatelessWidget {
  const ErrorScreen({super.key});
  @override
  Widget build(BuildContext context) {
    return Scaffold(
      appBar: AppBar(
        automaticallyImplyLeading: true,
        title: const Text("Error Screen"),
      ),
      body: Center(
        child: ElevatedButton(
          onPressed: () => context.go("/"),
          child: const Text("Go to home page"),
        ),
      ),
    );
  }
}
Add this ErrorScreen now to the GoRouter object’s errorBuilder argument.
final GoRouter _router = GoRouter(
  errorBuilder: (context, state) => const ErrorScreen(),
);
Try launching your Flutter mobile application in the Chrome browser and choosing a random path to travel. As a response, ErrorScreen will be displayed as you can see.

Example
Add this code to your main.dart file.
import 'package:flutter/material.dart';
import 'package:go_router/go_router.dart';
void main() {
  runApp(const MyApp());
}

final GoRouter _router = GoRouter(
  errorBuilder: (context, state) => const ErrorScreen(),
  routes: <RouteBase>[
    GoRoute(
      path: '/',
      builder: (BuildContext context, GoRouterState state) {
        return const MainScreen();
      },
      routes: <RouteBase>[
        GoRoute(
          path: 'details',
          builder: (BuildContext context, GoRouterState state) {
            return const DetailsScreen();
          },
        ),
      ],
    ),
  ],
);
class MyApp extends StatelessWidget {
  const MyApp({super.key});
  // This widget is the root of your application.
  @override
  Widget build(BuildContext context) {
    return MaterialApp.router(
      routerConfig: _router,
    );
  }
}
class MainScreen extends StatefulWidget {
  const MainScreen({
    super.key,
  });
  @override
  State<MainScreen> createState() => _MainScreenState();
}
class _MainScreenState extends State<MainScreen> {
  @override
  Widget build(BuildContext context) {
    return Scaffold(
      appBar: AppBar(title: const Text('Home Screen')),
      body: Center(
        child: Column(
          mainAxisAlignment: MainAxisAlignment.center,
          children: <Widget>[
            ElevatedButton(
              onPressed: () => context.go('/details'),
              child: const Text('Go to the Details screen'),
            ),
          ],
        ),
      ),
    );
  }
}
class DetailsScreen extends StatelessWidget {
  /// Constructs a [DetailsScreen]
  const DetailsScreen({Key? key}) : super(key: key);
  @override
  Widget build(BuildContext context) {
    return Scaffold(
      appBar: AppBar(title: const Text('Details Screen')),
      body: Center(
        child: Column(
          mainAxisAlignment: MainAxisAlignment.center,
          children: <ElevatedButton>[
            ElevatedButton(
              onPressed: () => context.go('/'),
              child: const Text('Go back to the Home screen'),
            ),
          ],
        ),
      ),
    );
  }
}
class ErrorScreen extends StatelessWidget {
  const ErrorScreen({super.key});
  @override
  Widget build(BuildContext context) {
    return Scaffold(
      appBar: AppBar(
        automaticallyImplyLeading: true,
        title: const Text("Error Screen"),
      ),
      body: Center(
        child: ElevatedButton(
          onPressed: () => context.go("/"),
          child: const Text("Go to home page"),
        ),
      ),
    );
  }
}
Output
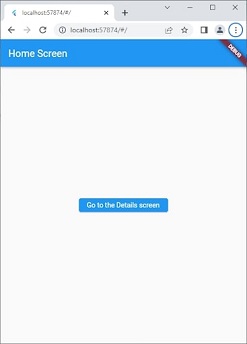
This is the homepage. By clicking on the button you will go to the details screen.
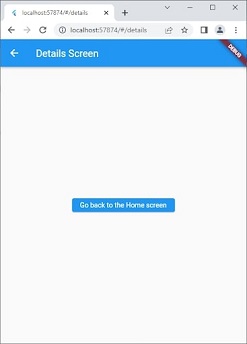
This is the details screen:
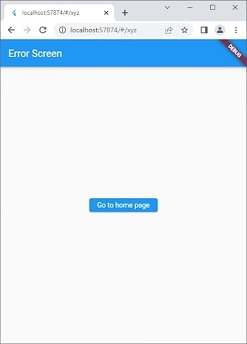
When you add the wrong argument in the url then the error builder widget displays an error screen. (add xyz after “ / “).
Conclusion
In this article, we have seen that Using GoRouter in the Flutter project and some of its capabilities, such as route parameters, query parameters, named routes, managing errors, and redirection, have been covered.
Suppose you want to develop a Flutter app and include these new features and functionalities. We’re happy to use these new functionalities to provide our clients with high-quality, beautifully designed apps. Our Flutter development team will therefore help organizations and businesses use these new capabilities to produce high-quality, innovative mobile apps that satisfy their specific demands and desires.
Frequently Asked Questions (FAQs)
1. What will the Flutter GoRouter package perform?
An easy-to-use, URL-based API for switching between different screens is provided by a declarative routing package for Flutter that uses the Router API. You can handle deep links, set URL patterns, and perform various other navigation-related tasks.
2. Define the GoRouter in Flutter.
GoRouter.Routes will provide the HTTP traffic from a cloud foundry to the relevant and specific component. It receives route updates via NATS. Hence, the Routes not being modified in two minutes are pruned from a GoRouter database.
3. How many types of Navigators are in Flutter development?
In Flutter, these elements are referred to as routes and are managed by the Navigator widget. This Navigator will work the stack of route objects, giving two ways to manage the stack. A declarative API.Navigator pages or imperative API Navigator.push and Navigator.

Contemporary ventures
Recent blog


Join our newsletter
Read and share new topics about all things Tech.
ready to get started?
Fill out the form below and we will be in touch soon!
"*" indicates required fields