
Transform Your Chat Application Using ChatGPT 3.5 API and Flutter
Welcome to the exciting world of creating a ChatGPT 3.5 API client application using the magical Flutter framework! Get ready to embark on a journey that combines the sheer joy of artificial intelligence with the delightful versatility of Flutter.
In this enchanting tutorial, we’ll guide you through setting up the project, integrating the ChatGPT API, and designing a chat interface that will make your users smile from ear to ear. And if you’re looking to hire Flutter developers to bring your app to life, look no further than FlutterAgency.com – your one-stop destination for top-notch Flutter development talent. Let’s dive in and sprinkle some happiness into our app!
Setting Up the Project with ChatGPT 3.5 API
So, to begin our delightful journey, let’s set up the project using Flutter. Make sure Flutter is installed on your computer. Once that’s done, create a new Flutter project and add the necessary dependencies. This will ensure that our ChatGPT client app shines with pure joy. So, if you need assistance then you can take the help of Flutter experts from Flutteragency.com is here to help you realize your vision.
Integrating the ChatGPT 3.5 API
Now comes the truly magical part! Thanks to the amazing ChatApi class, integrating the ChatGPT API into our app is a breeze. Our app can communicate with the ChatGPT model and receive delightful responses by providing the required API key and organization. Hence, this seamless integration is the secret ingredient that makes our app truly magical. If you’re looking for Flutter programmers who can seamlessly integrate APIs like ChatGPT 3.5 API into your Flutter app development.
Designing the Chat Interface
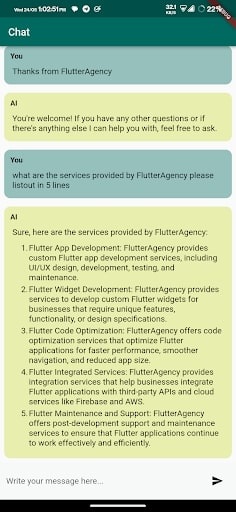
Flutter’s versatility allows us to create a chat interface that radiates happiness. With the MessageBubble widget, we can display messages in a delightful and visually appealing way. The vibrant colors and rounded corners will make users feel like they’re in a wonderland of delightful conversations. Let’s unleash our creativity and design an interface that sparks joy! And if you’re seeking talented designers and developers to bring your chat interface to life, skilled Flutter developers ready to create a delightful user experience.
Implementing the Chat Functionality
With Flutter’s powerful State Management libraries, we can create an interactive chat experience. The ChatPage widget manages the chat messages and orchestrates the communication between the user and the ChatGPT model. When the user sends a message using the MessageComposer widget, the ChatApi class comes to life and provides an enchanting response from the ChatGPT model. It’s like having a friendly assistant at our fingertips, ready to fulfill our every request. So that, the Flutter coders who can implement complex chat functionalities in your app.
Enhancing the User Experience
Mostly, to truly create a joyful experience, let’s sprinkle some additional magic into our app. We can add delightful animations, such as a loading indicator, when awaiting a response from the ChatGPT model. Therefore, Flutter’s vast library of animated widgets allows us to create smooth transitions that bring a smile to the user’s face. So, let’s make interacting with our app an absolute delight!

Example
Here’s an example of how the provided code can be used to create a delightful ChatGPT client app in Flutter:
import 'package:dart_openai/openai.dart';
import 'package:flutter/material.dart';
import 'package:markdown_widget/markdown_widget.dart';


void main() {
  runApp(ChatApp(chatApi: ChatApi()));
}

class ChatApp extends StatelessWidget {
  const ChatApp({required this.chatApi, Key? key}) : super(key: key);

  final ChatApi chatApi;

  @override
  Widget build(BuildContext context) {
    return MaterialApp(
      title: 'ChatGPT Client',
      theme: ThemeData(
        colorScheme: ColorScheme.fromSeed(
          seedColor: Colors.teal,
          secondary: Colors.lime,
        ),
      ),
      home: ChatPage(chatApi: chatApi),
    );
  }
}

class ChatApi {
  static const _model = 'gpt-3.5-turbo';

  ChatApi() {
    OpenAI.apiKey = openAiApiKey;
    OpenAI.organization = openAiOrg;
  }

  Future<String> completeChat(List<ChatMessage> messages) async {
    final chatCompletion = await OpenAI.instance.chat.create(
      model: _model,
      messages: messages
          .map((e) => OpenAIChatCompletionChoiceMessageModel(
                role: e.isUserMessage ? 'user' : 'assistant',
                content: e.content,
              ))
          .toList(),
    );
    return chatCompletion.choices.first.message.content;
  }
}

class ChatMessage {
  ChatMessage(this.content, this.isUserMessage);

  final String content;
  final bool isUserMessage;
}

class MessageBubble extends StatelessWidget {
  const MessageBubble({
    required this.content,
    required this.isUserMessage,
    Key? key,
  }) : super(key: key);

  final String content;
  final bool isUserMessage;

  @override
  Widget build(BuildContext context) {
    final themeData = Theme.of(context);
    return Container(
      margin: const EdgeInsets.all(8),
      decoration: BoxDecoration(
        color: isUserMessage
            ? themeData.colorScheme.primary.withOpacity(0.4)
            : themeData.colorScheme.secondary.withOpacity(0.4),
        borderRadius: const BorderRadius.all(Radius.circular(12)),
      ),
      child: Padding(
        padding: const EdgeInsets.all(12),
        child: Column(
          crossAxisAlignment: CrossAxisAlignment.start,
          children: [
            Row(
              children: [
                Text(
                  isUserMessage ? 'You' : 'AI',
                  style: const TextStyle(fontWeight: FontWeight.bold),
                ),
              ],
            ),
            const SizedBox(height: 8),
            MarkdownWidget(
              data: content,
              shrinkWrap: true,
            ),
          ],
        ),
      ),
    );
  }
}

class MessageComposer extends StatelessWidget {
  MessageComposer({
    required this.onSubmitted,
    required this.awaitingResponse,
    Key? key,
  }) : super(key: key);

  final TextEditingController _messageController = TextEditingController();

  final void Function(String) onSubmitted;
  final bool awaitingResponse;

  @override
  Widget build(BuildContext context) {
    return Container(
      padding: const EdgeInsets.all(12),
      color: Theme.of(context).colorScheme.secondaryContainer.withOpacity(0.05),
      child: SafeArea(
        child: Row(
          children: [
            Expanded(
              child: !awaitingResponse
                  ? TextField(
                      controller: _messageController,
                      onSubmitted: onSubmitted,
                      decoration: const InputDecoration(
                        hintText: 'Write your message here...',
                        border: InputBorder.none,
                      ),
                    )
                  : Row(
                      mainAxisAlignment: MainAxisAlignment.center,
                      children: const [
                        SizedBox(
                          height: 24,
                          width: 24,
                          child: CircularProgressIndicator(),
                        ),
                        Padding(
                          padding: EdgeInsets.all(16),
                          child: Text('Fetching response...'),
                        ),
                      ],
                    ),
            ),
            IconButton(
              onPressed: !awaitingResponse
                  ? () => onSubmitted(_messageController.text)
                  : null,
              icon: const Icon(Icons.send),
            ),
          ],
        ),
      ),
    );
  }
}

class ChatPage extends StatefulWidget {
  const ChatPage({
    required this.chatApi,
    Key? key,
  }) : super(key: key);

  final ChatApi chatApi;

  @override
  State<ChatPage> createState() => _ChatPageState();
}

class _ChatPageState extends State<ChatPage> {
  final _messages = <ChatMessage>[
    ChatMessage('Hello, how can I help?', false),
  ];
  var _awaitingResponse = false;

  @override
  Widget build(BuildContext context) {
    return Scaffold(
      appBar: AppBar(title: const Text('Chat')),
      body: Column(
        children: [
          Expanded(
            child: ListView(
              children: [
                ..._messages.map(
                  (msg) => MessageBubble(
                    content: msg.content,
                    isUserMessage: msg.isUserMessage,
                  ),
                ),
              ],
            ),
          ),
          MessageComposer(
            onSubmitted: _onSubmitted,
            awaitingResponse: _awaitingResponse,
          ),
        ],
      ),
    );
  }

  Future<void> _onSubmitted(String message) async {
    setState(() {
      _messages.add(ChatMessage(message, true));
      _awaitingResponse = true;
    });
    try {
      final response = await widget.chatApi.completeChat(_messages);
      setState(() {
        _messages.add(ChatMessage(response, false));
        _awaitingResponse = false;
      });
    } catch (err) {
      ScaffoldMessenger.of(context).showSnackBar(
        const SnackBar(content: Text('An error occurred. Please try again.')),
      );
      setState(() {
        _awaitingResponse = false;
      });
    }
  }
}
Output
Testing and Debugging
Just like a magician perfects their tricks, we must also test and debug our app to ensure a flawless user experience. By simulating various user interactions and handling potential errors, we can create an app that is delightful and reliable. Moreover, Flutter’s robust testing capabilities and debugging tools will be our trusty companions on this magical journey.
Conclusion
Congratulations on completing this whimsical journey of creating a delightful ChatGPT 3.5 API client app with Flutter! By integrating the ChatGPT 3.5 API, designing a joyful chat interface, and enchanting the user experience, you’ve created an app that will bring smiles and delight to all who use it.
Now it’s time to spread the joy and share your creation with the world. And if you’re looking to hire Flutter developers who can turn your app dreams into reality, remember to visit FlutterAgency.com, where you’ll find a talented pool of Flutter developers ready to bring your vision to life. Happy coding, and may your app continue to sprinkle happiness wherever it goes!
Frequently Asked Questions (FAQs)
1. Which AI chat is the most powerful?
The most latest and effective OpenAI chatbot is now accessible. Users can test ChatGPT 3.5 API, the newest and most powerful AI chatbot from OpenAI, at this time. Hence, it amazed users of the internet throughout the globe by responding to an extensive series of queries. ChatGPT 3.5 API can be mistaken for another chatbot or language model when first introduced.
2. How can Flutter integrate chatbots?
You can use a package like flutter_dialogflow or flutter_tts to handle the chatbot’s conversation flow and text-to-speech features when integrating it with Flutter. For natural language processing, you’ll need to set up a chatbot service (like Dialogflow) and then utilize the package’s API to let users ask questions and get answers within your Flutter app.
3. Which method is applied to chatbots?
Open-ended questions can be understood by it, and machine learning algorithms can be used to train it. In addition to comprehending commands, it is linguistically competent. Therefore, the bot improves as it gains knowledge from its interactions with users.

Contemporary ventures
Recent blog


Join our newsletter
Read and share new topics about all things Tech.
ready to get started?
Fill out the form below and we will be in touch soon!
"*" indicates required fields