How to create a staggered menu animation in Flutter?
Animation is one of the best things that can be done using the Flutter environment. It can easily take the visual appeal of the user interface to the next level, ensuring the website or mobile application can easily drive maximum traffic and keep the users engaged. There are several animation types, out of which the staggered menu animation has become popular.
It will automate the movements of different elements or items you need to involve in the menu page. For example, let’s say you want the UI of your restaurant’s menu page to have multiple items in a columnar layout. If you use traditional animation, all the elements will move simultaneously or simultaneously. Although it affects the users’ minds or perspectives, it fails to create eagerness.
This is where the concept of staggered menu animation comes into play. Before you hire Flutter developers, you should know the use of this animated concept and generate the required visual appeal. So, we have discussed everything about this new UI motion for your maximum clarification.
What is staggered menu animation?
The literal meaning of staggering means steps by step. Therefore, the elements you have included in the animation block will appear as transitioning animations. You can easily understand the concept with the below example, where we will focus on building the menu page of a restaurant website.
Applying staggered menu animation, each element will appear on the screen with certain motion effects one after the other, or there might be some overlays. Each dish included in the menu will appear on the screen after a certain time that can be customized through the coding. It not only pipes up the users’ interests, but the menu page will look amazing.
What are the Benefits of staggered menu animation?
Following are the major benefits of implementing staggered menu animation in the Flutter UI code.
- It can easily create a strong visual appeal that you wouldn’t be able to do with simple animation.
- You can implement staggered animation in three ways. It includes the appearance of the UI elements one after the other, overlapping with each other, and appearing after a break time.
- Staggered menu animation can help you control the timing between each item to be included. You can even include a break between two items where no animation will be there.
Steps to create staggered menu animation using Flutter
The basic steps of creating the staggered menu animation in Flutter are:
- Creating the AnimationController class to control all the animations to be included in the Flutter code.
- Creating a Tween for every single element to be included in the animation.
- Tween is used to define multiple value ranges.
- It incorporates the animate method to involve the parent controller. This is what produces animation in real-time after codes are implemented in real-time.
- Specifying the total time interval between each animation according to the Animation Curve.
While building the Tween, you can use the predefined data types or a user-defined method. The first part will define the beginning and end time of the entire animation block, which can be changing the border, radius, or color. Within the CurvedAnimation class, you need to define the intervals at which the animation will be applied to the items, followed by instantiating the curve object with the pre-defined curves in Flutter, like the Ease.
Following is the syntax that is usually used:
CurvedAnimation(
parent: controller,
curve: Interval(
0.250, 0.550,.
curve: Curves:ease,))
As the staggered animation code is defined based on interactive widgets, you must import both Stateless and Stateful widgets. Following are the below uses of these two widgets:
- The Stateless widget is used to define all the items to be included in the Animation class, Tween, and a user-defined build() function within which you can define the widget tree.
- In the Stateful widget, you can create the animation controller, code for playing the animation series, and build the rest of the UI code that won’t be animated and will be static. You need to include a trigger or tap in the code. Once the compiler comes across the statement, it will play the animation, and the Stateless widget will be called.
You can animate multiple elements to create the best staggered menu animation. For example, you can control the animation of the object’s opacity, border, radius, height, width, padding, and even color. Every time the frame is updated, the new values will be stored in another method, and the final functions will be called.
Ensure to properly define the animated and non-animated parts of the codes using the Stateless and Stateful widgets. These need to be defined separately so that developers can easily debug the code and ensure the animated elements are customized according to the animation curve planned at first.
Example :
import 'package:flutter/material.dart';
void main() {
runApp(const MyApp());
}
class MyApp extends StatelessWidget {
const MyApp({super.key});
@override
Widget build(BuildContext context) {
return const MaterialApp(
home: ExampleStaggeredAnimations(),
);
}
}
class ExampleStaggeredAnimations extends StatefulWidget {
const ExampleStaggeredAnimations({
super.key,
});
@override
State<ExampleStaggeredAnimations> createState() =>
_ExampleStaggeredAnimationsState();
}
class _ExampleStaggeredAnimationsState extends State<ExampleStaggeredAnimations>
with SingleTickerProviderStateMixin {
late AnimationController _drawerSlideController;
@override
void initState() {
super.initState();
_drawerSlideController = AnimationController(
vsync: this,
duration: const Duration(milliseconds: 150),
);
}
@override
void dispose() {
_drawerSlideController.dispose();
super.dispose();
}
bool _isDrawerOpen() {
return _drawerSlideController.value == 1.0;
}
bool _isDrawerOpening() {
return _drawerSlideController.status == AnimationStatus.forward;
}
bool _isDrawerClosed() {
return _drawerSlideController.value == 0.0;
}
void _toggleDrawer() {
if (_isDrawerOpen() || _isDrawerOpening()) {
_drawerSlideController.reverse();
} else {
_drawerSlideController.forward();
}
}
@override
Widget build(BuildContext context) {
return Scaffold(
backgroundColor: Colors.white,
appBar: _buildAppBar(),
body: Stack(
children: [
_buildContent(),
_buildDrawer(),
],
),
);
}
PreferredSizeWidget _buildAppBar() {
return AppBar(
title: const Text(
'Flutter staggered menu',
style: TextStyle(
color: Colors.black,
),
),
backgroundColor: Colors.transparent,
elevation: 0.0,
automaticallyImplyLeading: false,
actions: [
AnimatedBuilder(
animation: _drawerSlideController,
builder: (context, child) {
return IconButton(
onPressed: _toggleDrawer,
icon: _isDrawerOpen() || _isDrawerOpening()
? const Icon(
Icons.clear,
color: Colors.black,
)
: const Icon(
Icons.menu,
color: Colors.black,
),
);
},
),
],
);
}
Widget _buildContent() {
// Put page content here.
return const SizedBox();
}
Widget _buildDrawer() {
return AnimatedBuilder(
animation: _drawerSlideController,
builder: (context, child) {
return FractionalTranslation(
translation: Offset(1.0 - _drawerSlideController.value, 0.0),
child: _isDrawerClosed() ? const SizedBox() : const Menu(),
);
},
);
}
}
class Menu extends StatefulWidget {
const Menu({super.key});
@override
State<Menu> createState() => _MenuState();
}
class _MenuState extends State<Menu> with SingleTickerProviderStateMixin {
static const _menuTitles = [
'Home',
'Posts',
'Settings',
'Profile',
'Logout',
];
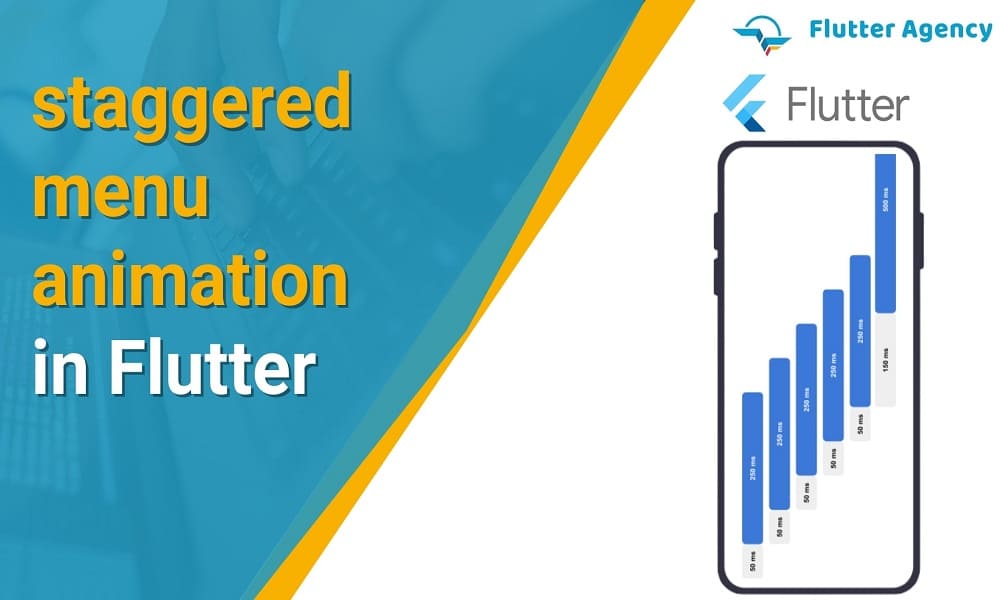
static const _initialDelayTime = Duration(milliseconds: 50);
static const _itemSlideTime = Duration(milliseconds: 250);
static const _staggerTime = Duration(milliseconds: 50);
static const _buttonDelayTime = Duration(milliseconds: 150);
static const _buttonTime = Duration(milliseconds: 500);
final _animationDuration = _initialDelayTime +
(_staggerTime * _menuTitles.length) +
_buttonDelayTime +
_buttonTime;
late AnimationController _staggeredController;
final List<Interval> _itemSlideIntervals = [];
late Interval _buttonInterval;
@override
void initState() {
super.initState();
_createAnimationIntervals();
_staggeredController = AnimationController(
vsync: this,
duration: _animationDuration,
)..forward();
}
void _createAnimationIntervals() {
for (var i = 0; i < _menuTitles.length; ++i) {
final startTime = _initialDelayTime + (_staggerTime * i);
final endTime = startTime + _itemSlideTime;
_itemSlideIntervals.add(
Interval(
startTime.inMilliseconds / _animationDuration.inMilliseconds,
endTime.inMilliseconds / _animationDuration.inMilliseconds,
),
);
}
final buttonStartTime =
Duration(milliseconds: (_menuTitles.length * 30)) + _buttonDelayTime;
final buttonEndTime = buttonStartTime + _buttonTime;
_buttonInterval = Interval(
buttonStartTime.inMilliseconds / _animationDuration.inMilliseconds,
buttonEndTime.inMilliseconds / _animationDuration.inMilliseconds,
);
}
@override
void dispose() {
_staggeredController.dispose();
super.dispose();
}
@override
Widget build(BuildContext context) {
return Container(
color: Colors.white,
child: Stack(
fit: StackFit.expand,
children: [
_buildFlutterLogo(),
_buildContent(),
],
),
);
}
Widget _buildFlutterLogo() {
return const Positioned(
right: -100,
bottom: -30,
child: Opacity(
opacity: 0.4,
child: FlutterLogo(
size: 400,
),
),
);
}
Widget _buildContent() {
return Column(
crossAxisAlignment: CrossAxisAlignment.start,
children: [
const SizedBox(height: 16),
..._buildListItems(),
const Spacer(),
],
);
}
List<Widget> _buildListItems() {
final listItems = <Widget>[];
for (var i = 0; i < _menuTitles.length; ++i) {
listItems.add(
AnimatedBuilder(
animation: _staggeredController,
builder: (context, child) {
final animationPercent = Curves.easeOut.transform(
_itemSlideIntervals[i].transform(_staggeredController.value),
);
final opacity = animationPercent;
final slideDistance = (1.0 - animationPercent) * 50;
return Opacity(
opacity: opacity,
child: Transform.translate(
offset: Offset(slideDistance, 0),
child: child,
),
);
},
child: Padding(
padding: const EdgeInsets.symmetric(horizontal: 36.0, vertical: 16),
child: Text(
_menuTitles[i],
textAlign: TextAlign.left,
style: const TextStyle(
fontSize: 24,
fontWeight: FontWeight.w500,
),
),
),
),
);
}
return listItems;
}
}
Conclusion
In this article, we have briefed about the process of building staggering animations using Stateless and Stateful widgets. You can easily customize the properties and ensure the animation curve is defined properly. Ensure to use the animated items properly, so you don’t have to face any further problems.
If you need an further assistance with the Flutter app development, you can contact Flutter agency.
Frequently Asked Questions (FAQs)
1. Define the staggered animations in Flutter
A staggered animation has sequential or overlapping animations. For creating staggered animations, you can make use of several animation objects. One AnimationController controls all of the Animations. Each animation object will specify an animation during the interval.
2. What are the keys to Flutter app development?
A key is considered the attribute for Widgets, Elements and SemanticsNodes. The new widget is only used to update the existing element if its key is the same as the current widget associated with the element.
3. What is the hot restart in the Flutter project?
Hot restart loads the code changes into the VM will, restart the Flutter application and lose an app state. For IntelliJ or Android Studio use: shift + cmd +\ For VSCode: shift + ctrl + F5.

Contemporary ventures
Recent blog


Join our newsletter
Read and share new topics about all things Tech.
ready to get started?
Fill out the form below and we will be in touch soon!
"*" indicates required fields