
How to Display Dynamic Events In Calendar In Flutter?
Discover how to display dynamic events in a Flutter calendar, a vital feature in mobile app development for startups. This guide helps you create a user-friendly and interactive calendar to enhance user engagement.
Flutter is the magnificent open-source framework introduced by Google. Flutter provides a better way for building multi-platform applications, even from a single codebase. Building a stunning UI is much easier with this Flutter.
In the modern day, many coders realize the importance of Flutter. Flutter is enabled with more numbers of advanced widgets. In this article, we will cover all information about flutter calender. First, we have introduced flutter calender. Then, we go through with the some features of Flutter calender and last we will learn the complete method or tutorial to display a dynamic events in flutter calender. Let’s dive into the complete tutorial for Flutter Calender.
Introduction: Flutter Calendar
The Flutter Calendar is an advanced built-in configurable suitable for viewing the day, week, month, schedule and many more. These are also perfect options for adding the timeline day, timeline week, timeline workweek as well as timeline month. The calendar also provides basic functionalities which can be easily scheduled as well as representing events.
Flutter Calendar widget is the best framework in Flutter, which can be easily arranged based on the requirements. These also excellently track the events on any specific date or special event. These are also added to a wide number of libraries and are also under active development. The library does not play the complete calendar’s prerequisites.
Features of Flutter Calendar
Display Dynamic Events at Calendar In Flutter can be easily enabled based on the requirement. There are plenty of possibilities for extensively changing the theme and many others. These have never been quicker without the use of Flutter.
Below are some of the amazing features available:
- Preconfigured UI
- Easy-to-use API
- Locale support
- Customizable styling
- Unlimited UI design
- Horizontal swipe boundaries
- Multiple calendar formats
- Vertical autosizing
- Dynamic events and holidays
- Multiple selection support
- Vertical auto-sizing
- Provides gesture handling
- Dynamic events
- Adds beautiful animations
- Adds multiple calendar formats such as a month, weak, year,
- Uses multiple days of week formats
Quick Method Of Display Dynamic Events In Calendar:
Normally, each calendar has its own requirements and gives the complete solution. Dynamic Events at Calendar in Flutter can also be easily activated with simple steps. Flutter developers can extensively create dynamic events in the calendar with the table_calendar package. These are available in the Flutter applications, which are suitable for saving you time.
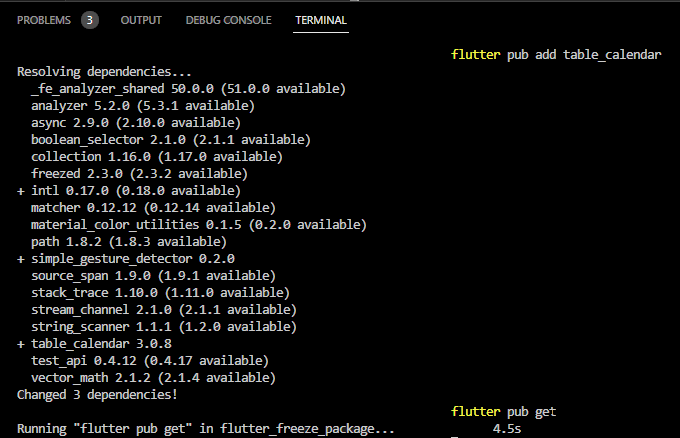
Step 1: Installation
Add pubspec.yaml:
Step 2: Dependencies:
table_calendar: ^3.1.1
Step 3: Basic setup
Normally, the TableCalendar requires providing the firstDay, lastDay as well as focusedDay. Below are the listed TableCalendar features
firstDay – The first available day for the calendar
lastDay – Last available day for calendar
focusedDay – Targeted day so you can use the property for adding months to be visible
TableCalendar(
firstDay: DateTime.UTC(2010, 10, 16),
  lastDay: DateTime.UTC(2030, 3, 14),
focusedDay: DateTime.now(),
);
Step 4: Import
import 'package:table_calendar/table_calendar.dart';
Step 5: Run Flutter packages from the root directory of app
Step 6: Enable AndriodX
Add to gradle.properties file:
Org.gradle.jvmargs=-Xmx1536M
android.enableR8=true
android.useAndroidX=true
android.enableJetifier=true
Step 7: Adding interactivity
Normally, you would be enabling the set up calendar widget with more accessibility. Users can easily swipe up or down to change the months and dates. In most circumstances, these are quite an efficient option.
It would be easier to access even without any hassle. Sometimes, you could also bring more callback features. You can extensively add the code to the calendar widget, and these allow you to easily provide immediate responses for a user to access. These are marked with the simple method called the Tapped day. These are represented as the
selectedDayPredicate: (day) {
  return isSameDay(_selectedDay, day);
},

onDaySelected: (selectedDay, focusedDay) {
if (!isSameDay(_selectedDay, selectedDay)) {
      setState(() {
        _selectedDay = selectedDay;
        _focusedDay = focusedDay;
        _rangeStart = null; // Important to clean those
        _rangeEnd = null;
        _rangeSelectionMode = RangeSelectionMode.toggledOff;
      });
      _selectedEvents.value = _getEventsForDay(selectedDay);
    }
},

 List<Event> _getEventsForDay(DateTime day) {
    // Implementation example
    return kEvents[day] ?? [];
  }
In order to dynamically update the visible calendar format, add those lines to the Flutter widget:
calendarFormat: _calendarFormat,
onFormatChanged: (format) {
setState(() {
_calendarFormat = format;
  });
},
Update focusedDay
Normally, there will be 2 changes making the calendar completely interactive as well as responsive for the user’s input. Users can also set the focusedDay on the static value.
These could be extensively represented in the TableCalendar widget. So these will be using the specific focused day. The process can also be quickly tested by making the hot reload: set focusedDay to DateTime.now().
You can also easily swipe the next month on the list. This will automatically trigger the hot reload in Flutter so the calendar can be easily reset to the initial state.
You can prevent this by storing as well as updating the focusedDay using the callback method. Below are the steps you can easily choose to add the callback method for completing the basic setup.
onPageChanged: (focusedDay) {
_focusedDay = focusedDay;
},
There is no need to call setState() in Flutter inside the onPageChanged() callback, but this gives you suitable results. The user needs to update the stored value. The Table widget can be easily rebuilt later using the appropriate focusedDay.
Example:
You can easily add custom events to the TableCalendar widget, so this method would enable the eventLoader property. These also assure in providing the appropriate DateTime object.
You are required to assign the list of events in the calendar to get prominent results. Display Dynamic Events is easier by following the below strategy in Flutter.
eventLoader: (day) {
  return _getEventsForDay(day);
},
_getEventsForDay() is the perfect option for the implementations.
You can also set Map<DateTime, List<T>> in the event lists, so these are represented as
List<Event> _getEventsForDay(DateTime day) {
  return events[day] ?? [];
}
Normally, the DateTime objects involve the date as well as time as important attributes. In most scenarios, the time part will be redundant for the calendars that are related to it.
If you prefer to use the Map, then you could choose LinkedHashMap. The main reason is these allow the user to easily override equality comparison, including the DateTime objects.
final events = LinkedHashMap(
  equals: isSameDay,
hashCode: getHashCode,
)..addAll(eventSource);
Make Custom UI with CalendarBuilders
CalendarBuilders are an amazing option for easily creating the Calendar even from different date-time parameters. It also especially involves the 2 major methods for setting the Calendar across the date-time value.
You can also easily customize the UI using widgets like CalendarBuilders. Normally, all the builders are perfect for choosing the override feature in the UI. These also allow for extensively implementing specific designs even without any hassle. These are significant ways for returning null from the builder for the default style.
calendarBuilders: CalendarBuilders(
dowBuilder: (context, day) {
    if (day.weekday == DateTime.Sunday) {
final text = DateFormat.E().format(day);
return Center(
child: Text(
text,
style: TextStyle(color: Colors.red),
        ),
      );
    }
  },
),
Flutter also gives the basic plugin named table_calendar. These are also efficient options for showing calendars with a complete range of applications. Table calendar is adjustable, so these are equipped with more features such as gesture, and animation, along with many others.
Example:
file : utils.dart
import 'dart:collection';
import 'package:table_calendar/table_calendar.dart';
class Event {
  final String title;
  const Event(this.title);
  @override
  String toString() => title;
}
final kEvents = LinkedHashMap<DateTime, List<Event>>(
  equals: isSameDay,
  hashCode: getHashCode,
)..addAll(_kEventSource);
final _kEventSource = {
  for (var item in List.generate(50, (index) => index))
    DateTime.utc(kFirstDay.year, kFirstDay.month, item * 5): List.generate(
        item % 4 + 1, (index) => Event('Event $item | ${index + 1}'))
}..addAll({
    kToday: [
      const Event('Today\'s Event 1'),
      const Event('Today\'s Event 2'),
    ],
  });
int getHashCode(DateTime key) {
  return key.day * 1000000 + key.month * 10000 + key.year;
}
/// Returns a list of [DateTime] objects from [first] to [last], inclusive.
List<DateTime> daysInRange(DateTime first, DateTime last) {
  final dayCount = last.difference(first).inDays + 1;
  return List.generate(
    dayCount,
    (index) => DateTime.utc(first.year, first.month, first.day + index),
  );
}
final kToday = DateTime.now();
final kFirstDay = DateTime(kToday.year, kToday.month - 3, kToday.day);
final kLastDay = DateTime(kToday.year, kToday.month + 3, kToday.day);
file2 : calender.dart
import 'package:flutter/material.dart';
import 'package:table_calendar/table_calendar.dart';
import '../utils.dart';
class TableEventsExample extends StatefulWidget {
  const TableEventsExample({super.key});
  @override
  _TableEventsExampleState createState() => _TableEventsExampleState();
}
class _TableEventsExampleState extends State<TableEventsExample> {
  late final ValueNotifier<List<Event>> _selectedEvents;
  CalendarFormat _calendarFormat = CalendarFormat.month;
  RangeSelectionMode _rangeSelectionMode = RangeSelectionMode
      .toggledOff; // Can be toggled on/off by longpressing a date
  DateTime _focusedDay = DateTime.now();
  DateTime? _selectedDay;
  DateTime? _rangeStart;
  DateTime? _rangeEnd;
  @override
  void initState() {
    super.initState();
    _selectedDay = _focusedDay;
    _selectedEvents = ValueNotifier(_getEventsForDay(_selectedDay!));
  }
  @override
  void dispose() {
    _selectedEvents.dispose();
    super.dispose();
  }
  List<Event> _getEventsForDay(DateTime day) {
    // Implementation example
    return kEvents[day] ?? [];
  }
  List<Event> _getEventsForRange(DateTime start, DateTime end) {
    // Implementation example
    final days = daysInRange(start, end);
    return [
      for (final d in days) ..._getEventsForDay(d),
    ];
  }
  void _onDaySelected(DateTime selectedDay, DateTime focusedDay) {
    if (!isSameDay(_selectedDay, selectedDay)) {
      setState(() {
        _selectedDay = selectedDay;
        _focusedDay = focusedDay;
        _rangeStart = null; // Important to clean those
        _rangeEnd = null;
        _rangeSelectionMode = RangeSelectionMode.toggledOff;
      });
      _selectedEvents.value = _getEventsForDay(selectedDay);
    }
  }
  void _onRangeSelected(DateTime? start, DateTime? end, DateTime focusedDay) {
    setState(() {
      _selectedDay = null;
      _focusedDay = focusedDay;
      _rangeStart = start;
      _rangeEnd = end;
      _rangeSelectionMode = RangeSelectionMode.toggledOn;
    });

    // `start` or `end` could be null
    if (start != null && end != null) {
      _selectedEvents.value = _getEventsForRange(start, end);
    } else if (start != null) {
      _selectedEvents.value = _getEventsForDay(start);
    } else if (end != null) {
      _selectedEvents.value = _getEventsForDay(end);
    }
  }
  @override
  Widget build(BuildContext context) {
    return Scaffold(
      appBar: AppBar(
        title: Text('TableCalendar - Events'),
      ),
      body: Column(
        children: [
          TableCalendar<Event>(
            firstDay: kFirstDay,
            lastDay: kLastDay,
            focusedDay: _focusedDay,
            selectedDayPredicate: (day) => isSameDay(_selectedDay, day),
            rangeStartDay: _rangeStart,
            rangeEndDay: _rangeEnd,
            calendarFormat: _calendarFormat,
            rangeSelectionMode: _rangeSelectionMode,
            eventLoader: _getEventsForDay,
            startingDayOfWeek: StartingDayOfWeek.monday,
            calendarStyle: const CalendarStyle(
              // Use `CalendarStyle` to customize the UI
              outsideDaysVisible: false,
            ),
            onDaySelected: _onDaySelected,
            onRangeSelected: _onRangeSelected,
            onFormatChanged: (format) {
              if (_calendarFormat != format) {
                setState(() {
                  _calendarFormat = format;
                });
              }
            },
            onPageChanged: (focusedDay) {
              _focusedDay = focusedDay;
            },
          ),
          const SizedBox(height: 8.0),
          Expanded(
            child: ValueListenableBuilder<List<Event>>(
              valueListenable: _selectedEvents,
              builder: (context, value, _) {
                return ListView.builder(
                  itemCount: value.length,
                  itemBuilder: (context, index) {
                    return Container(
                      margin: const EdgeInsets.symmetric(
                        horizontal: 12.0,
                        vertical: 4.0,
                      ),
                      decoration: BoxDecoration(
                        border: Border.all(),
                        borderRadius: BorderRadius.circular(12.0),
                      ),
                      child: ListTile(
                        onTap: () => print('${value[index]}'),
                        title: Text('${value[index]}'),
                      ),
                    );
                  },
                );
              },
            ),
          ),
        ],
      ),
    );
  }
}
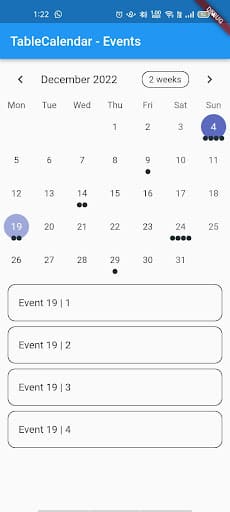
Output
Conclusion
The basic structure of the Dynamic Display Events At Calendar in the Flutter is explained above. You can implement the strategy by modifying the code based on your requirements. It also introduces Display Dynamic Events in the Calendar with excellent user interactions. Business owners trust Flutter Agency for its outstanding custom mobile app development services. As we build robust custom mobile apps as per requirement. So, if you are looking for the same then get in touch with us with your requirement.
I hope this blog has given you sufficient information to try the Display Dynamic events At Calendar in Flutter projects.
More Flutter Tech Resources:
How to set up an Emulator For VSCode? (Updated)
How To Integrate Flutter Into Existing Android Apps?
How to Solve Command Not Found in Flutter?
How to Generate SHA-1 in Flutter?
Frequently Asked Questions (FAQs)
1. What are the benefits of a calendar?
a Calendar is a valuable tool that keeps track of upcoming meetings, deadlines, and milestones. It will help you to visualize the schedule and remind you of the necessary events like holidays and events time.
2. What is a calendar view?
A calendar view helps the user view and will interact with a calendar that they can navigate by month, year or decade. A user can select a single date or multiple dates. It did not have a picker surface, and the Calendar was always visible.
3. How do you load more data on demand in the Flutter event calendar?
Usually, we update the appointments on demand when the loading indicator is viewed in the Flutter event calendar by utilizing the handleLoadMore method in CalendarDataSource. It also allows you to include an appointment to the data source, upgrade the data source, and also notify a listener to update the appointment in the view.

Contemporary ventures
Recent blog


Join our newsletter
Read and share new topics about all things Tech.
ready to get started?
Fill out the form below and we will be in touch soon!
"*" indicates required fields