How to Add Divider Between Each Line in Flutter?
ListView Widget is one of the important widget types that can be used anywhere to bind data. So in this article, we will go through How to Add Divider Between Each Line in Flutter.
Dividers play a crucial role in enhancing the visual structure of your app, providing a clear separation between lines of text or widgets. In this tutorial, we’ll guide you through the steps to implement dividers in your Flutter application, regardless of whether you’re working with a list view, chat interface, or any other layout. Join us as we uncover the techniques and best practices to achieve a polished and organized user interface that improves readability and user experience. Let’s get started on creating visually appealing and structured Flutter apps with dividers between each line!
How to Add Divider Between Each Line in Flutter?
For a short static list, you could also try the below code snippet.
ListView(
  children: ListTile.divideTiles( //          <-- ListTile.divideTiles
      context: context,
      tiles: [
        ListTile(
          title: Text('Horse'),
        ),
        ListTile(
          title: Text('Cow'),
        ),
        ListTile(
          title: Text('Camel'),
        ),
        ListTile(
          title: Text('Sheep'),
        ),
        ListTile(
          title: Text('Goat'),
        ),
      ]
  ).toList(),
)
We will get a result like the below:

For a long dynamic list
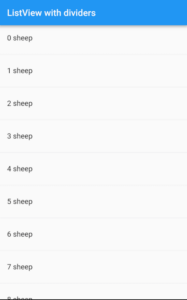
Use ListView.separated will have a code snippet like a one below:
ListView.separated(
  itemCount: 100,
  itemBuilder: (context, index) {
    return ListTile(
      title: Text('$index sheep'),
    );
  },
  separatorBuilder: (context, index) {
    return Divider();
  },
)
This returns two widgets for every item, except for the last item. The separatorBuilder is used to add the divider.
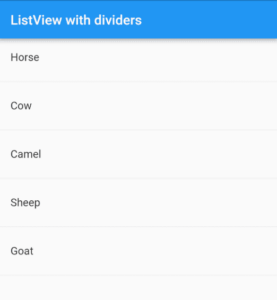
Create a custom item widget that uses a Divider or BoxDecoration.
Using Divider
final items = ['Horse', 'Cow', 'Camel', 'Sheep', 'Goat'];

@override
Widget build(BuildContext context) {
  return ListView.builder(
    itemCount: items.length,
    itemBuilder: (context, index) {
      return Column(
        children: <Widget>[
          ListTile(
            title: Text(items[index]),
          ),
          Divider(), //                           <-- Divider
        ],
      );
    },
  );
}
We will get output like the below:
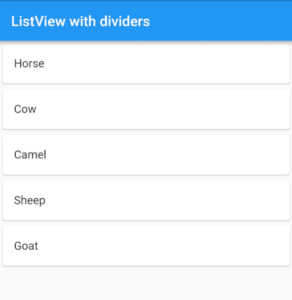
Using BoxDecoration
Code Snippet will look like the below:
final items = ['Horse', 'Cow', 'Camel', 'Sheep', 'Goat'];

@override
Widget build(BuildContext context) {
  return ListView.builder(
    itemCount: items.length,
    itemBuilder: (context, index) {
      return Container(
        decoration: BoxDecoration( //                    <-- BoxDecoration
          border: Border(bottom: BorderSide()),
        ),
        child: ListTile(
          title: Text(items[index]),
        ),
      );
    },
  );
}
We will get output like the below:
Both Divider and BoxDecoration are customizable as far as the line height and color go. The divider also has an indent option, but you could get a BoxDecoration to do the same thing with some padding.
For more style
Use a Card code snippet that will look like the below:
final items = ['Horse', 'Cow', 'Camel', 'Sheep', 'Goat'];

@override
Widget build(BuildContext context) {
  return ListView.builder(
    itemCount: items.length,
    itemBuilder: (context, index) {
      return Card( //                           <-- Card
        child: ListTile(
          title: Text(items[index]),
        ),
      );
    },
  );
}
The above code will give us output like the below:
The most correct way to do this is to use ListView.separated
ListView.separated(
     itemCount: 25,
     separatorBuilder: (BuildContext context, int index) => Divider(height: 1),
     itemBuilder: (BuildContext context, int index) {
       return ListTile(
         title: Text('item $index'),
       );
     },
);
Put your widget inside a container with BoxDecoration as
Container(
   child: YourWidgetHere(),
   decoration: BoxDecoration(
      border: Border(bottom: BorderSide(color: Colors.black26))),
);
You can also add a Divider Widget like:
Column(
          children: <Widget>[
            Container(
              padding: EdgeInsets.all(16.0),
              child: Column(
                children: <Widget>[
                  Image.network(video["imageUrl"]),
                  Container(
                    height: 6.0,
                  ),
                  Text(
                    video["name"],
                    textScaleFactor: 1.05,
                    style: TextStyle(fontWeight: FontWeight.bold),
                  ),
                ],
              ),
            ),
            Divider(
              color: Theme.of(context).primaryColor,
            )
          ],
        );
You can also use
ListTile(
       leading: Icon(Icons.home),
       title: Text('Home'),
),
Container(height: 1, color: Colors.grey), //divider
ListTile(
       leading: Icon(Icons.logout),
       title: Text('Logout'),
),
Dart 2.3
Another way, especially for generic non-list-view: Using for in a Collection with the … spread operator
Column(
   children: [
     for(var i=0; i<4; i+=1)
     ...[Container(height: 100, width: 100),
         Divider()
      ]])
Conclusion:
Thanks for being with us on a Flutter Journey!!!
In this article, we have been through how to add a divider between each line in a flutter.
Keep Learning !!! Keep Fluttering !!!
FlutterAgency.com is our portal Platform dedicated to Flutter Technology and Flutter Developers. The portal is full of cool resources from Flutter like Flutter Widget Guide, Flutter Projects, Code libs and etc.

Contemporary ventures
Recent blog


Join our newsletter
Read and share new topics about all things Tech.
ready to get started?
Fill out the form below and we will be in touch soon!
"*" indicates required fields