
How to Use Cupertino Sliver Navigation Bar In Flutter?
You may find a widget from Flutter in the CupertinoSilver NavigationBar with the same name. All around the community, developers use it frequently.
Using the right widget is one of the essential Flutter developer skills required for enterprise-level application development. Here, we assist our clients in choosing the right widget to make the app work smoothly and faster without delay. The CupertinoSilver NavigationBar widgets were created to help programmers integrate iOS-themed elements into flutter programs created for the iOS platform. It has received a great deal of community support since its debut.
I’ll walk you through the overview, usage, and implementation of the class Cupertino Sliver Navigation Bar in this article.
The CustomScrollView is a sliver group in which the CupertinoSliverNavigationBar is positioned. Two portions make up the Cupertino sliver navigation bar, one of which is fixed at the top. The second one has a large title and slides out. The second paragraph will follow the first.
When the sliver widens, it will glide down to reveal the large title. If the sliver crumbles, it will bury itself behind the first part. It provides a leading and trailing widget on the static top portion that stays during scrolling, just with CupertinoNavigationBar.
To use the CupertinoNavigationBar widget in our app, use the constructor.
const CupertinoSliverNavigationBar(
{Key? key,
Widget? largeTitle,
Widget? leading,
bool automaticallyImplyLeading = true,
bool automaticallyImplyTitle = true,
bool alwaysShowMiddle = true,
String? previousPageTitle,
Widget? middle,
Widget? trailing,
Border? border = _kDefaultNavBarBorder,
Color? backgroundColor,
Brightness? brightness,
EdgeInsetsDirectional? padding,
bool transitionBetweenRoutes = true,
Object heroTag = _defaultHeroTag,
bool stretch = false}
)
Below are the properties of the CupertinoNavigationBar widget.
1. largeTitle: When the navigation bar is raised, this text will be displayed below it in a larger font in the top static navigation bar.
2. automaticallyImplyLeading: Determines if we attempt to imply the leading widget in the case of a null widget.
3. leading: Adding a widget at the beginning of the navigation bar. A widget is accepted as value.
4. heroTag: As long as there is only one navigation bar per route, all navigation bars of the same navigator can transition between one another when using the default tag.
5. automaticallyImplyLeading: If this property is set to true, the scenario-appropriate leading widget will be displayed automatically. It accepts the value boolean.
6. previousPageTitle: This variable is used to give the title of the prior page route. The sliver navigation bar will use this title as the leading when the leading is null and automaticallyImplyLeading is true. A string is accepted as the value.
Let’s see an example of CupertinoNavigationBar:
import 'package:flutter/material.dart';
import 'package:flutter/cupertino.dart';

void main() {
  runApp(const MyApp());
}

class MyApp extends StatefulWidget {
  const MyApp({Key? key}) : super(key: key);
  @override
  State createState() => _MyAppState();
}

class _MyAppState extends State {
  @override
  Widget build(BuildContext context) {
    return MaterialApp(
      home: CupertinoPageScaffold(
        backgroundColor: Colors.white,
        child: CustomScrollView(
          slivers: [
            CupertinoSliverNavigationBar(
              backgroundColor: Colors.black,
              leading: CupertinoNavigationBarBackButton(
                onPressed: () {},
                color: CupertinoColors.activeBlue,
              ),
              middle: const Text(
                "Cupertino Sliver Navigation Bar",
                style: TextStyle(color: Colors.white),
              ),
              trailing: CupertinoButton(
                padding: EdgeInsets.zero,
                child: const Text(
                  "Done",
                  style: TextStyle(
                    color: CupertinoColors.activeBlue,
                  ),
                ),
                onPressed: () {},
              ),
              largeTitle: const Padding(
                padding: EdgeInsets.only(left: 20),
                child: Text(
                  "Large Tile",
                  style: TextStyle(
                    color: CupertinoColors.white,
                  ),
                ),
              ),
              previousPageTitle: "Back",
            ),
            SliverGrid(
                gridDelegate: const SliverGridDelegateWithFixedCrossAxisCount(
                  crossAxisCount: 2,
                  mainAxisSpacing: 10.0,
                  crossAxisSpacing: 10.0,
                ),
                delegate: SliverChildBuilderDelegate(
                    (BuildContext context, int index) => Padding(
                          padding: const EdgeInsets.only(left: 10, right: 10),
                          child: Container(
                              color: CupertinoColors.systemGrey3,
                              child: Padding(
                                padding: const EdgeInsets.all(8.0),
                                child: Image.network(
                                  "https://picsum.photos/250?image=9",
                                  fit: BoxFit.fill,
                                ),
                              )),
                        ),
                    childCount: 10))
          ],
        ),
      ),
    );
  }
}
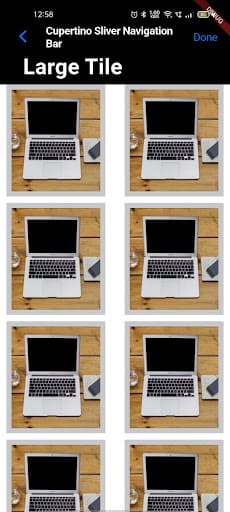
Output:
Conclusion:
The CupertinoSilverNavigationBar is a fantastic tool for improving user experience. It helps the user comprehend and maintain the fulfillment of their expectations. It is frequently used to give applications ios-styled user interfaces and themes. hope this article will help you. We are a top-notch leading Flutter development company with years of experience in customer-centric mobile application solutions for B2B and B2C clients. Get your application read with our highly experienced mobile application developers. For more details, contact us now.

Contemporary ventures
Recent blog


Join our newsletter
Read and share new topics about all things Tech.
ready to get started?
Fill out the form below and we will be in touch soon!
"*" indicates required fields