
Managing Offline Data Storage With Flutter Hive
Have you ever heard the name Flutter Hive? Nearly every app needs local storage for its data. Apps, including those built with Flutter, rely heavily on the ability to store and manipulate data. The replies from a REST API may be cached, an offline app could be developed, or data about customers could be saved for a food delivery service. Flutter provides developers with a number of mechanisms for saving state locally.
Of course, Flutter Hive is one of the finest options for offline data storage if you need a fast and secure local database compatible with Flutter Web().
What is Flutter Hive?
Hive is a very fast and small key-value database developed entirely in Dart that can be used to store and synchronize data for applications even when not online.
Hive is a high-performance, Dart-based key-value data store that works with simple and complicated data structures. It is also encrypted with AES-256 for further security.
Steps to Take When Beginning to Manage Offline Data Storage Using Flutter Hive
This blog post will use the TypeAdapter in Flutter app development with the Hive database. As one of the best mobile app development agencies, we will develop a minimal app consisting of a single page that can be used to see a directory of users, create new users, edit current ones, or remove old ones.
Step 1- First, install any necessary dependencies.
Two prerequisites must be met before Hive can be used.
hive and hive_flutter
The packages Hive and Hive Flutter must be included to pubspec.yaml.
dependencies:
 Flutter:
       sdk: flutter
 hive: ^2.2.3
 hive_flutter: ^1.1.0
Add the dev dependencies
dev_dependencies:
 flutter_test:
   sdk: flutter
hive_generator: ^2.0.1
build_runner: ^2.4.11
Step 2: Initialization of Hive Database
Before we can proceed with executing runApp in the Flutter app, we must first initialize Hive.
void main() async{
 WidgetsFlutterBinding.ensureInitialized();
   // Initializes Hive with a valid directory in your app files
 await Hive.initFlutter();
 runApp(const MyApp());
}
Hive is responsible for providing the initFlutter() method. Hive is essentially initialized by using the path given by the getApplicationDocumentsDirectory command.
What is a Box in Flutter Hive?
Using boxes, Flutter Hive categorizes the information it stores. The container looks like a SQL table but lacks any particular formatting and may store anything at all. Hive encrypts data, as indicated at the outset. Sensitive information may also be stored in encrypted boxes.
Hive saves its information in the form of key-value sets. You should start by opening the package.
void main() async{
 WidgetsFlutterBinding.ensureInitialized();
// Initializes Hive with a valid directory in your app files
 await Hive.initFlutter();
// open box
await Hive.openBox("userBox");
runApp(const MyApp());
}
Model Class With TypeAdapter
Our illustration includes a number of users, each with information such as their name, hobbies, and descriptions.
lib/models/person.dart
import 'package:hive/hive.dart';
part 'person.g.dart';
@HiveType(typeId: 1)
class Person {
  @HiveField(0)
  final String name;

  @HiveField(1)
  final String country;
  Person({
    required this.name,
    required this.country,
  });
}
It is necessary to import the Hive first. The type adapter may be generated by including the user model.g.dart file. Since we’re using the Hive generator package, building a TypeAdapter from scratch is unnecessary.
TypeAdapters are generated automatically for almost all classes using the Hive generator package. Several fields are marked in the userModel class.
Use @HiveType() to provide the model class and let the generator know it should produce a TypeAdapter.
The class’s fields must be annotated with @HiveField(index) and the matching index.
Execute the following command to build a TypeAdapter class:
flutter packages pub run build_runner build
Here an additional file, data model.g.dart (where g denotes “generated”), will be appended to the existing user model.dart. The resulting filename would be user model.g.dart.
CRUD Operations
Creating Data in Hive
/// Add new user
Future addUser({required UserModel userModel}) async {
 await box.add(userModel);
}
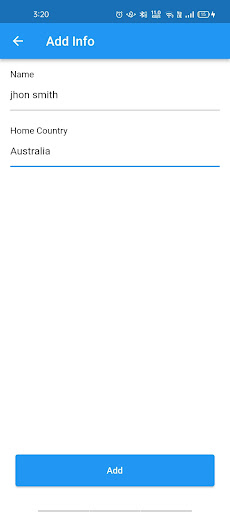
When we touch the floating button, a dialogue window appears where you may get details such as our name, interests, and bio. Then we’ll click the “add” button, and information will populate.
The Flutter Hive ValuelistenableBuilder() stream may eavesdrop on activities inside the container.
Retrieving Data in Flutter Hive
lib/screens/add_screen.dart
import 'package:flutter/material.dart';
import 'package:hive_demo/utils/add_person_form.dart';
class AddScreen extends StatefulWidget {
  @override
  _AddScreenState createState() => _AddScreenState();
}
class _AddScreenState extends State<AddScreen> {
  @override
  Widget build(BuildContext context) {
    return Scaffold(
      backgroundColor: Colors.white,
      appBar: AppBar(
        title: Text('Add Info'),
      ),
      body: Padding(
        padding: const EdgeInsets.all(16.0),
        child: AddPersonForm(),
      ),
    );
  }
}
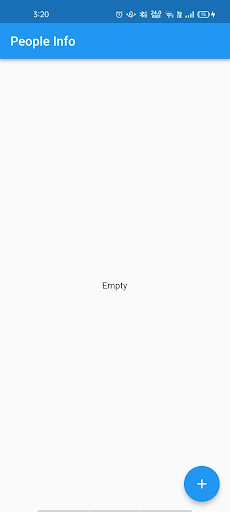
lib/screens/info_screen.dart
import 'package:flutter/material.dart';
import 'package:hive_demo/screens/update_screen.dart';
import 'package:hive_flutter/hive_flutter.dart';
import 'package:hive_demo/screens/add_screen.dart';
class InfoScreen extends StatefulWidget {
@override
_InfoScreenState createState() => _InfoScreenState();
}
class _InfoScreenState extends State<InfoScreen> {
late final Box contactBox;
// Delete info from people box
_deleteInfo(int index) {
contactBox.deleteAt(index);
print('Item deleted from box at index: $index');
}
@override
void initState() {
super.initState();
// Get reference to an already opened box
contactBox = Hive.box('peopleBox');
}
@override
Widget build(BuildContext context) {
return Scaffold(
appBar: AppBar(
title: Text('People Info'),
),
floatingActionButton: FloatingActionButton(
onPressed: () => Navigator.of(context).push(
MaterialPageRoute(
builder: (context) => AddScreen(),
),
),
child: Icon(Icons.add),
),
body: ValueListenableBuilder(
valueListenable: contactBox.listenable(),
builder: (context, Box box, widget) {
if (box.isEmpty) {
return Center(
child: Text('Empty'),
);
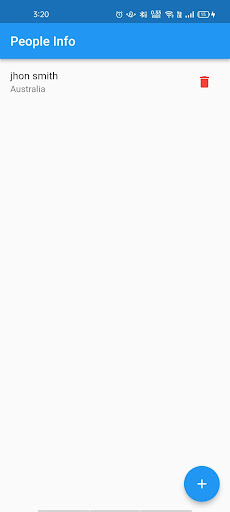
} else {
return ListView.builder(
itemCount: box.length,
itemBuilder: (context, index) {
var currentBox = box;
var personData = currentBox.getAt(index)!;
return InkWell(
onTap: () => Navigator.of(context).push(
MaterialPageRoute(
builder: (context) => UpdateScreen(
index: index,
person: personData,
),
),
),
child: ListTile(
title: Text(personData.name),
subtitle: Text(personData.country),
trailing: IconButton(
onPressed: () => _deleteInfo(index),
icon: Icon(
Icons.delete,
color: Colors.red,
),
),
),
);
},
);
}
},
),
);
}
}
lib/screens/update_screen.dart
import 'package:flutter/material.dart';
import 'package:hive_demo/models/person.dart';
import 'package:hive_demo/utils/update_person_form.dart';
class UpdateScreen extends StatefulWidget {
  final int index;
  final Person person;
  const UpdateScreen({
    required this.index,
    required this.person,
  });
  @override
  _UpdateScreenState createState() => _UpdateScreenState();
}
class _UpdateScreenState extends State<UpdateScreen> {
  @override
  Widget build(BuildContext context) {
    return Scaffold(
      backgroundColor: Colors.white,
      appBar: AppBar(
        title: Text('Update Info'),
      ),
      body: Padding(
        padding: const EdgeInsets.all(16.0),
        child: UpdatePersonForm(
          index: widget.index,
          person: widget.person,
        ),
      ),
    );
  }
}
lib/utils/add_person_form.dart
import 'package:flutter/material.dart';
import 'package:hive/hive.dart';
import 'package:hive_demo/models/person.dart';
class AddPersonForm extends StatefulWidget {
  const AddPersonForm({Key? key}) : super(key: key);
  @override
  _AddPersonFormState createState() => _AddPersonFormState();
}

class _AddPersonFormState extends State<AddPersonForm> {
  final _nameController = TextEditingController();
  final _countryController = TextEditingController();
  final _personFormKey = GlobalKey<FormState>();
  late final Box box;
  String? _fieldValidator(String? value) {
    if (value == null || value.isEmpty) {
      return 'Field can\'t be empty';
    }
    return null;
  }
  // Add info to people box
  _addInfo() async {
    Person newPerson = Person(
      name: _nameController.text,
      country: _countryController.text,
    );
    box.add(newPerson);
    print('Info added to box!');
  }
  @override
  void initState() {
    super.initState();
    // Get reference to an already opened box
    box = Hive.box('peopleBox');
  }
  @override
  Widget build(BuildContext context) {
    return Form(
      key: _personFormKey,
      child: Column(
        crossAxisAlignment: CrossAxisAlignment.start,
        children: [
          Text('Name'),
          TextFormField(
            controller: _nameController,
            validator: _fieldValidator,
          ),
          SizedBox(height: 24.0),
          Text('Home Country'),
          TextFormField(
            controller: _countryController,
            validator: _fieldValidator,
          ),
          Spacer(),
          Padding(
            padding: const EdgeInsets.fromLTRB(8.0, 0.0, 8.0, 24.0),
            child: Container(
              width: double.maxFinite,
              height: 50,
              child: ElevatedButton(
                onPressed: () {
                  if (_personFormKey.currentState!.validate()) {
                    _addInfo();
                    Navigator.of(context).pop();
                  }
                },
                child: Text('Add'),
              ),
            ),
          ),
        ],
      ),
    );
  }
}
lib/utils/update_person_form.dart
import 'package:flutter/material.dart';
import 'package:hive/hive.dart';
import 'package:hive_demo/models/person.dart';
class UpdatePersonForm extends StatefulWidget {
  final int index;
  final Person person;
  const UpdatePersonForm({
    required this.index,
    required this.person,
  });
  @override
  _UpdatePersonFormState createState() => _UpdatePersonFormState();
}
class _UpdatePersonFormState extends State<UpdatePersonForm> {
  final _personFormKey = GlobalKey<FormState>();
  late final _nameController;
  late final _countryController;
  late final Box box;
  String? _fieldValidator(String? value) {
    if (value == null || value.isEmpty) {
      return 'Field can\'t be empty';
    }
    return null;
  }
  // Update info of people box
  _updateInfo() {
    Person newPerson = Person(
      name: _nameController.text,
      country: _countryController.text,
    );
    box.putAt(widget.index, newPerson);

    print('Info updated in box!');
  }
  @override
  void initState() {
    super.initState();
    // Get reference to an already opened box
    box = Hive.box('peopleBox');
    _nameController = TextEditingController(text: widget.person.name);
    _countryController = TextEditingController(text: widget.person.country);
  }
  @override
  Widget build(BuildContext context) {
    return Form(
      key: _personFormKey,
      child: Column(
        crossAxisAlignment: CrossAxisAlignment.start,
        children: [
          Text('Name'),
          TextFormField(
            controller: _nameController,
            validator: _fieldValidator,
          ),
          SizedBox(height: 24.0),
          Text('Home Country'),
          TextFormField(
            controller: _countryController,
            validator: _fieldValidator,
          ),
          Spacer(),
          Padding(
            padding: const EdgeInsets.fromLTRB(8.0, 0.0, 8.0, 24.0),
            child: Container(
              width: double.maxFinite,
              height: 50,
              child: ElevatedButton(
                onPressed: () {
                  if (_personFormKey.currentState!.validate()) {
                    _updateInfo();
                    Navigator.of(context).pop();
                  }
                },
                child: Text('Update'),
              ),
            ),
          ),
        ],
      ),
    );
  }
}
lib/main.dart
import 'package:flutter/material.dart';
import 'package:hive_demo/models/person.dart';
import 'package:hive_flutter/hive_flutter.dart';
import 'screens/info_screen.dart';
main() async {
  // Initialize hive
  await Hive.initFlutter();
  // Registering the adapter
  Hive.registerAdapter(PersonAdapter());
  // Opening the box
  await Hive.openBox('peopleBox');
  runApp(MyApp());
}
class MyApp extends StatefulWidget {
  @override
  _MyAppState createState() => _MyAppState();
}
class _MyAppState extends State<MyApp> {
  @override
  void dispose() {
    // Closes all Hive boxes
    Hive.close();
    super.dispose();
  }
  @override
  Widget build(BuildContext context) {
    return MaterialApp(
      title: 'Hive Demo',
      theme: ThemeData(
        primarySwatch: Colors.purple,
      ),
      debugShowCheckedModeBanner: false,
      home: InfoScreen(),
    );
  }
}
Updating Data in Flutter Hive
Information associated with a key may be modified using the put() function.
With this, the previously-provided value will be replaced with the new one at that key.
/// update user data
Future updateUser({required int index,required UserModel userModel}) async {
 await box.putAt(index,userModel);
Output
Here, we’re taking use of auto-incrementing values; to make a change based on the index, just call the putAt(index) function on the box object.

Conclusion
Hive is a simple, quick, and secure NoSQL database. An API or developer language is often used to store, retrieve, search, update, query, and otherwise change data in a database. These tasks often occur behind the scenes of a program, undetected by users. Hence, the Hive has an efficient database, and particularly, it is blazing rapidly, and it supports almost all platforms.
This article will explain to handle the offline storage with a Flutter Hive. However, this functionality will aid you in creating high-quality and feature-rich apps with a few lines of coding! I hope you guys have a clear idea about handling the offline data in Flutter development. To integrate this functionality into your application, you can hire Flutter app experts to make an app innovative and with the latest features. Let’s get started and share your project requirements with us.
Frequently Asked Questions (FAQs)
1. What is Hive? and why is it used?
Hive is lightweight and has a fast key-value database written in Dart language. It grants you to store and sync application info offline. Thus, it is used to aid primitive and complicated data structures while delivering a high level of performance in the application.
2. How will you get the data from a hive database in Flutter?
Step 1: Install and Initialize the Hive database
Step 2: Import Hive and generate the type adapter
Step 3: Insert user_model.g.dart to automatically create a userModel class using the Hive generator package.
Step 4: Write that type of adapter before calling the run app function to register UserModelAdapter
3. How to store data locally in Flutter with Hive?
To store data locally in Flutter with Hive, you can follow these general steps:
- Define your data model
- Initialize Hive
- Open a Hive box
- Write data to the box
- Read data from the box
- Close the box
4. How do I integrate my flutter app with hive?
- Install the Hive package: Add the
hiveand - Define your Hive data model: Create a class that extends from
- Initialize Hive: In your app’s main method, initialize Hive by calling
- Open a Hive box: To open a Hive box, call
- Read and write data: To read data from your Hive box, call

Contemporary ventures
Recent blog


Join our newsletter
Read and share new topics about all things Tech.
ready to get started?
Fill out the form below and we will be in touch soon!
"*" indicates required fields