
How to create iOS Like DatePicker using CupertinoDatePicker in Flutter
This article will help to create iOS Like DatePicker using CupertinoDatePicker in Flutter. CupertinoDatePicker is an iOS-style date picker widget for Flutter.
Flutter gives us only a date picker facility. If we want to show this date picker in the bottom sheet with cancel and done button then we have to wrap CupertinoDatePicker widget with other Cupertino style widgets offered by Flutter.
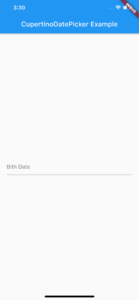
For this example, I have created a sample page with a text field in the center of the screen. Users cannot type anything in the text field but on click of the text field, the date picker will open from the bottom.
To achieve this I have used AbsorbPointer and GestureDetactor from Flutter library.
AbsorbPointer: We used this to prevent a user from typing anything in the text field.
GestureDetactor: We used this to open the date picker on click of the text field.
import 'package:flutter/cupertino.dart';
import 'package:flutter/material.dart';

class MyHomePage extends StatefulWidget {
  MyHomePage({
    Key? key,
  }) : super(key: key);

  @override
  _MyHomePageState createState() => _MyHomePageState();
}

class _MyHomePageState extends State {
  DateTime? _selectedDate;
  final TextEditingController _textEditingController = TextEditingController();

  @override
  Widget build(BuildContext context) {
    return Scaffold(
      appBar: AppBar(
        title: Text('CupertinoDatePicker Example'),
      ),
      body: Center(
        child: Padding(
          padding: const EdgeInsets.all(20.0),
          child: GestureDetector(
            onTap: () => _selectDate(),
            child: AbsorbPointer(
              child: TextField(
                controller: _textEditingController,
                decoration: InputDecoration(hintText: 'Bith Date'),
              ),
            ),
          ),
        ),
      ),
    );
  }

  _selectDate() async {
//open bottomsheet
  }
}
Here TextEditingController will be used for setting the text field value and _selectedDate will store the user’s selected date.
The _selectDate() will open the bottom sheet with a date picker and set the selected value in the text field.
So far our screen will look like this.
Now we will implement _selectDate().
_selectDate() async {
    DateTime? pickedDate = await showModalBottomSheet(
      context: context,
      builder: (context) {
        DateTime? tempPickedDate;
        return Container(
          height: 250,
          child: Column(
            children: [
              Container(
                child: Row(
                  mainAxisAlignment: MainAxisAlignment.spaceBetween,
                  children: [
                    CupertinoButton(
                      child: Text('Cancel'),
                      onPressed: () {
                        Navigator.of(context).pop();
                      },
                    ),
                    CupertinoButton(
                      child: Text('Done'),
                      onPressed: () {
                        Navigator.of(context).pop(tempPickedDate ?? DateTime.now());
                      },
                    ),
                  ],
                ),
              ),
              Divider(
                height: 0,
                thickness: 1,
              ),
              Expanded(
                child: Container(
                  child: CupertinoDatePicker(
                    mode: CupertinoDatePickerMode.date,
                    onDateTimeChanged: (DateTime dateTime) {
                      tempPickedDate = dateTime;
                    },
                  ),
                ),
              ),
            ],
          ),
        );
      },
    );

    if (pickedDate != null && pickedDate != _selectedDate) {
      setState(() {
        _selectedDate = pickedDate;
        _textEditingController.text = pickedDate.toString();
      });
    }
  }
After implementing the _selectDate() method our final result will look like this.
Here I have used the following Flutter widgets.
showModalBottomSheet
This widget opens a bottom sheet with a date picker. It takes context and builder parameters.
builder: It will return widget that you want to show in the bottom sheet.
To close this bottom sheet use Navigator.of(context).pop().
CupertinoButton
CupertinoButton is just like any other button but it is an iOS-style button. It takes child and onPressed parameters. We used these buttons to select the date or close the bottom sheet.
CupertinoDatePicker
This is an iOS-style date picker. We can change its mode to datetime or time depending on our requirements. The onDateTimeChanged is a callback that will be called when user scrolls to change date or time.
Here we have used a temporary variable called tempPickedDate.The variable will be set on the change of datetime. If the user taps on cancel this bottom sheet will be closed will null value. If the user taps on done it will close the bottom sheet with tempPickedDate.
onDateTimeChangedwill be called when the user change the date or time. If the user opens the date picker and taps on done it will return null. The default value of the date picker is current date.To solve this problem settempPickedDatewith DateTime.now().
After the bottom sheet closes we set the returned value to _selectedDate.
We can restrict the user from selecting invalid datetime by using maximumDate,minimumDate,maximumYear,minimumYear parameters.
e.g. For BirthDate field
Expanded(
  child: Container(
    child: CupertinoDatePicker(
      mode: CupertinoDatePickerMode.date,
      onDateTimeChanged: (DateTime dateTime) {
        tempPickedDate = dateTime;
      },
      maximumDate: DateTime.now(),
      //initialDateTime cannot be greater than maximumDate
      initialDateTime: DateTime.now().subtract(Duration(days: 1)),
    ),
  ),
),
So this was all about iOS Like DatePicker using CupertinoDatePicker in Flutter. I hope that this article helped you to learn something new. If you have any questions regarding this post feel free to comment below.
Github Url : Click Here. If you find this helpful then kindly give star to this project.

Contemporary ventures
Recent blog


Join our newsletter
Read and share new topics about all things Tech.
ready to get started?
Fill out the form below and we will be in touch soon!
"*" indicates required fields