
Flutter Navigation Bar: A Guide to Create Interactive Navigation Items in Flutter Web
In Flutter web, using the navigation bar at the top of the page is common. We aim to create simple web apps with interactive Flutter navigation items, such as showing a mouse pointer. Change the text style on hover and highlight the current selection.
Flutter NavigationBar In web applications, it plays an important role, and different frameworks have different implementation styles. In Flutter, we must mention the differences between mobile and the web. But we can use the same navigation item in the drawer with packages adaptive_navbar in Flutter.
Also, Read This Post:
A Complete Guide On Flutter App State Management
What is Bottom Navigation Bar in Flutter?
The bottom navigation bar helps us navigate from the top-level view of the app. in the navigation bar below. We display a row of widgets by clicking on those widgets. Usually, we show 3 to 5 items in the bottom navigation bar. Let’s see how we can implement the bottom navigation bar.
It is very easy to implement in a Flutter. You can select them individually, navigate to the desired screen, and add text and labels.
The important points to remember while using the navigation bar below:
- We can only show a small number of widgets in the bottom navigation, which can be 2 to 5
- There must be at least two bottom navigation items; otherwise, we will get an error.
- The icon and title properties are required; we must set corresponding widgets for these.
- Add a bottom navigation bar and a bottom navigation bar item in your outline.
- Now shows the selected item using the current index, two properties, and the onTap property.
- Now we need to show some pages by tapping on an item.
- That’s all, and now we can check and run our code.
Also, Read This Post:
Flutter Bottom Navigation Bar with Nested Routes: GoRouter vs. Beamer Comparison
How to Add Bottom Navigation Bar in Flutter?
First, we will learn how to create a basic bottom navigation bar, its components, and its properties. We will then learn to navigate the pages and create an animated bottom navigation bar. Here we create a simple page with the App Bar and add the name ‘Demo.’
Step 1: Create Scaffold Widgets
We create a Stateful Widget, and within a stateful widget, we create a Scaffold widget. This structure has properties such as a bottom navigation bar.
Step 2: Add Bottom Navigation Bar Widget
Then we create the bottom navigation bar widget. In this widget, we need an item to add to BottomNavigationBar
Step 3: Fill the bottom navigation bar with items
This is a widget, now the BottomNavigationBar item. There are two arguments, an icon, and a label. These arguments should not be null.
Every item has an icon and a label. The icon argument contains an icon widget, and the label argument contains a text widget.
Example
import 'package:flutter/material.dart';
void main() {
runApp(const MyApp());
}
class MyApp extends StatelessWidget {
const MyApp({super.key});
@override
Widget build(BuildContext context) {
return MaterialApp(
title: 'Title of Application',
theme: ThemeData(
primarySwatch: Colors.blue,
visualDensity: VisualDensity.adaptivePlatformDensity,
),
home: const MyHomePage(),
);
}
}
class MyHomePage extends StatefulWidget {
const MyHomePage({Key? key}) : super(key: key);
@override
State<StatefulWidget> createState() {
return MyHomePageState();
}
}
class MyHomePageState extends State<MyHomePage> {
int selectedIndex = 0;
Widget myContacts = const MyContacts();
Widget myEmails = const MyEmails();
Widget myProfile = const MyProfile();
@override
Widget build(BuildContext context) {
return Scaffold(
appBar: AppBar(
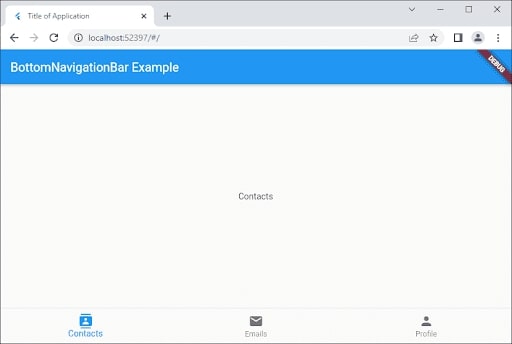
title: const Text("BottomNavigationBar Example"),
),
body: getBody(),
bottomNavigationBar: BottomNavigationBar(
type: BottomNavigationBarType.fixed,
currentIndex: selectedIndex,
items: const [
BottomNavigationBarItem(
icon: Icon(Icons.contacts),
label: "Contacts",
),
BottomNavigationBarItem(
icon: Icon(Icons.mail),
label: "Emails",
),
BottomNavigationBarItem(
icon: Icon(Icons.person),
label: "Profile",
)
],
onTap: (int index) {
onTapHandler(index);
},
),
);
}
Widget getBody() {
if (selectedIndex == 0) {
return myContacts;
} else if (selectedIndex == 1) {
return myEmails;
} else {
return myProfile;
}
}
void onTapHandler(int index) {
setState(() {
selectedIndex = index;
});
}
}
class MyContacts extends StatelessWidget {
const MyContacts({super.key});
@override
Widget build(BuildContext context) {
return const Center(child: Text("Contacts"));
}
}
class MyEmails extends StatelessWidget {
const MyEmails({super.key});
@override
Widget build(BuildContext context) {
return const Center(child: Text("Emails"));
}
}
class MyProfile extends StatelessWidget {
const MyProfile({super.key});
@override
Widget build(BuildContext context) {
return const Center(child: Text("Profile"));
}
}
Output
Also, Read This Post:
What is the Difference Between Scaffold and MaterialApp In Flutter?
Conclusion
Interactive navigation item in Flutter web is utilized to make a better user experience for the website. The users will navigate rapidly and provide a more organized and visually appealing layout. It makes them easier to use and will make them more intuitive. Hence, with the help of an interactive navigation feature, the website’s usage becomes user-friendly and simple to use.
However, Flutter is getting a lot of attention all over the world. It means that Flutter engineers will be in high demand. But, before you partner with a reliable Flutter app development company, you need to clearly understand the project or requirement and your expectations from the Flutter development team.

Frequently Asked Questions (FAQs)
1. What is the interactive navigation bar in Flutter?
The interactive navigation bar component has all the important sections or subsection states, organized components and styles. However, sections inside the navbar are interactive. “Hover”, “Pressed”, and many more states are in the sections and subsections.
2. What are navigation menu items?
Navigation menu items are clickable links or buttons that help users navigate to different sections or pages within a website or application, such as Home, About Us, Contact, Services, Products, and Blog. They are usually located in the header or footer of the site and are designed to provide a user-friendly browsing experience.
3. What is a dynamic navigation menu?
The dynamic menu is a modified concept of a menu component, sued when the number of actions available to a user is variable or dynamic. It is also helpful when several actions n the Menu are huge enough to be needed by search functionality.

Contemporary ventures
Recent blog


Join our newsletter
Read and share new topics about all things Tech.
ready to get started?
Fill out the form below and we will be in touch soon!
"*" indicates required fields