What’s New Feature In Flutter 3.7: New Features & Improvements
The beginning of 2023 is fabulous for programmers, as Google has just released the new version of Flutter 3.7. Flutter developers will enhance the ease of coding procedure with its new and innovative features. In addition, it has revamped and optimized the existing feature. However, the Dart 3 stable release is not yet announced, but it will come with high productivity and portability later.
In this article, let’s see what the new features are enhancements and modifications that have been done in the Flutter web application development for the coders.
New Features in Flutter 3.7
Let’s see the new functionalities below.
1. Menu Bars and Cascading Menus
Flutter can now build menu bars and cascading context menus.
For the macOS, build the menu bar using a PlatformMenuBar widget that defines a platform native menu bar rendered by a macOS instead of a Flutter framework.
However, for all the platforms, you can define the MaterialDesignMenu, which gives a cascading menu bar, or the standalone cascading menus triggered by other user interface elements. Hence, these menus are customizable, and menu items can be custom widgets, or you can use new menu item widgets.
2. Impeller preview
The Flutter community is happy to annoyance that a new Impeller rendering engine is ready for iOS application development. The performance of Impeller will meet or exceed the Skia renderer for most of the apps, and as for fidelity, Impeller integrates the whole but a few numbers of the rarely used in the corner cases. The Impeller is the default rendered on the iOS framework.
We are confident that Impeller on iOS will meet the rendering needs of all existing Flutter apps, and some of the gaps are in the API coverage. Hence, the users may notice a visual difference in rendering between Impeller and Skia in Flutter. So, these minor differences may be bugs, so feel free to file the issue.
Therefore, we continue to progress on the Vulkan backend for Impeller, but the Impeller on Android still needs to be ready for the preview. Android support is under active development and hopes to share it with news for the desktop and web support in future releases.
3. iOS release validation
When you release the iOS app, check the list of settings to update and ensure that your app is ready to go for submission to the App Store.
The Flutter build ipa command will now validate some of the settings and inform you if there are modifications that should be made to your app before release.
Also, Read This Post:
What’s the latest in Flutter 3.3
4. DevTools Update
In this release, several new tooling features and try overall improvements. The DevTools memory debugging tool has gone under overhaul. The new features, tabs, Profile, Trace, and Diff, will aid all the previously supported memory debugging features and will engage more to make the debugging easy. However, the new features can analyze a current memory allocation for your application by class and memory type. It will also investigate the path of the code that allocates the memory for the set of classes at runtime. The diff memory snapshots will help us understand memory management between the two points in time.
The performance page has a couple of new features. The new frame analysis tab at the top of a performance page will give insights for a selected Flutter frame. Insights may have suggestions on how to trace expensive parts of the Flutter frame in brief or give the alert about an expensive operation that is detected in the Flutter frame.
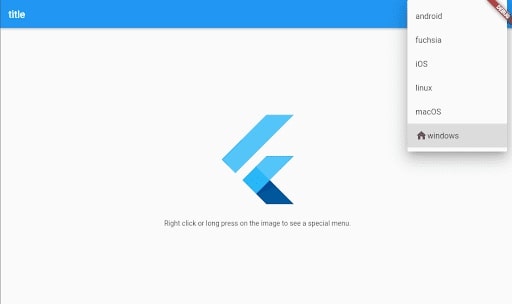
5. Custom context menus
You can now develop the custom context menus anywhere in the Flutter app development. You can also utilize them to customize the in-built context menus.
For instance, you can add the “Send Email” button and default text selection toolbar, shown when a user creates the email address code. See the contextMenuBuilder parameter, which has been added to an existing widget that shows the context menu by default, such as the TextField widget. You can return any of the widgets you desire from contextMenuBuilder, which has the changing default platform-adaptive context menu. Hence, this new feature will work externally for the text selection.
For instance, create an image widget that shadows the save button when you right-click or long-press. Use ContextMenuController to view the current platform default context menu or custom when developing custom mobile apps
Example
import 'package:flutter/material.dart';
import 'package:context_menus/context_menus.dart';
import 'package:url_launcher/url_launcher.dart';
import 'package:flutter/foundation.dart';
void main() {
  runApp(const MyApp());
}
class MyApp extends StatelessWidget {
  const MyApp({super.key});
  @override
  Widget build(BuildContext context) {
    return MaterialApp(
      title: 'Flutter Demo',
      theme: ThemeData(
        primarySwatch: Colors.blue,
      ),
      home: const MyHomePage(title: 'Flutter Demo Home Page'),
    );
  }
}
class MyHomePage extends StatefulWidget {
  const MyHomePage({super.key, required this.title});
  final String title;
  @override
  State<MyHomePage> createState() => _MyHomePageState();
}
class _MyHomePageState extends State<MyHomePage> {
  int _counter = 0;
  void _incrementCounter() {
    setState(() {
      _counter++;
    });
  }
  @override
  Widget build(BuildContext context) {
    const String route = 'image';
    const String title = 'ContextMenu on an Image';
    const String subtitle = 'A ContextMenu the displays on an Image widget';
    //  const String url = '$kCodeUrl/image_page.dart';
    DialogRoute _showDialog(BuildContext context) {
      return DialogRoute<void>(
        context: context,
        builder: (context) =>
            const AlertDialog(title: Text('Image saved! (not really though)')),
      );
    }
    return Scaffold(
      appBar: AppBar(
        title: Text("title"),
        actions: <Widget>[
          PlatformSelector(
            onChangedPlatform: (v) {},
          ),
          IconButton(
            icon: const Icon(Icons.code),
            onPressed: () async {
              if (!await launchUrl(Uri.parse("http://flutter.dev"))) {
                throw 'Could not launch ';
              }
            },
          ),
        ],
      ),
      body: Column(
        mainAxisAlignment: MainAxisAlignment.center,
        children: <Widget>[
          ContextMenuRegion(
            contextMenuBuilder: (context, offset) {
              return AdaptiveTextSelectionToolbar.buttonItems(
                anchors: TextSelectionToolbarAnchors(
                  primaryAnchor: offset,
                ),
                buttonItems: <ContextMenuButtonItem>[
                  ContextMenuButtonItem(
                    onPressed: () {
                      ContextMenuController.removeAny();
                     Navigator.of(context).push(_showDialog(context));
                    },
                    label: 'Save',
                  ),
                ],
              );
            },
            contextMenu: LinkContextMenu(url: 'http://flutter.dev'),
            child: const SizedBox(
              width: 200.0,
              height: 200.0,
              child: FlutterLogo(),
            ),
          ),
          Container(height: 20.0),
          const Text(
            'Right click or long press on the image to see a special menu.',
          ),
        ],
      ),
    );
  }
}
typedef PlatformCallback = void Function(TargetPlatform platform);
class PlatformSelector extends StatefulWidget {
  const PlatformSelector({
    super.key,
    required this.onChangedPlatform,
  });

  final PlatformCallback onChangedPlatform;
  @override
  State<PlatformSelector> createState() => _PlatformSelectorState();
}
class _PlatformSelectorState extends State<PlatformSelector> {
  static const int targetPlatformStringLength = 15; // 'TargetPlatform.'.length
  static String _platformToString(TargetPlatform platform) {
    return platform.toString().substring(targetPlatformStringLength);
  }
  final TargetPlatform originaPlatform = defaultTargetPlatform;
  @override
  Widget build(BuildContext context) {
    return SizedBox(
      width: 160.0,
      child: DropdownButton<TargetPlatform>(
        value: defaultTargetPlatform,
        icon: const Icon(Icons.arrow_downward),
        elevation: 16,
        onChanged: (value) {
          if (value == null) {
            return;
          }
          widget.onChangedPlatform(value);
          setState(() {});
        },
        items: TargetPlatform.values.map((platform) {
          return DropdownMenuItem<TargetPlatform>(
            value: platform,
            child: Row(
              children: <Widget>[
                if (platform == originaPlatform)
                  const Icon(
                    Icons.home,
                    color: Color(0xff616161),
                  ),
                Text(_platformToString(platform)),
              ],
            ),
          );
        }).toList(),
      ),
    );
  }
}
Output

6. Scrolling Improvements
Various scrolling updates have arrived with the release: polish and refinement for trackpad interactions. New widgets such as Scrollbar and DraggableScrollableSheet have to improve the handling of the text selection within the context of scrolling.
Now, the macOS apps will feel the high field with an addition of the new scrolling physics to match and desktop platform.
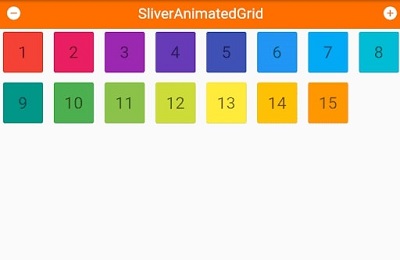
New AnimatedGrid and SilverAnimatedGrid widgets will animate the items added to the list.
We have fixed the builder constructor of numerous scrolling widgets, such as a Listview. However, during the migration of the Flutter framework, itemBuilder permitted the users to give the widgets on demand and was migrated to an IndexedWidgetBuilder. It means that an itemBuilder will no longer return null, which indicates the end of the list has been reached. Thus, this functionality was restored with NullableIndexedidgetBuilder.
Example
import 'package:flutter/material.dart';
void main() => runApp(const SliverAnimatedGridSample());
class SliverAnimatedGridSample extends StatefulWidget {
  const SliverAnimatedGridSample({super.key});
  @override
  State<SliverAnimatedGridSample> createState() =>
      _SliverAnimatedGridSampleState();
}
class _SliverAnimatedGridSampleState extends State<SliverAnimatedGridSample> {
  final GlobalKey<SliverAnimatedGridState> _listKey =
      GlobalKey<SliverAnimatedGridState>();
  final GlobalKey<ScaffoldState> _scaffoldKey = GlobalKey<ScaffoldState>();
  final GlobalKey<ScaffoldMessengerState> _scaffoldMessengerKey =
      GlobalKey<ScaffoldMessengerState>();
  late ListModel<int> _list;
  int? _selectedItem;
  late int
      _nextItem; // The next item inserted when the user presses the '+' button.
  @override
  void initState() {
    super.initState();
    _list = ListModel<int>(
      listKey: _listKey,
      initialItems: <int>[0, 1, 2, 3, 4, 5],
      removedItemBuilder: _buildRemovedItem,
    );
    _nextItem = 6;
  }
  // Used to build list items that haven't been removed.
  Widget _buildItem(
      BuildContext context, int index, Animation<double> animation) {
    return CardItem(
      animation: animation,
      item: _list[index],
      selected: _selectedItem == _list[index],
      onTap: () {
        setState(() {
          _selectedItem = _selectedItem == _list[index] ? null : _list[index];
        });
      },
    );
  }
  Widget _buildRemovedItem(
      int item, BuildContext context, Animation<double> animation) {
    return CardItem(
      animation: animation,
      removing: true,
      item: item,
    );
  }
  // Insert the "next item" into the list model.
  void _insert() {
    final int index =
        _selectedItem == null ? _list.length : _list.indexOf(_selectedItem!);
    _list.insert(index, _nextItem++);
  }
  // Remove the selected item from the list model.
  void _remove() {
    if (_selectedItem != null) {
      _list.removeAt(_list.indexOf(_selectedItem!));
    } else {
      _list.removeAt(_list.length - 1);
    }
    setState(() {
      _selectedItem = null;
    });
  }
  @override
  Widget build(BuildContext context) {
    return MaterialApp(
      scaffoldMessengerKey: _scaffoldMessengerKey,
      debugShowCheckedModeBanner: false,
      home: Scaffold(
        key: _scaffoldKey,
        body: CustomScrollView(
          slivers: <Widget>[
            SliverAppBar(
              title: const Text(
                'SliverAnimatedGrid',
                style: TextStyle(fontSize: 30),
              ),
              expandedHeight: 60,
              centerTitle: true,
              backgroundColor: Colors.amber[900],
              leading: IconButton(
                icon: const Icon(Icons.remove_circle),
                onPressed: _remove,
                tooltip:
                    'Remove the selected item, or the last item if none selected.',
                iconSize: 32,
              ),
              actions: <Widget>[
                IconButton(
                  icon: const Icon(Icons.add_circle),
                  onPressed: _insert,
                  tooltip: 'Insert a new item.',
                  iconSize: 32,
                ),
              ],
            ),
            SliverAnimatedGrid(
              key: _listKey,
              initialItemCount: _list.length,
              gridDelegate: const SliverGridDelegateWithMaxCrossAxisExtent(
                maxCrossAxisExtent: 100.0,
                mainAxisSpacing: 10.0,
                crossAxisSpacing: 10.0,
              ),
              itemBuilder: _buildItem,
            ),
          ],
        ),
      ),
    );
  }
}
typedef RemovedItemBuilder = Widget Function(
    int item, BuildContext context, Animation<double> animation);
class ListModel<E> {
  ListModel({
    required this.listKey,
    required this.removedItemBuilder,
    Iterable<E>? initialItems,
  }) : _items = List<E>.from(initialItems ?? <E>[]);
  final GlobalKey<SliverAnimatedGridState> listKey;
  final RemovedItemBuilder removedItemBuilder;
  final List<E> _items;
  SliverAnimatedGridState get _animatedGrid => listKey.currentState!;
  void insert(int index, E item) {
    _items.insert(index, item);
    _animatedGrid.insertItem(index);
  }
  E removeAt(int index) {
    final E removedItem = _items.removeAt(index);
    if (removedItem != null) {
      _animatedGrid.removeItem(
        index,
        (BuildContext context, Animation<double> animation) =>
            removedItemBuilder(index, context, animation),
      );
    }
    return removedItem;
  }
  int get length => _items.length;
  E operator [](int index) => _items[index];
  int indexOf(E item) => _items.indexOf(item);
}
class CardItem extends StatelessWidget {
  const CardItem({
    super.key,
    this.onTap,
    this.selected = false,
    this.removing = false,
    required this.animation,
    required this.item,
  }) : assert(item >= 0);
  final Animation<double> animation;
  final VoidCallback? onTap;
  final int item;
  final bool selected;
  final bool removing;
  @override
  Widget build(BuildContext context) {
    return Padding(
      padding: const EdgeInsets.only(
        left: 2.0,
        right: 2.0,
        top: 2.0,
      ),
      child: ScaleTransition(
        scale: CurvedAnimation(
            parent: animation,
            curve: removing ? Curves.easeInOut : Curves.bounceOut),
        child: GestureDetector(
          onTap: onTap,
          child: SizedBox(
            height: 80.0,
            child: Card(
              color: selected
                  ? Colors.black12
                  : Colors.primaries[item % Colors.primaries.length],
              child: Center(
                child: Text(
                  (item + 1).toString(),
                  style: Theme.of(context).textTheme.headlineMedium,
                ),
              ),
            ),
          ),
        ),
      ),
    );
  }
}
Output

7. Internalization tools and docs
Internalization support has been entirely revamped! As we have wholly rewritten the gen-l10n tool to support.
- Descriptive syntax errors
- Complicated messages add nested/multiple plurals, selects, and placeholders.
8. Text magnifier
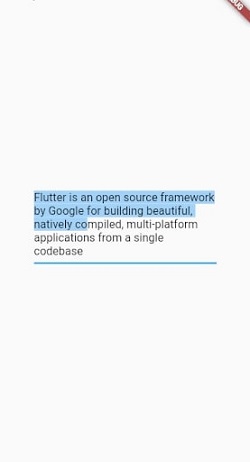
A magnifying glass will appear during a text selection on Android and iOS which will now work in Flutter. It has enabled the box for all a pass with a text selection, but if you want to include or customize it, see the magnifierConfiguration property.
Example
import 'package:flutter/foundation.dart';
import 'package:flutter/material.dart';
void main() => runApp(const MyApp(text: 'Flutter is an open source framework by Google for building beautiful, natively compiled, multi-platform applications from a single codebase'));
class MyApp extends StatelessWidget {
  const MyApp({
    super.key,
    this.textDirection = TextDirection.ltr,
    required this.text,
  });
  final TextDirection textDirection;
  final String text;
  static const Size loupeSize = Size(200, 200);
  @override
  Widget build(BuildContext context) {
    return MaterialApp(
      home: Scaffold(
        body: Padding(
          padding: const EdgeInsets.symmetric(horizontal: 48.0),
          child: Center(
            child: TextField(
              maxLines : 5,
              textDirection: textDirection,
              magnifierConfiguration: TextMagnifierConfiguration(
                magnifierBuilder:
                    (_, __, ValueNotifier<MagnifierInfo> magnifierInfo) =>
                        CustomMagnifier(
                  magnifierInfo: magnifierInfo,
                ),
              ),
              controller: TextEditingController(text: text),
            ),
          ),
        ),
      ),
    );
  }
}
class CustomMagnifier extends StatelessWidget {
  const CustomMagnifier({super.key, required this.magnifierInfo});
  static const Size magnifierSize = Size(200, 200);
  final ValueNotifier<MagnifierInfo> magnifierInfo;
  @override
  Widget build(BuildContext context) {
    return ValueListenableBuilder<MagnifierInfo>(
        valueListenable: magnifierInfo,
        builder: (BuildContext context, MagnifierInfo currentMagnifierInfo, _) {
          Offset magnifierPosition = currentMagnifierInfo.globalGesturePosition;
          magnifierPosition = Offset(
            clampDouble(
              magnifierPosition.dx,
              currentMagnifierInfo.currentLineBoundaries.left,
              currentMagnifierInfo.currentLineBoundaries.right,
            ),
            clampDouble(
              magnifierPosition.dy,
              currentMagnifierInfo.currentLineBoundaries.top,
              currentMagnifierInfo.currentLineBoundaries.bottom,
            ),
          );
          magnifierPosition -= Alignment.bottomCenter.alongSize(magnifierSize);
          return Positioned(
            left: magnifierPosition.dx,
            top: magnifierPosition.dy,
            child: RawMagnifier(
              magnificationScale: 2,
              focalPointOffset: Offset(0, magnifierSize.height / 2),
              // Decorate it however we'd like!
              decoration: const MagnifierDecoration(
                shape: StarBorder(
                  side: BorderSide(
                    color: Colors.green,
                    width: 2,
                  ),
                ),
              ),
              size: magnifierSize,
            ),
          );
        });
  }
}
Output

9. Swift migration for plugins
Apple is focusing on swift for its APIs, and we wanted to make the references that help the Flutter developer to migrate or make new plugins with swift. The quick_actions plugin has been migrated from Objective-C to Swift, used to demonstrate best practices.
10. iOS Platform View BackdropFilter
The ability for the native iOS views is being blurred when it is rendered underneath a blurred Flutter widget is now wrapped BackdropFilter internally.
Also, Read This Post:
Develop FinTech App For iOS and Android
11. Font asset hot reload
Adding the new fonts to a pubspec.yaml file needs the rebuilding application to view them, unlike another asset type which is hot reloaded in the Flutter app. Hence, the changes to a font manifest include an addition of new fonts, and it can be hot-reloaded into a Flutter application.

Conclusion
It is a fact that Flutter gives a great user experience with the help of its talented and passionate contributors. The Flutter team at Google delivers innovative work to give a high-quality experience to its users. Stay tuned for more information about Flutter news and releases.
If you have the idea for developing next-gen mobile apps with the latest version, consult the Flutter developer that will deliver rich mobile apps with a high quality and user-centric design.
Frequently Asked Questions (FAQs)
1. What is new in Flutter 3?
Since the launch of Flutter 3, it has merged 5,687 pull requests. With the help of this release, it brings updates to Flutter web, desktop, text handling improvements in performance, and so on. We are also updating to DevTools, custom context menu, and many more.
2. Is Flutter more complicated than React technology?
Flutter is easy and simple to use as it is resistant to system updates. It means that the app will stay the same when the iOS or Android update the OS. On the other hand, React Native is based on native elements, so when the update is launched, some issues may appear while deploying in the app.
3. Which backend is best for Flutter?
The latest backend option for Flutter apps is using the Backend-as–a-service solution such as Supabse and Firebase. But, with this option, you still have to make the cloud functions with a preferred backend language to run the custom code for doing the actions that do not belong to a frontend code.
Contemporary ventures
Recent blog
ready to get started?
Fill out the form below and we will be in touch soon!
"*" indicates required fields


