
How to Run App On Multiple Connected Devices Simultaneously In Flutter?
While running a flutter app on multiple devices at the same time without having to go through the sequential procedure of selecting a device -> to run, select other device -> run it consumes a frequent time so in this article How to Run App On Multiple Connected Devices Simultaneously In Flutter?
Unlock the potential of simultaneous app testing and development by learning how to run your Flutter app on multiple connected devices at once. In this enlightening blog post, discover the techniques and tools that enable you to deploy and test your app across multiple devices simultaneously. Streamline your development process, identify device-specific issues, and ensure consistent performance across various platforms. Whether you’re targeting Android or iOS, this tutorial will provide you with the insights and practical examples you need to run your app on multiple connected devices simultaneously in Flutter. Level up your app development workflow and maximize efficiency with this essential skill.
How to Run App On Multiple Connected Devices Simultaneously In Flutter?
Run command in terminal:
flutter run -d all
or create a script (e.g. runall.sh in root):
#!/usr/bin/env bash
flutter run -d all
and go to “Run” -> “Edit Configurations“. Press “+” in upper left corner -> select “Bash“. Then set:
- Name: runall
- Script: [path to runall.sh script]
- Interpreter Path: /bin/bash
Select “run all” instead of “main. dart” beside the run icon. Performing run (also through a shortcut) will now run an app on all devices.
Flutter supports certain signals to trigger a hot reload natively
--pid-file Specify a file to write the process id to. You can send SIGUSR1 to trigger a hot reload and SIGUSR2 to trigger a hot restart.
Here is a fast example:
#!/usr/bin/env bash

set -euo pipefail

# Remove previous pid files
rm -f /tmp/flutter.pid

# Run in a loop a hot reload call in a subshell
(while true
do
    # Wait for flutter to start before monitoring pid
    while [[ ! -f /tmp/flutter.pid ]]; do sleep 1; done;

    # Send hot reload signal when files change
    find lib/ -name '*.dart' | entr -n -d -p kill -USR1 $(cat /tmp/flutter.pid)
done) &

# Run all devices under 1 pid
flutter run -d all --pid-file /tmp/flutter.pid
Tip of the day
Top configuration mistakes that will fail your mobile CI build:
“Build failures in that regard are most commonly caused by missing build steps before performing a specific action. If the build scripts are not coded, it’s important to add those scripts in the CI configuration”
If you don’t want to use the command line directly each time, you can do the following workaround:
- Download bash support plugin
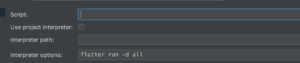
Create a new configuration of bash, leave the script field empty, and in the interpreter options cell insert: flutter run -d all. It should look something like this:
- If step two didn’t work, create a file called something like run_all.sh in your root project. and put the next lines there(assuming that bin/bash is the path to your bash):
#!/bin/bash
flutter run -d all
type in your terminal:chmod 755 run_all.sh.
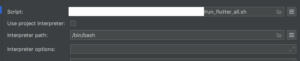
Specify run_all.sh in your configuration and bin/bash as your interpreter path. Remove flutter run -d all from interpreter options. It should look like the below:
There are many ways to do this as previously answered. If you use VS Code instead of Android Studio as your Flutter IDE, this is how you can use the VSC launch configuration and tasks to run concurrently from a single launch and have hot reload enabled for all devices.
If you have an issue with executing flutter run -d all this is an alternative solution will which let you specify the devices that should run. Ensure that the devices you specify are available when running flutter devices.
Your current launch.json file may look something like this:
{
    "version": "0.2.0",
    "configurations": [
        {
            "name": "Flutter",
            "type": "dart",
            "request": "launch",
            "flutterMode": "debug"
        }
    ]
}
Setup
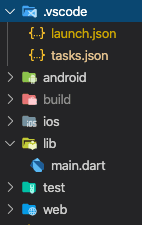
You will need to update this launch.json file and create tasks.json in the same .vscode folder that is in your application’s root directory.
Paste only the below code into launch.json
{
    "version": "0.2.0",
    "configurations": [
        {
            "name": "Flutter-All",
            "preLaunchTask": "Flutter-Launch-All",
            "type": "dart",
        },
        {
            "name": "Flutter-iOS",
            "preLaunchTask": "Flutter-Launch-iOS",
            "type": "dart",
        },
        {
            "name": "Flutter-Android",
            "preLaunchTask": "Flutter-Launch-Android",
            "type": "dart",
        },
        {
            "name": "Flutter-Web",
            "preLaunchTask": "Flutter-Launch-Web",
            "type": "dart",
        }
    ],
}
Paste only the below code into tasks.json
{
  "version": "2.0.0",
  "tasks": [
    {
      "label": "Flutter-Launch-All",
      "dependsOn": [
        "Flutter-Launch-iOS",
        "Flutter-Launch-Android",
        "Flutter-Launch-Web"
      ]
    },
    {
      "label": "Flutter-Launch-iOS",
      "type": "shell",
      "command": "flutter run -d 'iPhone 11' "
    },
    {
      "label": "Flutter-Launch-Android",
      "type": "shell",
      "command": "flutter run -d 'AOSP on IA Emulator' "
    },
    {
      "label": "Flutter-Launch-Web",
      "type": "shell",
      "command": "flutter run -d 'Chrome' "
    }
  ]
}
Replace the device names accordingly
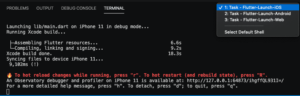
Firing up all devices Press the F5 key.
If the F5 shortcut to Start Debugging does not work for you, navigate to Debug & Run on the side panel and select the Flutter-All Configuration you’ve just created and then Run.

You will then see the terminal window appear and will able to switch between the individual hot-reload sessions running (as Tasks in their own shell).
Some Background
We use ‘Compound Tasks‘ by way of the dependsOn option on a Task and not ‘Compounds‘ which are for Configurations.
As it is not possible to launch Configurations concurrently, only sequentially, we use tasks that can run concurrently.
Hence, the “Flutter-All” Configuration executes the tasks of the iOS, Android and Web Configurations.
If using Compounds, a Configuration will need to complete before the next runs which is not what we want.
So with Tasks, we can choose to execute them sequentially however by default they will execute concurrently when using the depends option.
//Do not use this unless you want to use Configurations only by testing them sequentially and not tasks
"compounds": [
    {
        "name": "Flutter-All",
        "configurations": ["Flutter-iOS", "Flutter-Android", "Flutter-Web"],
    }
]
Conclusion:
Thanks for Reading !!! Keep Learning !!!
SO in this article, we have been through how to run an app on multiple connected devices simultaneously in flutter…
Also, Don’t miss out on StreamBuilder Widget.
Do let us know if you need any assistance with flutter development!! We would love to assist you:)
FlutterAgency.com is our portal Platform dedicated to Flutter Technology and Flutter Developers. The portal is full of cool resources from Flutter like Flutter Widget Guide, Flutter Projects, Code libs and etc.
FlutterAgency.com is one of the most popular online portals dedicated to Flutter Technology and daily thousands of unique visitors come to this portal to enhance their knowledge of Flutter.

Contemporary ventures
Recent blog


Join our newsletter
Read and share new topics about all things Tech.
ready to get started?
Fill out the form below and we will be in touch soon!
"*" indicates required fields