
How To Remove Debug Mode Tag In Flutter Application?
Flutter has 3 build modes such as Debug, Profile, and Release. Debug mode in the Flutter App indicates the debugging information, service extensions and enables all the debugger aids. These are suitable options to debug mode on a device that includes the simulator and emulators.
For removing the flutter debug banner, you have lots of possibilities that include using the debugShowCheckModeBanner property. When you are looking to remove the debug mode tag then seeking the guidance of Flutter Agency is an efficient option. The second possibility of the process is to hide debug mode banners using Flutter Inspector.
What Is The Purpose Of Debug Banner?
Flutter shows a debug banner for easily indicating that the app runs on the debug mode. Apart from these, the banner does not show the release mode when you do not disturb it.
The Debug Banner is especially suitable for preventing people from complaining that the app runs slowly with debug configuration. Normally, Flutter enables expensive diagnostics for aiding the development in the debug mode. Performance in the debug mode does not represent any information on the release mode.
The Flutter app would show the debug mode only when the debugShowCheckedModeBanner has been set as the true attribute to the default mode. When you are running the Flutter app for the first time, then you will notice the debug banner on the upper right of the screen.
Banner is especially intended for preventing people from complaining that the app slows running under the Debug configuration. To remove the debug mode tag, you can seek the Flutter Agency for gaining better information.
Need For Removing Debug Mode Tag In Flutter App?
Flutter enables expensive diagnostics for aiding the developments with debug mode. Performance in the debug mode especially does not represent the Release mode. When you find the Flutter App slows mode stating debugShowCheckedModeBanner is set to true, which aids with default true.
The main reason for the debug mode banner is due to the debug mode app running slowly during the operation. The Debug banner easily represents build type, and these could be debug or released.
Running the app is especially enabled with Debug mode so they can be extensively optimized for the development cycle. When you feel that your app runs slowly based on performance, then it would not be in the case of Release mode.
Debug banner is a suitable option for helping to know that the app is running slower. These are indicated with the Debug mode and assure with running and testing the app on the Release mode.
How To Remove A Debug Banner?
Commonly, the Debug banner is denoted as a red-coloured banner with text ‘DEBUG’ written inside. These appear at the top right side of the Flutter app. It is useful for indicating that you are running the Flutter app in Debug mode. The debug banner has been mainly controlled by the debugShowCheckedModeBanner property in the CupertinoApp widget.
It is quite convenient for hiring or removing Debug batter in the Flutter app for setting the debugShowCheckedModeBanner property. These are false with the constructor argument of the MaterialApp/CupertinoApp. Below is the simple process for easily removing the debug mode tag in the flutter app.
MaterialApp(
debugShowCheckedModeBanner: false,
  home: Scaffold(
appBar: AppBar(
title: const Text('Home'),
	),
  ),
);
When you are looking for removing debug banners or debug mode from your app, then you can easily follow the above function. These would automatically enable the debug mode banner with debugging the mobile app.
Normally, the Debug mode present on the device especially includes the emulators and simulators. You can conveniently turn on the assertions across the world. These would mainly include various other attributes that include the debugging information along with many other debugger aids.
It is quite a convenient option for optimizing the faster development or run cycle. In the modern-day, most developers and designers are using the Debug mode for extensively gaining more benefits.
Steps To Remove The Debug Banner:
Hiring or removing debug banners would give you a better feeling of the app being polished and a superior option to use. These would automatically provide the complete facilities for saving more time in the process. Below are the steps to easily remove debug banner in the Flutter app.
- Go to CupertinoApp or MaterialApp widget
- Add debugShowCheckedModeBanner
- Run your app
Upon running the app, you would automatically get the below process codes
Widget build(BuildContext context) {
  return MaterialApp(
debugShowCheckedModeBanner: false,
	title: 'Flutter Demo',
	theme: ThemeData(
primarySwatch: Colors.blue,
	),
	home: const MyHomePage(title: 'Flutter Demo Home Page'),
  );
}
Setting debugShowCheckedModeBanner is a suitable way to remove or hide the debug banner. Normally, the Debug banner does not appear with the running app on release mode. For running the app with Release mode that includes
- Open the terminal
- Enter the following command
- flutter run — release
- Remove the DEBUG banner from the top-right corner
Simply turn off debugShowCheckedModeBanner as shown below:
// lib/main.dart
import 'package:flutter/material.dart';
void main() => runApp(MyApp());
class MyApp extends StatelessWidget {

@override
  Widget build(BuildContext context) {
	return MaterialApp(   // or CupertinoApp
title: 'My Flutter App',
debugShowCheckedModeBanner: false,
home: Scaffold(
appBar: AppBar(
title: Text('Welcome to Flutter Agency!'),
 	   ),
  	),
	);
  }
}
Creating the fresh Flutter project would be a suitable option for observing the Debug banner on the right side of the app. It is convenient for removing Debug banners with the Flutter app for focusing on customizing with UI.
These would match with the design and are helpful for removing debug banners in the Flutter app. When you are looking to debug or even hide the ribbon, you could conveniently set debugShowCheckedModeBanner property with Material Widget.
class MyApp extends StatelessWidget {
  // This widget is the root of your application.
@override
  Widget build(BuildContext context) {
	return new MaterialApp(
debugShowCheckedModeBanner: false,
title: 'Flutter Demo',
home: new MyHomePage(title: 'Flutter Demo Home Page'),
	);
  }
}
For Example:
Below is the example code for the simple Flutter mobile application. You can easily value the debugShowCheckedModeBanner property using the MaterialApp widget. These are mainly set to false.
You can extensively set the debugShowCheckedModeBanner with the false attributes. It also helps to hide DEBUG labels.
import 'package:flutter/material.dart';
void main() {
  runApp(MaterialApp(
   debugShowCheckedModeBanner: false,
   home: Scaffold(
       appBar: AppBar(
         backgroundColor: Colors.blue,
         title: const Center(child: Text('Debug Banner')),
       )
   )
));
}
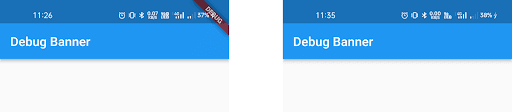
Output:
Conclusion:
Debug labels can be removed automatically with building the Flutter mobile application with Release mode. This label will be removed using the debug app and hide the DEBUG Banner. You can also get the best guidance and resources from flutteragency.com.
Thank you for reading the blog. We hope this was helpful and helped you learn something new.
It’s Free

Contemporary ventures
Recent blog


Join our newsletter
Read and share new topics about all things Tech.
ready to get started?
Fill out the form below and we will be in touch soon!
"*" indicates required fields