How to Change Textfield Underline Color in Flutter Application?
The modern application needs the perfect type of input from users. Developers create an app with an ideal text field that allows users to input something. Developers rely on the best platform for app development.
Flutter is the best option if you are a developer and look for an immersive platform. It is easy to manage visual consistency across the platform. Developers gain immense benefits with flutter. If you want to learn more about the platform, you can access Flutter Agency and understand important things.
You can come across a vast range of widgets and learn simple tips and tricks to use them. Textfield widget is a comprehensive thing in the app. Developers may also modify Text Field for project requirements. It comes up with a default light blue color bottom underline. If you have any doubts when changing the color, you can speak with an agency and get an idea.
Use of Textfield:
Textfield is an important element that allows users to input relevant details like name, password, address, and a lot more. It takes such details as alphanumeric data.
The GUI control element helps people enter information in the text format with programmable code. The app may also be designed with a single line or multiple-line text fields. It often uses text.input widget that lets users gather input from the keyboard.
Professionals use such a widget to create forms, search experience, and send a message. Flutter offers a widget with an underline along with diverse attributes. With the advent of technology, it is easy to find Flutter Agency and get service for making the necessary changes in-app.
Business owners use the app to build good connections and relationships with customers. Professionals keep apps with up to date trends to attract an audience and use the feature to change something in-app.
Procedure to change Textfield underline color:
It brings a vast range of features like inline hint text, icon, label, and error message. Developers utilize input decoration for decoration purposes.
If you want to eliminate decoration property, you can set it to null. With the help of Flutter Agency, you can understand step-by-step procedures and change the underline color. Here is the complete code for changing the Textfield underline color.
import 'package:flutter/material.dart';
void main() => runApp(const MyApp());
class MyApp extends StatelessWidget {
const MyApp({Key? key}) : super(key: key);

@override
Widget build(BuildContext context) {
return MaterialApp(
debugShowCheckedModeBanner: false,
home: Scaffold(
appBar: AppBar(
title: const Text("Change Input Text Field Color"),
),
body: Center(
child: Column(
mainAxisAlignment: MainAxisAlignment.center,
children: [
Container(
width: 290,
padding: const EdgeInsets.all(10.0),
child: const TextField(
autocorrect: true,
decoration: InputDecoration(
hintText: 'UserName',
enabledBorder: UnderlineInputBorder(
borderSide: BorderSide(color: Colors.blue),
),
focusedBorder: UnderlineInputBorder(
borderSide: BorderSide(color: Colors.red),
),
))),
Container(
width: 290,
padding: const EdgeInsets.all(10.0),
child: const TextField(
autocorrect: true,
decoration: InputDecoration(
hintText: 'E-mail',
enabledBorder: UnderlineInputBorder(
borderSide: BorderSide(color: Colors.blue),
),
focusedBorder: UnderlineInputBorder(
borderSide: BorderSide(color: Colors.red),
),
))),
],
))));
}
}
- First of all, import the material dart package into the application file.
- Next, call myapp class by implementing the void main runapp() method.
- Build scaffold widget in safe area widget and center them in the myapp class.
- Develop a Textfield widget in the center in the container widget.
- Finish source code for the main.dart file.
How to implement Textfield widget in the app:
Before using Textfield widget, you must understand attributes and how to use them. Every attribute comes up with unique functionality and helps developers create an app quickly. You may also work with professionals to properly understand the widget attributes.
- Border
Create default rounded rectangle border throughout Textfield
- Hint text
Displays hint text within Textfield
- Icon
Insert icons to Textfield directly
- Label text
Display label text on a collection of field
- Decoration
Display decoration about the Textfield
Once you learn all the attributes in the Textfield widget, you can get ready to work on the project. Developers use the Textfield widget in the app by following the necessary guidelines. Whether you are willing to flutter a project, Flutter Agency guides you to create a source code and finish the project. They help you a lot and correct mistakes.
- Build flutter project in IDE by using flutter.
- Open Visual Studio Code and move to the lib folder.
- Then, open the main.dart file and import the package like material. dart.
- Call myapp class using the void main run app function and develop the main widget class myapp extends with statefulwidget.
- Build scaffold widget under column widget in the class widget build area.
- At last, develop the Textfield widget.
- You can setup an emulator to run your Flutter project.
Developers follow steps to form code that comes up with the Textfield widget. Flutter app has two text fields and one raisedbutton. Users fill in all the necessary details, click on the button, and see the output.
Recover value of textfield:
Flutter helps users recover text in different ways. Professionals use the unchanged and controller method to get back data.
Unchanged method:
It is the best option to regain the value of text and store the current value with simple variables and use them in the widget.
Controller method:
It is another important method for professionals to get data. Texteditingcontroller attaches to textfield widget and focuses on change and control value.
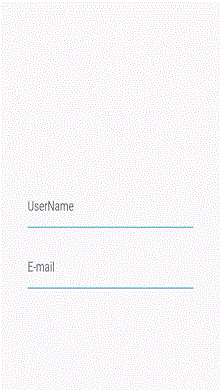
Output
Conclusion:
In this article, you can learn Textfield in flutter and how to change underline color for a project. Flutter Agency provides stunning resources and engages developers to build skills and focus on projects and create them in perfect order.
Contemporary ventures
Recent blog
ready to get started?
Fill out the form below and we will be in touch soon!
"*" indicates required fields


