Fluttering into Action: A Step-By-Step Guide to Installing and Configuring Flutter SDK on macOS
Flutter has attained immense popularity in the software industry. Big tech corporations are investing large sums of money to hire a Flutter developers team. As a result, the developer community has become obsessed with mastering the skills necessary to harness the full potential of the platform. However, software developers face a steep learning curve when they select Flutter app development. This comprehensive guide will teach you how to install and configure Flutter on macOS and efficiently migrate your project onto the platform. Let’s go ahead and understand the installation process of Flutter on macOS.
Step-By-Step Guide For Flutter Installation On MacOS
Before you initiate the installation process, you must make sure that your current hardware and system fulfill the minimum requirement of Flutter.
System Requirements
- Operating Systems: macOS (64-bit), version 10.14 (Mojave) or higher.
- Disk Space: 2.8 GB (excluding space for IDE/tools).
- Tools: Git for macOS or Xcode.
Download Flutter SDK
Now that you have verified that your hardware and system meet the basic requirements for the installation, you can proceed to the first step of the process.
Start by downloading the installation bundle from here – Flutter SDK for macOS.
The newest version of Flutter 3.16.3 for macOS was released on the stable channel on 12/06/2023.
If you are using the Apple Silicon processor, download the latest version from here – flutter_macos_arm64_3.13.7-stable.zip
-
Extract The Zip File
Extract the downloaded Zip file to a folder of your choice.
cd ~/development
$ unzip ~/Downloads/flutter_macos_3.13.7-stable.zip
-
Append Flutter Tool to your assigned path
export PATH="$PATH:`pwd`/flutter/bin"
To verify if the PATH is already set correctly, you must run the program once.
flutter --version
Using this command is vital because the installer appends the Flutter repository as the default PATH. This prevents Flutter from working in another terminal directory. Once you are done with this step, you can deploy Flutter commands successfully.
Run Flutter Doctor
If any dependencies are missing, Flutter won’t work. Most firms hire Flutter developers team after getting stuck on this step. However, you can use the following command to check for the missing dependencies-
flutter doctor
This useful command runs a full diagnostic on the system environment and generates a full report on its findings. The report is supplied at the terminal window, and it tells the developer if he needs to download or update an existing dependency. You cannot skip over this step even if you downloaded Flutter through the Dart SDK. There might be some other software missing or additional tasks you need to perform to get the platform up and running.
For example, you may face the “Android license status unknown” message in case the sdkmanager shell script crashes in the $android_sdk/tools/bin directory.
Review PATH Environment Variable
A skilled Flutter developer from Flutter Agency will always validate that your system’s PATH environment variable incorporates the path to Android SDK’s bin directory. Look for this output –
export PATH=$PATH:/path/to/android-sdk/tools/bin
Install Flutter Plugin
IntelliJ, Android Studio, and VS Code each have their unique editor plugin. For our guide, we shall use the VS Code or Visual Studio Code.
- Run VS Code.
- Press Command+Shift+B buttons to activate View>Command Palette.
- Type ‘install’ on the command palette, and when the ‘Extensions: Install Extension’ comes up on the screen, click on it.
- Type ‘flutter’ on the search field and then click on the ‘Flutter’ option in the list.
- Click on the Install button.
- Reload VS Studio by clicking on the ‘Reload’ button.
Android Studio
Flutter Doctor often reports on two common issues associated with Android Studio. If you see ‘Flutter plugin not installed’ or ‘Dart plugin not installed’ flashing on the Flutter Doctor console, follow these steps to rectify the error –
- Launch Android Studio
- Click on ‘Preferences’, and from the drop-down, select ‘Plugins’.
- Click on ‘Browse Repositories’, and then select the Flutter plugin and click ‘Install’.
- Click on the ‘Yes’ button when prompted to start the Dart plugin installation process.
- After the installation, a dialogue box will appear with the restart option. Click on the “Restart’ option.
Verify Your Setup
You must run Flutter Doctor again to validate your setup thus far. Most software development companies need to hire flutter developers team because they skip over this step and face issues in the later stages of the app development.
iOS Setup
To start this process, you must first download and configure Xcode. These are the steps involved –
Install Xcode
- Download Xcode from the 9.0 version onwards from the Mac App Store to create Flutter applications for iOS.
- Configure Xcode using sudo xcode-select –switch /Applications/Xcode.app/Contents/Developer command.
- Use the command line to sign the Xcode license agreement by clicking on the ‘Agree’ button.
Configure The iOS Simulator
You need to test out your Flutter app on your iOS simulator first. Follow these steps – Use the open -a Simulator command to launch the simulator on your Mac.
- Click on the Hardware option and then Device to check if your simulator is using a 64-bit device.
- Select the Scale Menu on the Window option to set the app’s dimensions.
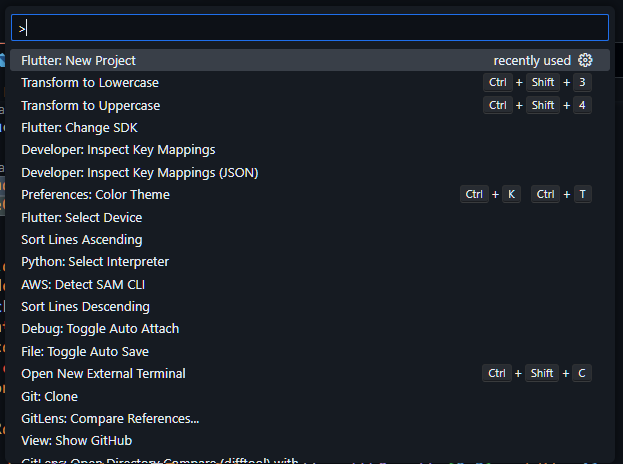
Launch A New Project In VS Code
Utilize the Flutter starter app template to initiate a new project.
- Press Cmd+Shift+P.
- Click on Flutter: New Project and then select ‘Enter’.
- Set a Project name and location.
Execution and Debugging
When you run a Flutter project on VS Code for the first time, the status bar will show Flutter-specific entries. You might also see the ‘No Devices’ error message. We will share a secret tip to overcome this error that only a skilled Flutter developer from the Flutter agency knows.
- Click on ‘No Devices’.
- On the command palette, click on iOS Simulator.
- Press F5 or click on the Debug menu on the IDE window to start debugging.
Conclusion
Now, you are ready to take advantage of Flutter, which has been instrumental in the success of other companies. Alternatively, you can also hire a Flutter developers team to take care of this massive undertaking.
Contemporary ventures
Recent blog
ready to get started?
Fill out the form below and we will be in touch soon!
"*" indicates required fields


