How to Create Animation Using the AnimatedAlign Widget?
The Flutter Agency focused on the most often used widgets while creating a Flutter app. If you have a basic understanding of those widgets, it becomes much easier for anyone to start creating wonderful apps with Flutter.
Now that Flutter offers animations, you can build wonderful fun-filled animations in your app by using animated widgets. So, in this article, we will see the AnimatedAlign widget.
To improve your application usability and performance, make sure you utilize this feature whenever you hire Flutter developer to build your business application. Sometimes you may need to change the alignment of a widget, and adding an animation can make the transition smoother during the transition to the new alignment. In Flutter, creating such animation can be done thanks easily to the AnimatedAlign widget.
The Animated Align Widget aligns the child’s location in a given period in a given alignment automatically. You can also choose an animation period with a curve. The alignment to the new target will be animated by the widget.
Let’s go over the constructor…
const AnimatedAlign(
{Key? key,
required AlignmentGeometry alignment,
Widget? child,
double? heightFactor,
double? widthFactor,
Curve curve = Curves.linear,
required Duration duration,
VoidCallback? onEnd}
)
There isn’t much in the constructor, other than 3 properties that are important that make the whole animation work.
Alignment(Alignment): the initial position of the child widget.
1. Curve(Curve): In curve animation, easy curves are utilized to modify the rate of change. This enables both slow and high speeds. There are a variety of alternatives to choose from.
2. Duration(Duration): Using the duration, we can determine the time required for a change in alignment.
Let’s see a snippet of how to add an animatedAlign widget in the flutter app.
AnimatedAlign(
 alignment: _alignment,
 duration: Duration(seconds: 2),
 curve: Curves.easeInOutBack,
 child: SizedBox(
     width: 100.0,
     height: 100.0,
     child: Image.asset(
       'assets/images/pluginIcon.png',
       height: 40,
     )),
),
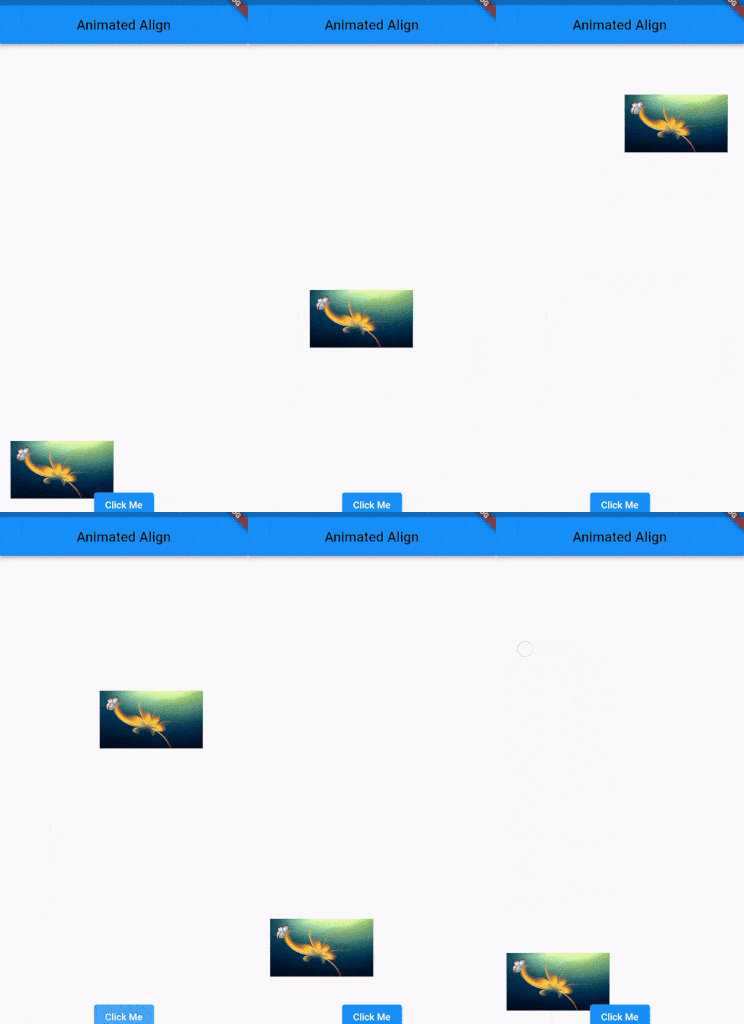
As this screen has an image whose arrangement will go from Alignment.topRight to Alignment.bottomLeft. The duration time is also set as per our It has the option of the curve. There are many types of curves. We have used the curves (Curves.easeInOutBack).
Let’s see a full example to better understand the AnimatedAlignment widget.
class MyHomePage extends StatefulWidget {
  const MyHomePage({Key? key}) : super(key: key);
  @override
  State<MyHomePage> createState() => _MyHomePageState();
}

class _MyHomePageState extends State<MyHomePage> {
  static const _alignments = [
    Alignment.topRight,
    Alignment.bottomLeft,
  ];

  var _index = 0;

  AlignmentGeometry get _alignment => _alignments[_index % _alignments.length];

  @override
  Widget build(BuildContext context) {
    return Scaffold(
      appBar: AppBar(
        title: const Text(
          'Animated Align',
          style: TextStyle(
            color: Colors.black,
          ),
        ),
        centerTitle: true,
      ),
      body: Container(
        padding: const EdgeInsets.all(15),
        child: Stack(
          alignment: Alignment.bottomCenter,
          children: <Widget>[
            AnimatedAlign(
              alignment: _alignment,
              duration: const Duration(seconds: 2),
              curve: Curves.decelerate,
              child: SizedBox(
                  width: 150.0,
                  height: 150.0,
                  child: Image.asset(
                    'assets/images/3.png',
                    height: 40,
                  )),
            ),
            ElevatedButton(
              onPressed: () {
                setState(() {
                  _index++;
                });
              },
              child: const Text(
                'Click Me',
              ),
            ),
          ],
        ),
      ),
    );
  }
}
To compile and run the above code to need a real device or an android emulator, read our article on how to set up an emulator for VSCode to set up an Android emulator easily.
Output:

Conclusion:
We saw an Animated Align Widget demo in this article, which you can modify and experiment with according to your own preferences. We hope that this blog gives you enough knowledge to try out the Animated Align Widget in your flutter project.
As a leading Flutter development company, we at Flutter Agency ensure that our clients always get the top-notch mobile application that upgrades their operational performance. Consult our Flutter expert and get professional advice to build a great customer-centric application. Thank you for reading our article and keep visiting Flutter Agency.
Contemporary ventures
Recent blog
ready to get started?
Fill out the form below and we will be in touch soon!
"*" indicates required fields


