How to Do Textfield Validation In Flutter?
TextField Widget is used to get data from users and perform the desired operation…So, in this article, we will go through how to do Textfield Validation In Flutter.
Validating user input is essential for ensuring data integrity and creating a seamless user experience. In this blog post, we’ll explore various validation methods, including built-in and custom validators, as well as real-time validation. By following the step-by-step instructions and practical examples, you’ll gain the skills to implement robust user input handling in your Flutter applications. Get ready to elevate your user input validation skills and build error-free apps. Let’s dive in!
How to Do Textfield Validation In Flutter?
A Minimal Example of what you want:
class MyHomePage extends StatefulWidget {
 @override
 MyHomePageState createState() {
   return new MyHomePageState();
 }
}

class MyHomePageState extends State<MyHomePage> {
 final _text = TextEditingController();
 bool _validate = false;

 @override
 void dispose() {
   _text.dispose();
   super.dispose();
 }

 @override
 Widget build(BuildContext context) {
   return Scaffold(
     appBar: AppBar(
       title: Text('TextField Demo'),
     ),
     body: Center(
       child: Column(
         mainAxisAlignment: MainAxisAlignment.center,
         children: <Widget>[
           Text('Error Showed if Field is Empty on Submit button Pressed'),
           TextField(
             controller: _text,
             decoration: InputDecoration(
               labelText: 'Enter the Value',
               errorText: _validate ? 'Value Can\'t Be Empty' : null,
             ),
           ),
           ElevatedButton(
               onPressed: () {
                 setState(() {
                   _text.text.isEmpty ? _validate = true : _validate = false;
                 });
               },
               child: Text('Submit'),
               style: ElevatedButton.styleFrom(
                   foregroundColor: Colors.white, backgroundColor: Colors.blueAccent,//button text color
                   shape: RoundedRectangleBorder(
                     borderRadius: BorderRadius.circular(25),
                   )
               )
           )
         ],
       ),
     ),
   );
 }
}
TextFormField is also a better option for validation. Flutter handles error text itself, so we don’t require to use variable _validate. It will check at runtime whether you satisfied the condition or not.
final confirmPassword = TextFormField(
  controller: widget.confirmPasswordController,
  obscureText: true,
  decoration: InputDecoration(
    prefixIcon: Icon(Icons.lock_open, color: Colors.grey),
    hintText: 'Confirm Password',
    errorText: validatePassword(widget.confirmPasswordController.text),
    contentPadding: EdgeInsets.fromLTRB(20, 10, 20, 10),
  ),
);

String? validatePassword(String value) {
  if (value == null || !(value.length > 5) && value.isNotEmpty) {
    return "Password should contain more than 5 characters";
  }
  return null;
}
Note: The user must add at least one character to get this error message. Using a TextFormField with a validator.
class MyHomePageState extends State<MyHomePage> {
  final _formKey = GlobalKey<FormState>();

  @override
  Widget build(BuildContext context) {
    return Scaffold(
      appBar: AppBar(
        title: Text('TextFormField validator'),
      ),
      body: Form(
        key: _formKey,
        child: Column(
          mainAxisAlignment: MainAxisAlignment.center,
          children: <Widget>[
            TextFormField(
              decoration: InputDecoration(
                hintText: 'Enter text',
              ),
              textAlign: TextAlign.center,
              validator: (text) {
                if (text == null || text.isEmpty) {
                  return 'Text is empty';
                }
                return null;
              },
            ),
            ElevatedButton(
              onPressed: () {
                if (_formKey.currentState!.validate()) {
                  // TODO submit
                }
              },
              child: Text('Submit'),
            )
          ],
        ),
      ),
    );
  }
}
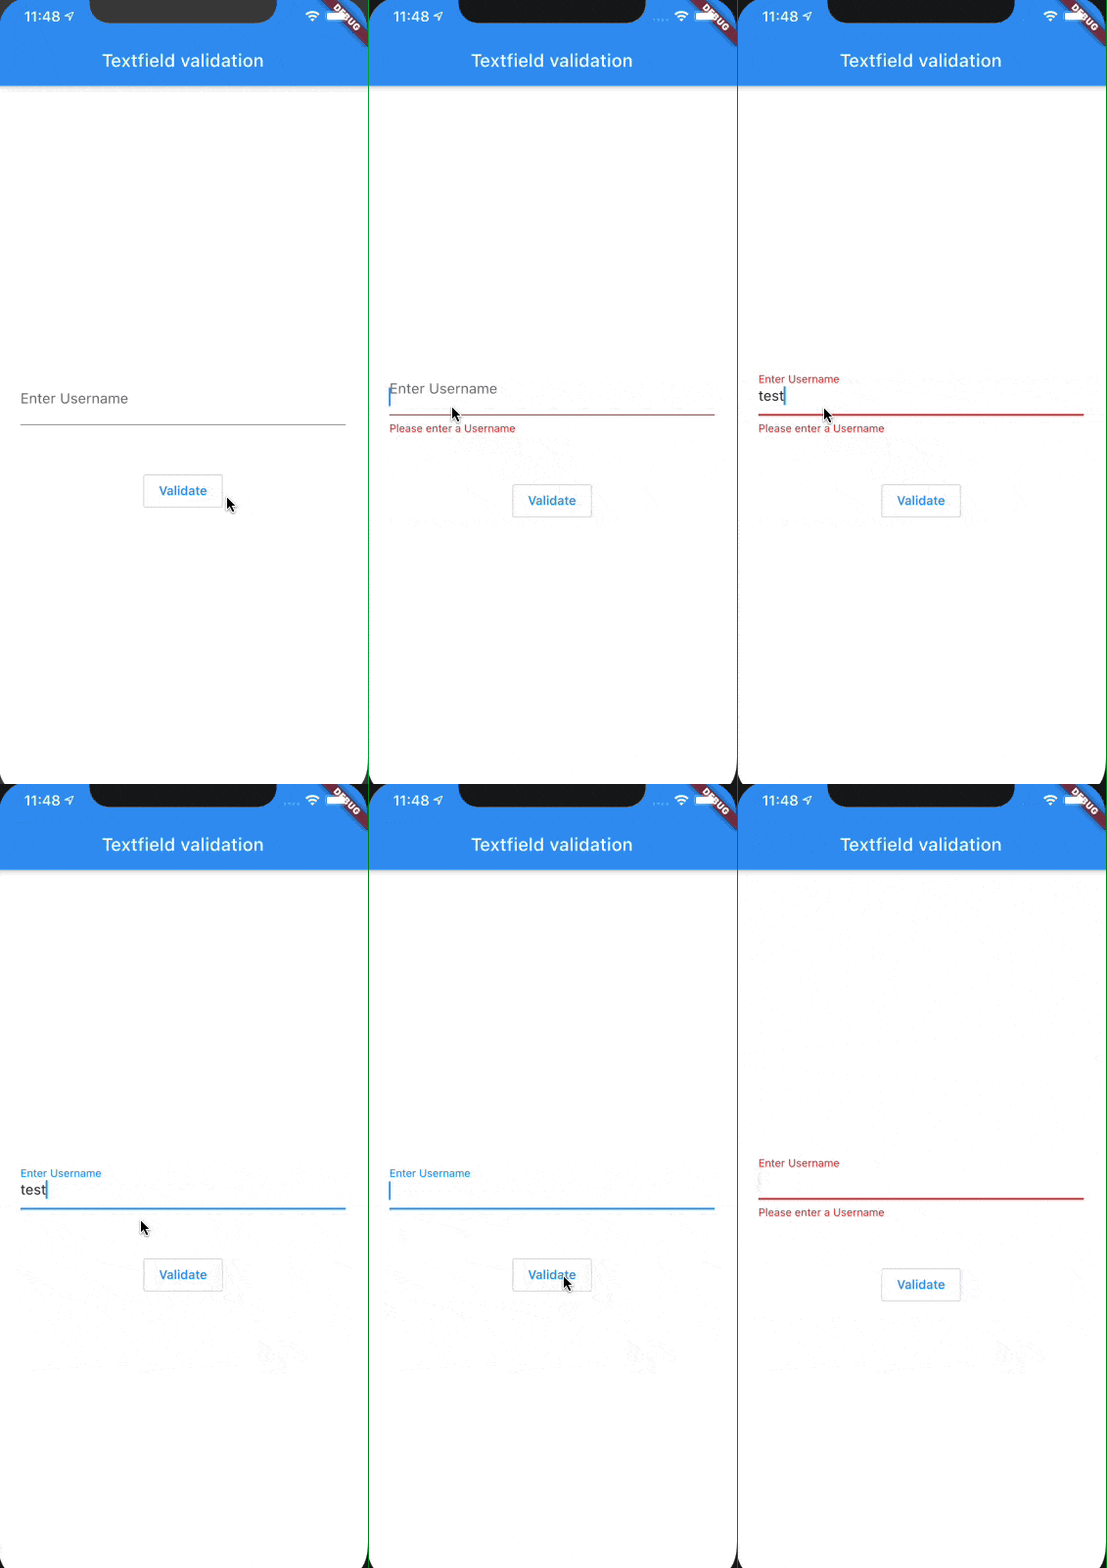
You can do something like this
class _validateTextField extends State<validateTextField> {
  TextEditingController userNameController = TextEditingController();
  bool userNameValidate = false, isUserNameValidate = false;

  @override
  Widget build(BuildContext context) {
    return Scaffold(
      appBar: AppBar(
        title: Text(widget.title),
      ),
      body: Center(
          child: Column(
              mainAxisAlignment: MainAxisAlignment.center,
              children: <Widget>[
                TextField(
                  controller: userNameController,
                  decoration: InputDecoration(
                      labelText: 'Enter Username',
                      errorText: isUserNameValidate ? 'Please enter a Username' : null
                  ),
                ),
                SizedBox(height: 50,),
                OutlinedButton(
                  onPressed: () {
                    validateTextField(userNameController.text);
                  },
                  child: Text('Validate'),
                  style: OutlinedButton.styleFrom(
                    side: BorderSide(
                      width: 2,
                      color: Colors.blue,
                      style: BorderStyle.solid,
                    ),
                  ),
                ),
              ]
          )
      ),
    );
  }
}
Create Function – This function will validate whether the value you entered is validate or not. And call it at the click of a submit or validate button.
bool validateTextField(String userInput) {
  if (userInput.isEmpty) {
    setState(() {
      isUserNameValidate = true;
    });
    return false;
  }
  setState(() {
    isUserNameValidate = false;
  });
  return true;
}
The above code will give us output like the below:
validation in a textfield
- If you use TextFormField then you could easily implement ‘Error below your text fields’.
- You can do this without using _validate or any other flags.
- In this example, I have used the validator method of the TextFormField Widget. This makes the work a lot easier and readable at the same time.
- I also used FormState to make the work easier.
void main() {
  runApp(MyApp());
}

class MyApp extends StatelessWidget {
  final _form = GlobalKey<FormState>(); //for storing form state.

//saving form after validation
void _saveForm() {
    final isValid = _form.currentState!.validate();
    if (!isValid) {
      return;
    }
  }

  @override
  Widget build(BuildContext context) {
    return MaterialApp(
      home: Scaffold(
        body: Form(
          key: _form, //assigning key to form

          child: ListView(
            children: <Widget>[

              TextFormField(
                decoration: InputDecoration(labelText: 'Full Name'),
                validator: (text) {
                  if (text == null || !(text.length > 5) && text.isNotEmpty) {
                    return "Enter valid name of more then 5 characters!";
                  }
                  return null;
                },
              ),

              TextFormField(
                decoration: InputDecoration(labelText: 'Email'),
                validator: (text) {
                  if (text == null || !(text.contains('@')) && text.isNotEmpty) {
                    return "Enter a valid email address!";
                  }
                  return null;
                },
              ),

              ElevatedButton(
                child: Text('Submit'),
                onPressed: () => _saveForm(),
              )
            ],
          ),
        ),
      ),
    );
  }
}
Stay connected for more articles like flutter textfield validation without form, password validation in flutter, flutter form( autovalidate), flutter regex validation, flutter form validation bloc, flutter registration form, flutter form builder, textformfield flutter, etc.
Conclusion:
Thanks for being with us on a Flutter Journey !!! Hope you have learned about How to Do Textfield Validation In Flutter.
Keep Learning !!! Keep Fluttering !!!
So in this article, we have been through How to Do Textfield Validation In Flutter.
Drop us your valuable suggestion/feedback in the comments.
If you are still confused about something in Flutter development!! Do let us know…we would love to assist
Consult Our Developer Now
Contemporary ventures
Recent blog
ready to get started?
Fill out the form below and we will be in touch soon!
"*" indicates required fields


