How to Take a Screenshot of the Current Widget In Flutter ?
Flutter is all about widgets. So in this article, we will go through How to Take a Screenshot of the Current Widget In Flutter.
How to Take a Screenshot of the Current Widget In Flutter?
Code Snippet will look like the below:
import 'package:flutter/material.dart';
import 'dart:async';
import 'dart:typed_data';
import 'dart:ui' as ui;
import 'package:flutter/material.dart';
import 'package:flutter/rendering.dart';
import 'package:flutter/services.dart';
import 'package:path_provider/path_provider.dart';
import 'dart:io';

void main() => runApp(new MyApp());

class MyApp extends StatelessWidget {
  // This widget is the root of your application.
  @override
  Widget build(BuildContext context) {
    return new MaterialApp(
      title: 'Flutter Demo',
      theme: new ThemeData(
        primarySwatch: Colors.blue,
      ),
      home: new MyHomePage(title: 'Flutter Demo Home Page'),
    );
  }
}

class MyHomePage extends StatefulWidget {
  MyHomePage({Key key, this.title}) : super(key: key);
  final String title;

  @override
  _MyHomePageState createState() => new _MyHomePageState();
}

class _MyHomePageState extends State<MyHomePage> {
  static GlobalKey previewContainer = new GlobalKey();
  int _counter = 0;

  void _incrementCounter() {
    setState(() {
      // This call to setState tells the Flutter framework that something has
      // changed in this State, which causes it to rerun the build method below
      // so that the display can reflect the updated values. If we changed
      // _counter without calling setState(), then the build method would not be
      // called again, and so nothing would appear to happen.
      _counter++;
    });
  }

  @override
  Widget build(BuildContext context) {

    return RepaintBoundary(
        key: previewContainer,
      child: new Scaffold(
      appBar: new AppBar(

        title: new Text(widget.title),
      ),
      body: new Center(
        child: new Column(

          mainAxisAlignment: MainAxisAlignment.center,
          children: <Widget>[
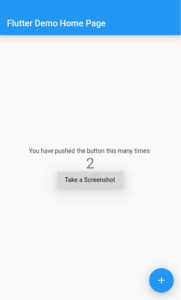
            new Text(
              'You have pushed the button this many times:',
            ),
            new Text(
              '$_counter',
              style: Theme.of(context).textTheme.display1,
            ),
            new RaisedButton(
                onPressed: takeScreenShot,
              child: const Text('Take a Screenshot'),
            ),
          ],
        ),
      ),
      floatingActionButton: new FloatingActionButton(
        onPressed: _incrementCounter,
        tooltip: 'Increment',
        child: new Icon(Icons.add),
      ), // This trailing comma makes auto-formatting nicer for build methods.
    )
    );
  }
  takeScreenShot() async{
    RenderRepaintBoundary boundary = previewContainer.currentContext.findRenderObject();
    ui.Image image = await boundary.toImage();
    final directory = (await getApplicationDocumentsDirectory()).path;
    ByteData byteData = await image.toByteData(format: ui.ImageByteFormat.png);
    Uint8List pngBytes = byteData.buffer.asUint8List();
    print(pngBytes);
    File imgFile =new File('$directory/screenshot.png');
    imgFile.writeAsBytes(pngBytes);
  }
}
Finally, check your application directory You will find screenshot.png !!

let’s say you want to take a screenshot of the FlutterLogo widget. wrap it in a RepaintBoundary with will creates a separate display list for its child. and provide with a key
var scr= new GlobalKey();
RepaintBoundary(
         key: scr,
         child: new FlutterLogo(size: 50.0,))
and then you can get the pngBytes by converting the boundary to an image
takescrshot() async {
  RenderRepaintBoundary boundary = scr.currentContext.findRenderObject();
  var image = await boundary.toImage();
  var byteData = await image.toByteData(format: ImageByteFormat.png);
  var pngBytes = byteData.buffer.asUint8List();
  print(pngBytes);
  }
A Screenshot is a simple plugin to capture widgets as Images. This plugin wraps your widgets inside RenderRepaintBoundary.
Use this package as a library:
- Add this to your package’s pubspec.yaml file:
dependencies:
  screenshot: ^0.2.0
- Now in your Dart code, Import it:
import 'package:screenshot/screenshot.dart';
This handy plugin can be used to capture any widget including full-screen screenshots & individual widgets like Text().
- Create Instance of Screenshot Controller
class _MyHomePageState extends State<MyHomePage> { int _counter = 0; File _imageFile; //Create an instance of ScreenshotController ScreenshotController screenshotController = ScreenshotController(); @override void initState() { // TODO: implement initState super.initState(); } ... } - wrap the widget that you want to capture inside the screenshot widget. Assign the controller to screenshot the Controller that you have created earlier.
Screenshot( controller: screenshotController, child: Text("This text will be captured as image"), ), - Take the screenshot by calling the capture method. This will return a File
screenshotController.capture().then((File image) {
 //Capture Done
 setState(() {
     _imageFile = image;
 });
}).catchError((onError) {
 print(onError);
});
User can also run a command like the below:
flutter screenshot
It will take the screenshot from your connected device and save that to your folder in which you are doing development it will save flutter_01.jpg like that in your folder
Conclusion:
Thanks for being with us on a Flutter Journey !!!
So in this article, we have been through How to Take a Screenshot of the Current Widget In Flutter.
Keep Learning !!! Keep Fluttering !!!
Flutter Agency is our portal Platform dedicated to Flutter Technology and Flutter Developers. The portal is full of cool resources from Flutter like Flutter Widget Guide, Flutter Projects, Code libs and etc.
Flutter Agency is one of the most popular online portals dedicated to Flutter Technology and daily thousands of unique visitors come to this portal to enhance their knowledge of Flutter.
Contemporary ventures
Recent blog
ready to get started?
Fill out the form below and we will be in touch soon!
"*" indicates required fields


