How to Store API Keys in Flutter: dart-define vs .env files
Integrating authorized security plugins with Flutter is the ideal method to improve your security features. Since these solutions are suited to provide the whole solution, you do not need to manage anything on your own to secure your data.
These methods do not guarantee success. We should keep an API key on the server if we can not lose it. Beyond the preview of this essay, secure client-server communication requires several factors.
1. Including the key in a Dart file by hard coding
Our API key may be saved into a dart folder like this for quick and easy access:
// api_key.dart
final tmdbApiKey = 'a1b2c33d4e5f6g7h8i9jakblc';
We may add a .gitignore file in the same directory with the following information to make sure the key is not uploaded to git:
# Hide key from version control
api_key.dart

If we have done this correctly, the file should appear like this in the explorer:
File explorer after adding api_key.dart to .gitignore
And if we need to use the key anywhere, we can import api_key.dart and read it.
Here is an illustration of how to retrieve data from the TMDB API using the dio package:
import 'api_key.dart'; // import it here
import 'package:dio/dio.dart';
Future<TMDBMoviesResponse> fetchMovies() async {
  final url = Uri(
	scheme: 'https',
	host: 'api.themoviedb.org',
	path: '3/movie/now_playing',
	queryParameters: {
  	'api_key': tmdbApiKey, // read it here
  	'include_adult': 'false',
  	'page': '$page',
	},
  ).toString();
  final response = await Dio().get(url);
  return TMDBMoviesResponse.fromJson(response.data);
}
Despite being fairly straightforward, this method has certain limitations:
- It is challenging to handle several API keys for various variants and contexts.
- The api key.dart file contains the key in plaintext, which facilitates the attacker’s task.
In the source code, you should not ever hardcode API keys. However if you gitignore them afterwards, if you accidentally add things to version control, they will still be there in the git history.
Let us examine the second choice now.
Also, Read This Post:
How to Refresh Token Using Interceptor In Dio for Flutter ??
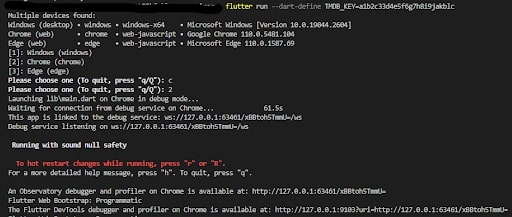
2. By using —dart-define, passing the key
An alternate method is to build the API key and send it with the —dart-define flag.
As a result, we may use the app as follows:
run —dart-define flutter TMDB KEY=a1b2c33d4e5f6g7h8i9jakblc

In the Dart program, we can then:
const tmdbApiKey = String.fromEnvironment('TMDB_KEY');
if (tmdbApiKey.isEmpty) {
  throw AssertionError('TMDB_KEY is not set');
}
// TODO: use api key
The defaultValue parameter of the String.fromEnvironment function is a fallback if the key is not set. It is not a wise option to use defaultValue in this situation since, as we previously stated, we must not hardcode any API key inside of our code (if it is gitignored or not).U
Using —dart-define to compile and launch the application
The most significant benefit of dart-define is that sensitive keys are no longer hardcoded in the source code.
- The keys will nonetheless be included in the final binary when we assemble our application.
- The release binary is created by combining source code and API keys.
- The release binary is created by combining source code and API keys.
When we create a release build, we may obfuscate our Dart code to reduce risk (more on this below).
Additionally, if we have a lot of keys, running the programme becomes impractical:
flutter run \
  --dart-define TMDB_KEY=a1b2c33d4e5f6g7h8i9jakblc \
  --dart-define STRIPE_PUBLISHABLE_KEY=pk_test_aposdjpa309u2n230ibt23908g \
  --dart-define SENTRY_KEY=https://[email protected]/2130923
We can utilize launch configurations to handle this.
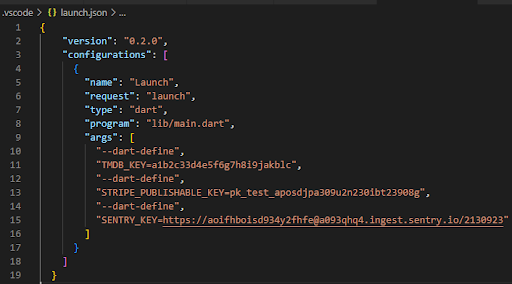
the key being kept within the launch.VSCode and JSON
If we use Visual Studio Code, we can modify the .vscode/launch.json file and add a few args to our launch arrangement:
{
  "version": "0.2.0",
  "configurations": [
	{
  	"name": "Launch",
  	"request": "launch",
  	"type": "dart",
  	"program": "lib/main.dart",
  	"args": [
    	"--dart-define",
    	"TMDB_KEY=a1b2c33d4e5f6g7h8i9jakblc",
    	"--dart-define",
    	"STRIPE_PUBLISHABLE_KEY=pk_test_aposdjpa309u2n230ibt23908g",
    	"--dart-define",
    	"SENTRY_KEY=https://[email protected]/2130923"
  	]
	}
  ]
}

Additionally, if necessary, we may create many launch configurations with various API keys (one for each flavor). Use run/debug configurations in IntelliJ or Android Studio to accomplish the same goal.
But as it happens, this creates a chicken-and-egg issue.
We must add it to.gitignore if we hardcode the API keys in launch.json
We will be able to execute the project once we construct launch.json once more and set the API key if launch.json is gitignored and we perform a fresh checkout of the project (s).
Also, Read This Post:
How to Parse JSON in the Background in Flutter?
3. The key is loaded from the a.env file
A standard file format called.env was created to provide programmers with a safe location to keep track of critical application secrets like API keys.
At the project’s root, we may add an a.env file to utilize this with Flutter:
# example .env file
TMDB_KEY=a1b2c33d4e5f6g7h8i9jakblc
# add more keys here if needed
And since this file contains our API key, we should add it to .gitignore:
# exclude all .env files from source control
*.env
After that, we can visit a pub. dev and locate a Flutter package that facilitates working with.env files.
Enter ENVied
We can create a Dart class using the variables from our.env file thanks to the ENVied package.
Given this.env file, which includes our API key, as an illustration:
# example .env file
TMDB_KEY=a1b2c33d4e5f6g7h8i9jakblc
We can create an env.dart file that looks like this:
import 'package:envied/envied.dart';
part 'env.g.dart';
@Envied(path: '.env')
abstract class Env {
  @EnviedField(varName: 'TMDB_KEY')
  static const tmdbApiKey = _Env.tmdbApiKey;
}
Then, we can run this command:
flutter pub run build_runner build --delete-conflicting-outputs
And this will use build_runner to generate an env.g.dart file that looks like this:
// GENERATED CODE - DO NOT MODIFY BY HAND
part of 'env.dart';

// **************************************************************************
// EnviedGenerator
// **************************************************************************
class _Env {
  static const tmdbApiKey = 'a1b2c33d4e5f6g7h8i9jakblc';
}
As a result, we can import env.dart and access the tmdbApiKey as needed.
And since our precious API key is hardcoded inside env.g.dart, we should add it to .gitignore:
# exclude the API key from version control
env.g.dart
As a result, we should see the following files in the project explorer:
File explorer after adding api_key.dart to .gitignore
File explorer after adding api_key.dart to .gitignore
What About Obfuscation?
So far, we have successfully created a tmdbApiKey persistent from our.env file.
However, it is still kept in plaintext, making it possible for hackers to obtain the key if they try to disassemble our software.
We may use obfuscation to increase the security of our API key.
This is done by adding the obfuscate: true flag in the @EnviedField annotation:
import 'package:envied/envied.dart';
part 'env.g.dart';
@Envied(path: '.env')
abstract class Env {
  @EnviedField(varName: 'TMDB_KEY', obfuscate: true)
  static final tmdbApiKey = _Env.tmdbApiKey;
}
Declare as final any variables marked with the obfuscation flag (not const).
The code generation stage can then be repeated:
flutter pub run build_runner build --delete-conflicting-outputs
The API key has also been obfuscated, as can be seen if we look closely at the produced env.g.dart file:
// GENERATED CODE - DO NOT MODIFY BY HAND
part of 'env.dart';
// **************************************************************************
// EnviedGenerator
// **************************************************************************
class _Env {
  static const List<int> _enviedkeytmdbApiKey = [
	3083777460,
	1730462941,
	// many other lines
  ];
  static const List<int> _envieddatatmdbApiKey = [
	3083777414,
	1730462956,
	// many other lines
  ];
  static final tmdbApiKey = String.fromCharCodes(
	List.generate(_envieddatatmdbApiKey.length, (i) => i, growable: false)
    	.map((i) => _envieddatatmdbApiKey[i] ^ _enviedkeytmdbApiKey[i])
    	.toList(growable: false),
  );
}
Excellent! The API key is, therefore, no longer hardcoded, making it far more difficult for an attacker to obtain if they decompile our software. Go to the Usage section to find out how to utilize the ENVied package with various environments/flavors.
Also, Read This Post:
RawKeyboardListener Widget – Flutter Widget Guide By Flutter Agency
API Keys: Runtime Reading vs Code Generation
Our API keys are more secure (however not 100% fail-proof) against efforts at reverse engineering, thanks to code creation and obfuscation.
The.env file is added to the assets directory, and its contents are accessed at runtime by programmes like flutter dotenv, in contrast. This is quite unsafe because it is simple to extract any asset file by unhooking the release APK, which exposes the configuration settings.
Therefore, avoid using flutter dotenv for your API keys. Should use the ENVied package instead and turn on obfuscation.
Checklist of API Keys Security
To safeguard your API keys if you decide to use.env files with the ENVied package, take the following actions:
- create a .env file to store your API keys in plaintext
- add that .env. file to .gitignore
- install the ENVied package
- create an env.dart file and define the Env class with one field for each API key, using obfuscate: true
- run the code generator
- add the env.g.dart file to .gitignore
- import env.dart and read the API key as needed
Visit my films app on GitHub for a sample that employs this strategy:
Movie App using Provider, Riverpod, flutter bloc, and more: Flutter State Management
Which Choice Should You Make?
We have now looked at three methods for keeping API keys on clients:
- Hard-coding keys inside a .dart file (not recommended)
- Passing keys as command line arguments with –dart-define
- Loading keys from a .env file with the ENVied package
Which Option Should We Select, Then?
The fact that option one and option three call for the API key(s) to be kept in a Dart file makes them equivalent. Because of this, the file cannot be put under source code (as the entire git history may be searched).
Option 3 allows for the obfuscation of the keys during the code creation process, which adds a degree of security.
The standard method for creating custom configuration settings is Option 2. However, if we have a lot of —dart-defines, it may become a bit impractical.
Choose option 3 for most apps, as it is more convenient to put all the variables in a single.env file.
There is one use scenario, nevertheless, where option two is preferred.
Using the native iOS and Android keys to access the keys
The key must be kept in AndroidManifest.xml or AppDelegate.swift for several Flutter plugins, like Google Maps.
If you define the values using —dart-define, you may do this. This article describes the additional configuration procedures for Android and iOS.
How to configure dart-define for keys and credentials in Flutter application development on Android and iOS
Therefore, using —dart-define is the only option to specify the key once before and retrieve it from the Android/iOS side if you employ a plugin like Google Maps.
Observation On Obfuscation
The official documentation outlines how to achieve this, and it is an intelligent option to obfuscate your whole code when you create a remastered edition of your app, regardless of whatever option you select:
Obfuscating Dart code
Furthermore, while keeping API keys here on the client can be risk-mitigated by obfuscation, susceptible keys ought to be retained on the server. Therefore, read the API provider’s documentation carefully and adhere to the suggested best practices.

Conclusion
Relying on applicable native structures is critical for protected storage. The Flutter Application presents one of the most environmentally friendly methods to safely store keys, even if Android and iOS provide the greatest mechanism. Keys might also be stored safely and securely in flutter channels for a prolonged period.
Suppose you want to store an API key in the Flutter development. In that case, you can consult a flutter app developer that will support and maintain your entire application. Thus, it builds an app that runs efficiently and seamlessly.
Frequently Asked Questions (FAQs)
1. What is the safest way to store API keys?
The secure method stores them in the environment variable outside of the app. In this manner, it is not exposed to anyone and is securely passed into an app when required. Thus, it reduces the risk of a malicious party accessing and exploiting the API keys.
2. What is the difference between API and secret keys?
The API key ID is engaged in all requests to examine the client. Whereas only the client and API Gateway know the secret key.
3. How is the API data stored?
An API where the Database where the app can save its data. A database server is running, like MySQL or Postgres, or it can be BaaS DB like firebase—a server, likely VPS, accessible to the internet where your application can run.
Contemporary ventures
Recent blog
ready to get started?
Fill out the form below and we will be in touch soon!
"*" indicates required fields


