PopupMenuButton Widget – Flutter Widget Guide By Flutter Agency
What is PopupMenuButton Widget?
PopupMenuButton Widget is a popup menu with a text and an image. Almost all the medium-scale applications have this feature. PopupMenuButton makes your app clean and creates a great user experience.
The PopupMenuButton Widget is similar to the DropDownButton Widget but has a bit different from it. The PopupMenuButton shows the menu but does not change the current button, you can do more things than the DropDownButton.
The constructor of PopupMenuButton Widget will look like below :
PopupMenuButton({
  Key? key,
  required List<PopupMenuEntry<dynamic>> Function(BuildContext) itemBuilder,
  dynamic initialValue,
  void Function()? onOpened,
  void Function(dynamic)? onSelected,
  void Function()? onCanceled,
  String? tooltip,
  double? elevation,
  Color? shadowColor,
  Color? surfaceTintColor,
  EdgeInsetsGeometry padding = const EdgeInsets.all(8.0),
  Widget? child,
  double? splashRadius,
  Widget? icon,
  double? iconSize,
  Offset offset = Offset.zero,
  bool enabled = true,
  ShapeBorder? shape,
  Color? color,
  Color? iconColor,
  bool? enableFeedback,
  BoxConstraints? constraints,
  PopupMenuPosition? position,
  Clip clipBehavior = Clip.none,
  bool useRootNavigator = false,
  AnimationStyle? popUpAnimationStyle,
})
Let’s understand each parameter in detail.
So our code snippet will look like below :
 PopupMenuButton<CustomPopupMenu>(
            child: Icon(
              Icons.more_vert,
            ),
            elevation: 3.2,
            onCanceled: () {
              print('You have not chossed anything');
            },
            tooltip: 'This is tooltip',
            onSelected: _select,
            itemBuilder: (BuildContext context) {
              return choices.map((CustomPopupMenu choice) {
                return PopupMenuItem<CustomPopupMenu>(
                  value: choice,
                  child: Text(choice.title),
                );
              }).toList();
            },
          )
itemBuilder :
itemBuilder: Building a list of items and them making converting to a list.
final PopupMenuItemBuilder<T> itemBuilder;
Let’s get into the detail about the builder.
typedef PopupMenuItemBuilder<T> = List<PopupMenuEntry<T>> Function(BuildContext context);
It is a function and should return a list with a type of the PopupMenuEntry. It is an abstract class, so we should use its subclasses. The relationship of the extends is below.
PopupMenuEntry
elevation: Elevation is used to give shadow below the menu.
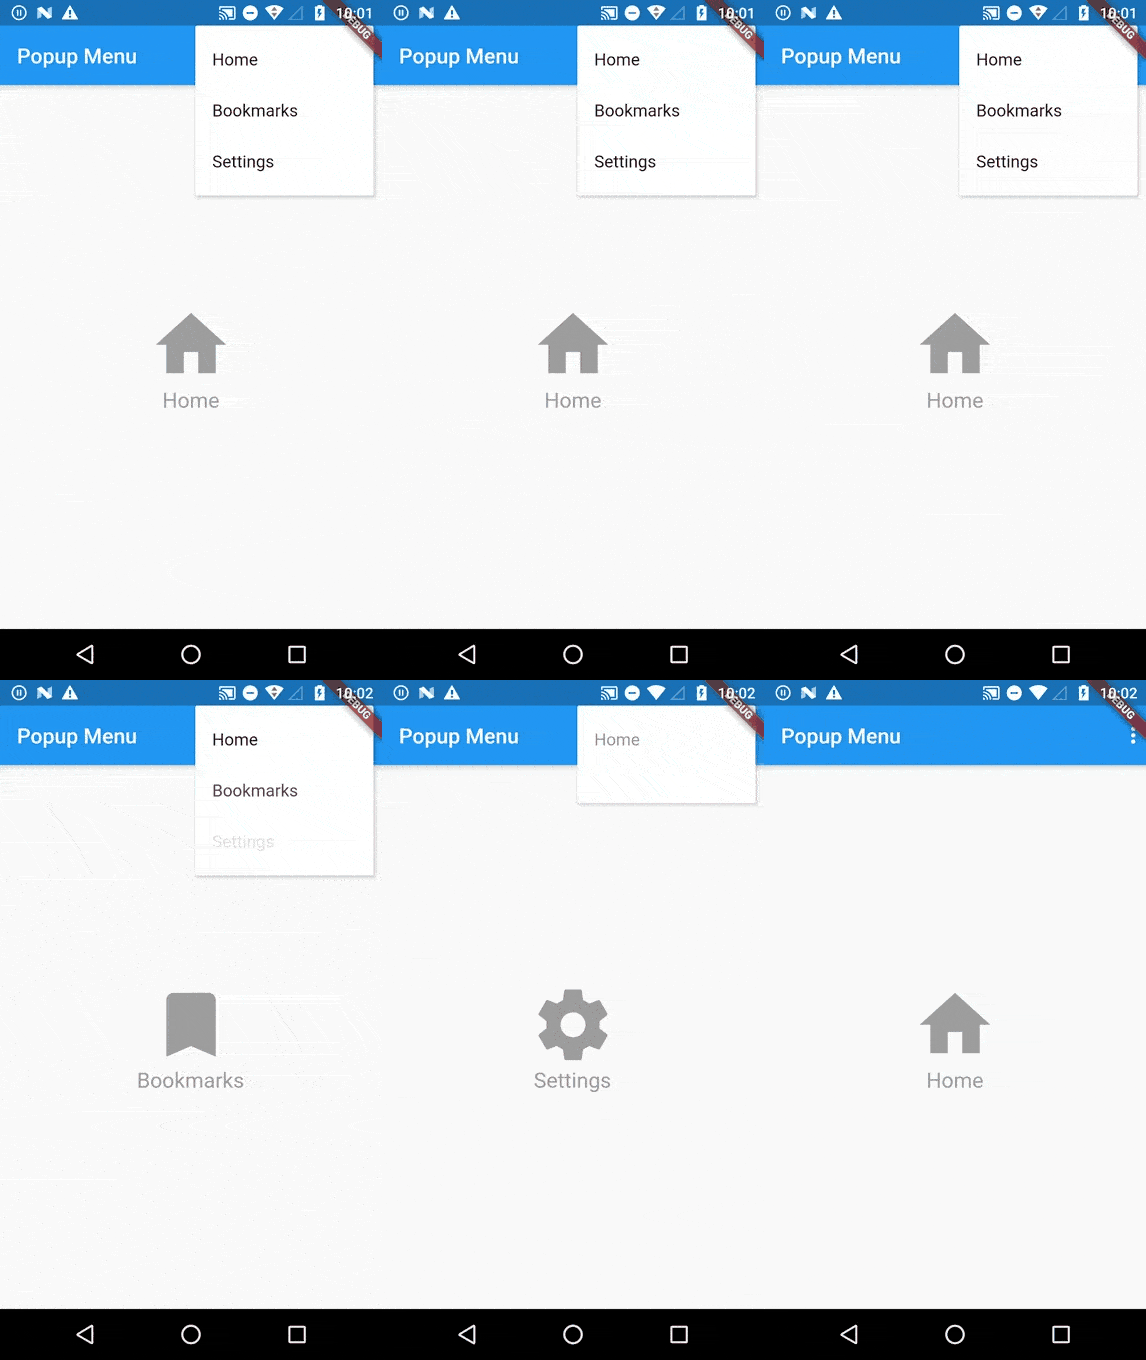
initialValue: This property highlights a value by default. In our case Bookmarks are highlighted.
onCanceled: This function will be called if you don’t select any value from the popup menu button.
tooltip: If you long press the three dots you will able to see a message.
Let’s create CustomPopupMenu class with an icon and string.
CustomPopupMenu _selectedChoice = CustomPopupMenu(
     title: 'Home', icon: Icons.home);
Now we have to build a list with all the options we want to show. You have the freedom to build this list in CustomPopupMenu class or in the main class.
List<CustomPopupMenu> choices = <CustomPopupMenu>[
    CustomPopupMenu(title: 'Home', icon: Icons.home),
    CustomPopupMenu(title: 'Bookmarks', icon: Icons.bookmark),
    CustomPopupMenu(title: 'Settings', icon: Icons.settings),
  ];
To show an image and a text in the middle of the screen. We will create a stateless widget class. The reason to create a Stateless widget class is we are not performing any action on text and image. So it is safe to make it Stateless.
class SelectedOption extends StatelessWidget {
  final CustomPopupMenu choice;

  // Removed the Key parameter as it's not necessary here
  SelectedOption({required this.choice});

  @override
  Widget build(BuildContext context) {
    return Container(
      child: Center(
        child: Column(
          mainAxisAlignment: MainAxisAlignment.center,
          children: <Widget>[
            Icon(
              choice.icon,
              size: 80.0,
              color: Colors.grey,
            ),
            Text(
              choice.title,
              style: TextStyle(
                color: Colors.grey,
                fontSize: 20,
              ),
            )
          ],
        ),
      ),
    );
  }
}
Just putting an object in the center of the screen.
Note: CustomPopupMenu object is passed to the constructor and inilitized.
onSelected this function will be called and update the CustomPopupMenu object with a newly selected object’s value. Code Snippet will look like below :
  void _select(CustomPopupMenu choice) {
    setState(() {
      _selectedChoices = choice;
    });
  }
Complete Source code will look like below :
import 'package:flutter/material.dart';

void main() {
  runApp(MyApp());
}

class MyApp extends StatelessWidget {
  @override
  Widget build(BuildContext context) {
    return MaterialApp(
      home: PopupMenuButtonScreen(),
    );
  }
}

class PopupMenuButtonScreen extends StatefulWidget {
  @override
  _PopupMenuButtonScreenState createState() => _PopupMenuButtonScreenState();
}

// Moved the choices list inside the State class
class _PopupMenuButtonScreenState extends State<PopupMenuButtonScreen> {
  List<CustomPopupMenu> choices = <CustomPopupMenu>[
    CustomPopupMenu(title: 'Home', icon: Icons.home),
    CustomPopupMenu(title: 'Bookmarks', icon: Icons.bookmark),
    CustomPopupMenu(title: 'Settings', icon: Icons.settings),
  ];

  CustomPopupMenu _selectedChoice = CustomPopupMenu(
      title: 'Home', icon: Icons.home); // Initialize with a default value

  void _select(CustomPopupMenu choice) {
    setState(() {
      _selectedChoice = choice;
    });
  }

  @override
  Widget build(BuildContext context) {
    return Scaffold(
      appBar: AppBar(
        title: Text('Popup Menu'),
        actions: <Widget>[
          PopupMenuButton<CustomPopupMenu>(
            child: Icon(Icons.more_vert),
            elevation: 3.2,
            onCanceled: () {
              print('You have not chosen anything');
            },
            tooltip: 'This is tooltip',
            onSelected: _select,
            itemBuilder: (BuildContext context) {
              return choices.map((CustomPopupMenu choice) {
                return PopupMenuItem<CustomPopupMenu>(
                  value: choice,
                  child: Text(choice.title),
                );
              }).toList();
            },
          )
        ],
      ),
      body: bodyWidget(),
    );
  }

  Widget bodyWidget() {
    return Container(
      child: SelectedOption(choice: _selectedChoice),
    );
  }
}

class SelectedOption extends StatelessWidget {
  final CustomPopupMenu choice;

  // Removed the Key parameter as it's not necessary here
  SelectedOption({required this.choice});

  @override
  Widget build(BuildContext context) {
    return Container(
      child: Center(
        child: Column(
          mainAxisAlignment: MainAxisAlignment.center,
          children: <Widget>[
            Icon(
              choice.icon,
              size: 80.0,
              color: Colors.grey,
            ),
            Text(
              choice.title,
              style: TextStyle(
                color: Colors.grey,
                fontSize: 20,
              ),
            )
          ],
        ),
      ),
    );
  }
}

class CustomPopupMenu {
  CustomPopupMenu({
    required this.title,
    required this.icon,
  });
  String title;
  IconData icon;
}
Our output like below :

Thanks for reading it !!!
Keep Fluttering !!!
3 comments
Leave a comment
Contemporary ventures
Recent blog
ready to get started?
Fill out the form below and we will be in touch soon!
"*" indicates required fields


Whn I try and use this I get the error: The argument type ‘PopupMenuItem Function(CustomPopupMenu)’ can’t be assigned to the parameter type ‘dynamic Function(dynamic)’.
This occurs at: return choices.map((CustomPopupMenu choice) { …..
Dear Tim,
Hope this message finds you well !!!
Thanks for reading the article and your response.
If we have got you right you are getting an error on ” The argument type ‘PopupMenuItem Function(CustomPopupMenu)’ can’t be assigned to the parameter type ‘dynamic Function(dynamic) ” RIght ??
Awaiting for your prompt response.
Warm Regards,
Flutter Agency
How do I enter this on my view to make it visible? Is it inside a container? what method should I refer to?