How to Add Date Picker In Flutter App ?
Sometimes users need to show data that requires showing Date Picker in a Mobile Application. To Display, the same kind of data Date Picker is used. Our today’s topic is How to Add Date Picker In Flutter App?
In this blog post, we’ll walk you through the process of integrating a date picker in your Flutter app. We’ll cover everything from setting up the necessary dependencies to implementing the date picker widget and handling user selections. By the end of this guide, you’ll have the knowledge and tools to create an intuitive and interactive date picker that enhances the functionality of your Flutter app.
How to Add Date Picker In Flutter App?
Flutter provides showDatePicker function to achieve this. It is part of the flutter material library. You can find complete documentation at showDatePicker.
Consider a code snippet as below:
import 'package:flutter/material.dart';
import 'package:intl/intl.dart'; //this is an external package for formatting date and time

class DatePicker extends StatefulWidget {
  @override
  _DatePickerState createState() => _DatePickerState();
}

class _DatePickerState extends State<DatePicker> {
  DateTime _selectedDate;

  //Method for showing the date picker
  void _pickDateDialog() {
    showDatePicker(
            context: context,
            initialDate: DateTime.now(),
            //which date will display when user open the picker
            firstDate: DateTime(1950),
            //what will be the previous supported year in picker
            lastDate: DateTime
                .now()) //what will be the up to supported date in picker
        .then((pickedDate) {
      //then usually do the future job
      if (pickedDate == null) {
        //if user tap cancel then this function will stop
        return;
      }
      setState(() {
        //for rebuilding the ui
        _selectedDate = pickedDate;
      });
    });
  }

  @override
  Widget build(BuildContext context) {
    return Column(
      children: <Widget>[
        RaisedButton(child: Text('Add Date'), onPressed: _pickDateDialog),
        SizedBox(height: 20),
        Text(_selectedDate == null //ternary expression to check if date is null
            ? 'No date chosen!'
            : 'Picked Date: ${DateFormat.yMMMd().format(_selectedDate)}'),
      ],
    );
  }
}
This is a very good way too:
import 'package:flutter/material.dart';
  import 'dart:async';

  void main() => runApp(new MyApp());

  class MyApp extends StatelessWidget {
    // This widget is the root of your application.
    @override
    Widget build(BuildContext context) {
      return new MaterialApp(
        title: 'Flutter Demo',
        theme: new ThemeData(
          primarySwatch: Colors.blue,
        ),
        home: new MyHomePage(title: 'Flutter Date Picker Example'),
      );
    }
  }

  class MyHomePage extends StatefulWidget {
    MyHomePage({Key key, this.title}) : super(key: key);
    final String title;
    @override
    _MyHomePageState createState() => new _MyHomePageState();
  }

  class _MyHomePageState extends State<MyHomePage> {
    var finaldate;

    void callDatePicker() async {
      var order = await getDate();
      setState(() {
        finaldate = order;
      });
    }

    Future<DateTime> getDate() {
      // Imagine that this function is
      // more complex and slow.
      return showDatePicker(
        context: context,
        initialDate: DateTime.now(),
        firstDate: DateTime(2018),
        lastDate: DateTime(2030),
        builder: (BuildContext context, Widget child) {
          return Theme(
            data: ThemeData.light(),
            child: child,
          );
        },
      );
    }

    @override
    Widget build(BuildContext context) {
      return new Scaffold(
        appBar: new AppBar(
          title: new Text(widget.title),
The simple way is to use CupertinoDatePicker class:
First import its package which building in a flutter:
import 'package:flutter/cupertino.dart';
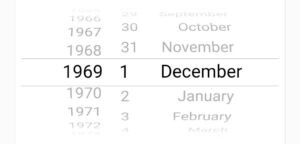
Then just add this widget in your form:
Container(
             height: 200,
             child: CupertinoDatePicker(
               mode: CupertinoDatePickerMode.date,
               initialDateTime: DateTime(1969, 1, 1),
               onDateTimeChanged: (DateTime newDateTime) {
                 // Do something
               },
             ),
           ),
The result will be as this image:

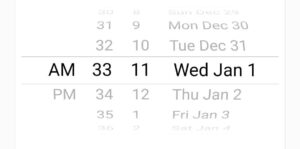
Also, you can change the mode to (date and time, time)… for example this for date and time mode:
Container(
             height: 200,
             child: CupertinoDatePicker(
               mode: CupertinoDatePickerMode.dateAndTime,
               initialDateTime: DateTime(1969, 1, 1, 11, 33),
               onDateTimeChanged: (DateTime newDateTime) {
                 //Do Some thing
               },
               use24hFormat: false,
               minuteInterval: 1,
             ),
           ),
We will get output like below:

Conclusion:
In this article, We have been through How to Add Date Picker In Flutter App?
Keep Learning !!!
Keep Fluttering.
FlutterAgency.com is our portal Platform dedicated to Flutter Technology and Flutter Developers. The portal is full of cool resources from Flutter like Flutter Widget Guide, Flutter Projects, Code libs and etc.
FlutterAgency.com is one of the most popular online portal dedicated to Flutter Technology and daily thousands of unique visitors come to this portal to enhance their knowledge on Flutter.
Contemporary ventures
Recent blog
ready to get started?
Fill out the form below and we will be in touch soon!
"*" indicates required fields


