Flutter Tutorial: How to Apply “Frosted Glass” Effect?
Flutter provides an inbuilt set of widgets to apply different effects to mobile applications so in this article We will go through How to Apply “Frosted Glass” Effect In Flutter?
How to Apply the “Frosted Glass” Effect In Flutter?
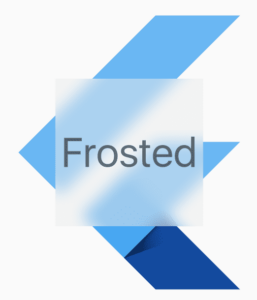
In order to apply the “Frosted Glass” Effect In flutter we need to follow the code snippet like below:
import 'dart:ui';
import 'package:flutter/material.dart';

void main() {
  runApp(new MaterialApp(home: new FrostedDemo()));
}

class FrostedDemo extends StatelessWidget {
  @override
  Widget build(BuildContext context) {
    return new Scaffold(
      body: new Stack(
        children: <Widget>[
          new ConstrainedBox(
            constraints: const BoxConstraints.expand(),
            child: new FlutterLogo()
          ),
          new Center(
            child: new ClipRect(
              child: new BackdropFilter(
                filter: new ImageFilter.blur(sigmaX: 10.0, sigmaY: 10.0),
                child: new Container(
                  width: 200.0,
                  height: 200.0,
                  decoration: new BoxDecoration(
                    color: Colors.grey.shade200.withOpacity(0.5)
                  ),
                  child: new Center(
                    child: new Text(
                      'Frosted',
                      style: Theme.of(context).textTheme.display3
                    ),
                  ),
                ),
              ),
            ),
          ),
        ],
      ),
    );
  }
}
This will give us output like the below:

You can use the BackdropFilter Widget to achieve this effect. You can also consider a code snippet like the below:
import 'package:flutter/material.dart';
import 'dart:ui' as ui;

void main() => runApp(
    MaterialApp(
        title: "Frosted glass",
        home: new HomePage()
    )
);

class HomePage extends StatelessWidget {
  @override
  Widget build(BuildContext context) {
    return new Scaffold(
      body: new Stack(
        fit: StackFit.expand,
        children: <Widget>[
          generateBluredImage(),
          new Column(
            mainAxisAlignment: MainAxisAlignment.center,
            children: <Widget>[
              rectShapeContainer(),
            ],
          ),
        ],
      ),
    );
  }

  Widget generateBluredImage() {
    return new Container(
      decoration: new BoxDecoration(
        image: new DecorationImage(
          image: new AssetImage('assets/images/huxley-lsd.png'),
          fit: BoxFit.cover,
        ),
      ),
      //I blured the parent container to blur background image, you can get rid of this part
      child: new BackdropFilter(
        filter: new ui.ImageFilter.blur(sigmaX: 3.0, sigmaY: 3.0),
        child: new Container(
          //you can change opacity with color here(I used black) for background.
          decoration: new BoxDecoration(color: Colors.black.withOpacity(0.2)),
        ),
      ),
    );
  }

  Widget rectShapeContainer() {
    return Container(
      margin: const EdgeInsets.symmetric(horizontal: 40.0, vertical: 10.0),
      padding: const EdgeInsets.all(15.0),
      decoration: new BoxDecoration(
        //you can get rid of below line also
        borderRadius: new BorderRadius.circular(10.0),
        //below line is for rectangular shape
        shape: BoxShape.rectangle,
        //you can change opacity with color here(I used black) for rect
        color: Colors.black.withOpacity(0.5),
        //I added some shadow, but you can remove boxShadow also.
        boxShadow: <BoxShadow>[
          new BoxShadow(
            color: Colors.black26,
            blurRadius: 5.0,
            offset: new Offset(5.0, 5.0),
          ),
        ],
      ),
      child: new Column(
        children: <Widget>[
          new Text(
            'There\'s only one corner of the universe you can be certain of improving and that\'s your own self.',
            style: new TextStyle(
              color: Colors.white,
              fontSize: 20.0,
            ),
          ),
        ],
      ),
    );
  }
}
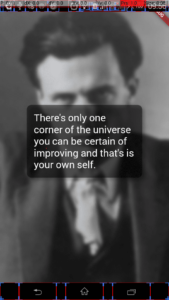
You can also our other articles based on AbsorbPointer Widget in Flutter.
We will get output like the below:

If you are willing to use BackdropFilter Widget then code Snippet will look like the below:
BackdropFilter(
  filter: ImageFilter.blur(sigmaX: _sigmaX, sigmaY: _sigmaY),
  child: Container(
    color: Colors.black.withOpacity(_opacity),
  ),
),
Conclusion:
Thanks for walking with us on a Flutter Journey !!!
In this article, we have been through How to Apply “Frosted Glass” Effect In Flutter?
Keep Learning !!! Keep Fluttering !!!
FlutterAgency.com is our portal Platform dedicated to Flutter Technology and Flutter Developers. The portal is full of cool resources from Flutter like Flutter Widget Guide, Flutter Projects, Code libs and etc.
Contemporary ventures
Recent blog
ready to get started?
Fill out the form below and we will be in touch soon!
"*" indicates required fields


