Support For Autofill With Flutter 1.20 Release
Flutter is Google’s mobile UI framework for crafting high-quality native interfaces on iOS and Android in record time. Flutter works with existing code, is used by developers and organizations around the world, and is free and open source.
Flutter is fast, beautiful, productive, and open for every platform we support. In Flutter 1.20, which is released on 5 August 2020 to our stable channel, Flutter has improvements for every one of these four pillars.
To Make Flutter faster we have got multiple performance improvements, from the lowest levels of the rendering engine and in the Dart language itself.
To enable you to build Flutter apps that are ever more beautiful, 1.20 release has several UI enhancements, including the long-awaited features like listed below:
- Support for autofill,
- A new way to layer your widgets to support pan and zoom
- New mouse cursor support,
- Updates to old favorite Material widgets such as the time and date pickers
- A whole new responsive license page for the About box in your desktop and mobile form-factor Flutter apps.
We will discuss everything in detail with separate articles on each So Let’s get started with Support for autofill.
- Support For Autofill
One of the most demanding Flutter features to support the underlying Android and iOS support for text autofill in Flutter programs. Now users have to no more ask your users to re-enter data that the OS has already gathered for them using Autofill With Flutter.
Example
- Create a TextFieldWidget Using below Code Snippet.
import 'package:flutter/material.dart';
import 'package:flutter/services.dart';

class PlainTextFieldWidget extends StatelessWidget {
  final TextEditingController myController;
  final List<TextInputFormatter> inputFormatterList;
  final FocusNode myFocusNode;
  final TextInputType inputType;
  final TextInputAction inputAction;
  final EdgeInsetsGeometry myMargin;
  final Function(String) onChanged;
  final Function(String) onSubmited;
  final VoidCallback textFocus;
  final String Function(String) validator;
  final bool autoValidate;
  final bool isAlignLeft;
  final String myHint;
  final String currencyImg;
  final bool myAutoFocus;
  final int myMaxLength;
  final TextCapitalization textCapitalization;

  PlainTextFieldWidget({
    Key key,
    this.myController,
    this.inputFormatterList,
    this.myFocusNode,
    this.currencyImg,
    this.isAlignLeft = true,
    this.myMargin = const EdgeInsets.all(0),
    this.inputType = TextInputType.text,
    this.inputAction = TextInputAction.done,
    this.textFocus,
    this.onChanged,
    this.onSubmited,
    this.validator,
    this.myHint,
    this.myAutoFocus = false,
    this.autoValidate = false,
    this.myMaxLength,
    this.textCapitalization = TextCapitalization.none,
  }) : super(key: key);

  @override
  Widget build(BuildContext context) {
    return TextFormField(
      maxLength: myMaxLength,
      autofocus: myAutoFocus,
      textAlign: TextAlign.start,
      autovalidate: this.autoValidate,
      validator: this.validator,
      style: Theme.of(context).textTheme.caption.copyWith(
            fontWeight: FontWeight.w600,
            fontSize: 16,
            color: Colors.black,
          ),
      controller: myController,
      focusNode: myFocusNode,
      keyboardType: inputType,
      textInputAction: inputAction,
      onEditingComplete: textFocus,
      decoration: InputDecoration(
        contentPadding: EdgeInsets.all(15.0),
        hintStyle: Theme.of(context).textTheme.caption.copyWith(
              fontWeight: FontWeight.w600,
              fontSize: 16,
              color: Colors.black,
            ),
        errorStyle: Theme.of(context).textTheme.caption.copyWith(
              color: Colors.red,
              fontWeight: FontWeight.w700,
            ),
        disabledBorder: OutlineInputBorder(
          borderRadius: BorderRadius.circular(28.0),
          borderSide: BorderSide(
            color: Colors.blue,
          ),
        ),
        enabledBorder: OutlineInputBorder(
          borderRadius: BorderRadius.circular(28.0),
          borderSide: BorderSide(
            color: Colors.blue,
          ),
        ),
        focusedErrorBorder: OutlineInputBorder(
          borderRadius: BorderRadius.circular(28.0),
          borderSide: BorderSide(
            color: Colors.blue,
          ),
        ),
        errorBorder: OutlineInputBorder(
          borderRadius: BorderRadius.circular(28.0),
          borderSide: BorderSide(
            color: Colors.blue,
          ),
        ),
        hintText: myHint,
        focusedBorder: OutlineInputBorder(
          borderRadius: BorderRadius.circular(28.0),
          borderSide: BorderSide(
            color: Colors.blue,
          ),
        ),
        focusColor: Colors.green,
        counterText: '',
      ),
      onChanged: (str) {
        onChanged(str);
      },
      onSaved: (str) {
        onSubmited(str);
      },
      inputFormatters: inputFormatterList,
      textCapitalization: textCapitalization,
    );
  }
}
Now create a simple form using below code Snippet.
import 'package:flutter/material.dart';
import 'package:flutteragencydemo/plain_textfield_widget.dart';

class AutoFillSupportWidget extends StatefulWidget {
  @override
  _AutoFillSupportWidgetState createState() => _AutoFillSupportWidgetState();
}

class _AutoFillSupportWidgetState extends State<AutoFillSupportWidget> {
  bool _autoValidate = false;
  TextEditingController _fullNameController;
  TextEditingController _lastNameController;
  TextEditingController _emailController;

  String fullName;
  String lastName;
  String email;
  @override
  Widget build(BuildContext context) {
    return Padding(
      padding: const EdgeInsets.only(
        left: 15,
        right: 15,
        top: 15,
      ),
      child: Column(
        mainAxisAlignment: MainAxisAlignment.start,
        crossAxisAlignment: CrossAxisAlignment.start,
        children: [
          Text(
            "Enter Name",
            style: Theme.of(context).textTheme.caption.copyWith(
                  fontSize: 16,
                  fontWeight: FontWeight.w600,
                ),
          ),
          SizedBox(
            height: 5,
          ),
          PlainTextFieldWidget(
            autoValidate: _autoValidate,
            myController: _fullNameController,
            inputType: TextInputType.text,
            onChanged: (String value) {
              fullName = value;
            },
            textCapitalization: TextCapitalization.words,
          ),
          SizedBox(
            height: 5,
          ),
          Text(
            "Enter LastName",
            style: Theme.of(context).textTheme.caption.copyWith(
                  fontSize: 16,
                  fontWeight: FontWeight.w600,
                ),
          ),
          SizedBox(
            height: 5,
          ),
          PlainTextFieldWidget(
            autoValidate: _autoValidate,
            myController: _lastNameController,
            inputType: TextInputType.text,
            onChanged: (String value) {
              lastName = value;
            },
            textCapitalization: TextCapitalization.words,
          ),
          SizedBox(
            height: 5,
          ),
          Text(
            "Enter Email",
            style: Theme.of(context).textTheme.caption.copyWith(
                  fontSize: 16,
                  fontWeight: FontWeight.w600,
                ),
          ),
          SizedBox(
            height: 5,
          ),
          PlainTextFieldWidget(
            autoValidate: _autoValidate,
            myController: _emailController,
            inputType: TextInputType.text,
            onChanged: (String value) {
              email = value;
            },
            textCapitalization: TextCapitalization.words,
          ),
          SizedBox(
            height: 5,
          ),
        ],
      ),
    );
  }
}
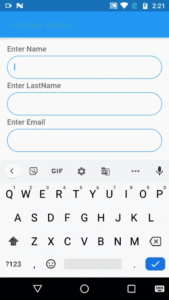
We will get output like below:
Autofill Support For Flutter 1.20
In the Above image, once the user enters details into the form and when the user comes out of the application and when the user next time tap on application Users will get data as it has been entered by him earlier.
Now in the next article, we will learn about Jank Improvements in Flutter 1.20 Release.
Thanks for being with us.
Do let us know your valuable suggestion/feedback to serve you better.
Contemporary ventures
Recent blog
ready to get started?
Fill out the form below and we will be in touch soon!
"*" indicates required fields


