How to Add Space Between Widgets in Flutter?
There are many options available in flutter which you can use to provide space and make UI attractive. So, in this article, we will see how to Add Space Between Widgets in Flutter.
How to Add Space Between Widgets in Flutter?
If you use Row and Column for arranging widgets, then by default limited options are available for alignment. There are many options available for the spacing of widgets like Padding, Spacer, Fractionally, SizedBox, Expanded, Flexible, etc. Here, we’ll learn about SizedBox, as it is easier to implement, provides more flexibility in alignment, and is also easier to understand.
A SizedBox is basically an empty box if no constraints are provided. By default, it can become as big as its parent widget allows, but you can set its height and width according to your needs.
Constructors:
const SizedBox({
  Key key,
  double width,
  double height,
  Widget child
})
Below is the description of the above-mentioned constraints:-
- Key key: This argument is of type key. A key is basically an identifier for widgets. A unique key can be provided to widgets to identify them.
- double width: This argument is of type double. You can provide double value as width to be applied to the child.
- double height: This argument is also of type double. The height that is to be applied to a child, is passed here as a double value.
- Widget child: The widget which is below this widget in the tree is passed here as a child and the above-mentioned constraints are automatically applied to it.
It is not compulsory to provide a child widget to SizedBox. For instance, if you are having two Card widgets and you want to give space between them, then you can use SizedBox. You can add SizedBox between those cards and pass the required height and width values.
Note: If you don’t provide a child widget to SizedBox and height and width are also null, then SizedBox would try to be as big as its parent widget allows. On the other hand, if the child widget is provided but height and width are null, then SizedBox would try to match it’s child’s size.
Example: With SizedBox
import 'package:flutter/material.dart';

void main() => runApp(MyApp());

class MyApp extends StatelessWidget {
  @override
  Widget build(BuildContext context) {
    return MaterialApp(
    home: Scaffold(
      appBar: AppBar(
      title: const Text('Flutter Agency'),
      backgroundColor: Colors.green,
    ),
    body: Center(
      child: Column(
      children: const [
      SizedBox(
      height: 20,
    ),
    Card(
      elevation: 10,
      child: Padding(
        padding: EdgeInsets.all(25),
        child: Text('Child widget 1',
        style: TextStyle(color: Colors.green),
        ),
      ),
    ),
    SizedBox( //Use of SizedBox
    height: 30,
    ),

    Card(
    elevation: 10,
      child: Padding(
      padding: EdgeInsets.all(25),
       child: Text('Child widget 2',
         style: TextStyle(color: Colors.green),
         ),
        ),
       ),
      ],
     ),
    ),
   ),
  );
 }
}
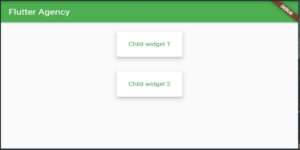
OUTPUT:

Here, in the above example, we have made two cards. By, default we can’t add custom space between them. So, in order to add the required amount of space, we’ve used SizedBox with custom height, which is required.
Conclusion:
Thanks for being with us on a Flutter Journey!
So, in this article, we have seen how to Add Space Between Widgets in Flutter. Also, feel free to comment and provide any other suggestions regarding Flutter tips & tricks.
Flutter Agency is our portal Platform dedicated to Flutter Technology and Flutter Developers. The portal is full of cool resources from Flutter like Flutter Widget Guide, Flutter Projects, Code libs and etc.
Flutter Agency is one of the most popular online portals dedicated to Flutter Technology. Daily thousands of unique visitors come to this portal to enhance their knowledge of Flutter.
Contemporary ventures
Recent blog
ready to get started?
Fill out the form below and we will be in touch soon!
"*" indicates required fields


