


How to Update Model From View Flutter?
In our previous article we have covered the concept of Model Viewer and its importance in Flutter application development. Do you want to explore the best practises of updating models from View Flutter? If yes, then stay with this blog to grab the complete details. In general, Flutter is the independent technology in Google’s platform to create mobile and web applications to the next level. In order to get the high end mobile and web applications, you can contact the professional app developers from Flutter Agency.
Why does Flutter need Model View ViewModel?
It is already known that Flutter usually doesn’t support any kind of architecture for development. During that time, developers have the full responsibility to implement the process.
In order to follow the best practises of the update model from view flutter, architecture is required to communicate between business logic and user interface. Therefore Model View ViewModel (MVVM) is the easy ways to hold the business logic around the user interface and ViewModel class separately.
- Model ClassA which has a List of ClassB. ClassB contains some String properties.
- A StatefulWidget view that has a ClassA instance with a PageView builder based on the List of ClassB.
- Every page inside the PageView shows some String properties of ClassB in a TextField.
Example of update model from view Flutter:
Widget createTextField(Class classB) {
returnEditableText(
onSubmitted: (value) {
setState(() {
classB.myStringValue = value;
});
}
);
}
PageView.builder(
itemBuilder: (BuildContext context, int index) {
varclassB = widget.classA.myList[index];
returncreateTextField(classB);
},
}
)
You should wrap the code that changes the value of a property inside
setState((){
// Put your codes here.
});
Benefits of update model from view Flutter:
- Here the view is completely independent from ViewModel class and then only reading state from ViewModel takes place.
- The business logic is not similar from the user interface.
- Writing the test cases for handling the project is very much simple
- The codes will be regularly updated and very easy to maintain based on user interface and logic.
Impact of Model View ViewModel:
- Model
Model layer is mainly responsible to fetch the data from the local DB or server and then transfer it to the ViewModel. The Flutter Agency will define the network, repository and local DB in this layer for communicating with DB, API and much more.
- ViewModel
ViewModel can be effectively useful in transferring the data between the view and model to the next level. This mainly accepts all request and user events to model for the data response.
When the model is having the data, then it will return to the ViewModel. After that, the ViewModel will notify such data to view very effectively. The ViewModel can be used by multiple views and this means that a single ViewModel can offer data from more than one view.
- View
Views can be effectively useful when the users are interacting with widgets. The user event will usually request a certain amount of data from the ViewModel. Then the rest of the ViewModel is able to process the event based on the request to model. When the ViewModel gets data from the model as requested then it will mainly reflect on the user view.
Process of Model View Update (MVU):
The Model View Update (MVU) is the most straightforward and simple architecture. It has the potential to fit with flutter in a most ultimate manner. Here you will have the model. Send that model to the view to make the render possible. View calls mainly update the methods that can update such models back to the update model.
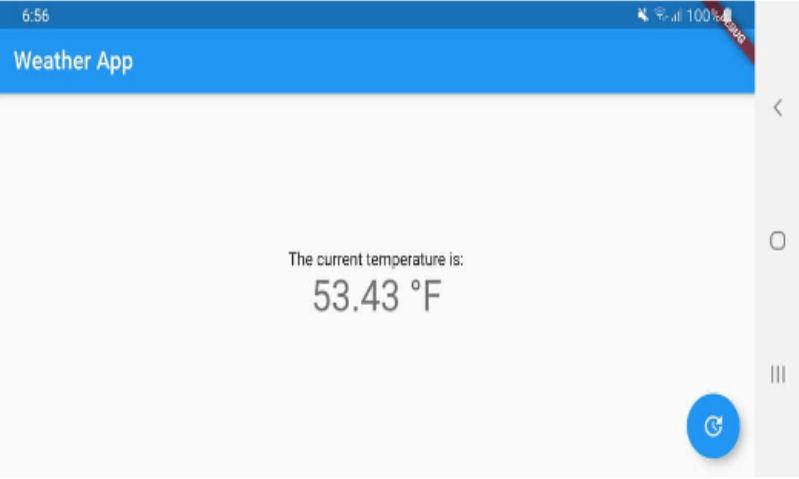
Simple Weather App:
In order to highlight this approach (update model from view Flutter), a simple weather app is the perfect example.
main.dart
Generally, the main.dart file consists of the standard setup of this app and here you can reference the regular page. This is known as ForecastPage.
import 'package:flutter/material.dart';
import 'ui/forecast.dart';

void main() => runApp(const MyApp());

class MyApp extends StatelessWidget {
const MyApp({Key? key}) : super(key: key);

// This widget is the root of your application.
@override
Widget build(BuildContext context) {
return MaterialApp(
title: 'Weather App',
theme: ThemeData(
primarySwatch: Colors.blue,
),
home: const ForecastPage(title: 'Weather App'),
);
}
}
forecast.dart
The ForecastPage is separated in another file just for the simple usage. This is known as the StatefulWidget.
import 'package:flutter/material.dart';
import '../io/darksky.dart' as darksky;

class ForecastPage extends StatefulWidget {
const ForecastPage({Key? key, required this.title}) : super(key: key);

final String title;

@override
_ForecastPageState createState() => _ForecastPageState();
}
Here the state for this page is completely out of the box. The major difference here is that the user interface building can be separated out to another function. ForecastPageState and it mainly holds the state and logic.
class _ForecastPageState extends State {
ForecastModel model = const ForecastModel(0, false);

void updateModel(Function update) => setState(() {
model = update();
});

void _updateTemperature(Future getForecast(), Function update) async {
update(() => const ForecastModel(0, true));

var forecast = await getForecast();

update(() => ForecastModel(forecast, false));
}

@override
Widget build(BuildContext context) {
return ForecastPageUI.buildUI(
context,
widget.title,
() => _updateTemperature(
darksky.getForecast, (func) => updateModel(func)),
model);
}
}
The buildUI is able to create a widget and needs some major information to pass through various parameters. It is the best functional way to build widgets to the next level.
Here you find the best ways to separate the logic and user interface. This can be beneficial for those who belong to the XAML or HTML based frameworks.
class ForecastPageUI {
static buildUI(BuildContext context, String title, Function update,
ForecastModel model) {
return Scaffold(
appBar: AppBar(
title: Text(title),
),
body: Center(
child: Column(
mainAxisAlignment: MainAxisAlignment.center,
children: model.loading
? ([const CircularProgressIndicator()])
: ([
const Text(
'The current temperature is:',
),
Text(
'${model.temperature} °F',
//style: Theme.of(context).textTheme.display1,
),
]),
),
),
floatingActionButton: FloatingActionButton(
onPressed: () => update,
tooltip: 'Update',
child: const Icon(Icons.update),
),
);
}
}
DarkSky Weather API:
By adding the http package in pubspec.yaml, you can call the API to the DarkSky weather API.
dependencies:
http: "^0.12.0"
flutter:
sdk: flutter
darksky.dart
Here the simple file consists of the function to get the details about the current forecast very effectively.
import 'package:http/http.dart' as http;
import 'dart:convert';

typedef Future GetHttp(dynamic url, {Map<String, String> headers});
GetHttp get getHttp => http.get;

typedef dynamic JsonDecode(String source);
JsonDecode get jsonDecode => json.decode;

const String url = "https://api.darksky.net/forecast//37.8267,-122.4233";

Future _getForecast(GetHttp getHttp, JsonDecode jsonDecode,
String url) async {

var response = await getHttp(url);

var decode = jsonDecode(response.body);

return decode["currently"]["temperature"];
}

Future getForecast() => _getForecast(getHttp, jsonDecode, url);
Output:
Conclusion:
Hope this blog is helpful to know the best practices to update models from View Flutter. The Flutter Agency provides the best practices of updating models from view Flutter and keeps everything simple. Moreover, they combine functional programming with their expertise to make the application works properly.

Contemporary ventures
Recent blog


Join our newsletter
Read and share new topics about all things Tech.
ready to get started?
Fill out the form below and we will be in touch soon!
"*" indicates required fields