


How to style a Container in Flutter?
The container in Flutter is a parent widget that can contain multiple child widgets. So, in this article, we will see how to style a Container in Flutter.
How to style a Container in Flutter?
Dynamic styling is very popular among developers. Also, you can change the look of the app at run-time. So, we will see how you can style the container in different ways according to your need. First of all, you have to write the following code for your project. Your code for the structure of the app will go like this:-
import 'package:flutter/material.dart';

void main(){
  runApp(MyApp());
}

class MyApp extends StatelessWidget {
  @override
  Widget build(BuildContext context) {
    return MaterialApp(
      home: HomePage(),
    );
  }
}

class HomePage extends StatelessWidget {
  @override
  Widget build(BuildContext context) {
    return Scaffold(
      body: Container(),
    );
  }
}
So, we created a stateless widget called HomePage in the home property of the Material App. So there will not be anything on your screen when you run the app. This is because a container itself is an empty body until some constraints are provided. Constraints mean giving some height or width to our container. Also, we need to assign some color to it so that it can be reflected in the app.
class HomePage extends StatelessWidget {
  @override
  Widget build(BuildContext context) {
    return Scaffold(
      body: Center(
      child: Container(
        height: 200.0,
        width: 200.0,
        color: Colors.blueAccent
      )
      )
    );
  }
}
Using decoration property of Container:
Decoration property takes an argument of type BoxDecoration. Now you can see that you can apply multiple properties to the container.
1. Border: Assign some borders to your container using Border.all constructor. Also provide it some width, color, and style properties.
2. Border Radius: This is used when we have to structure our container other than a default rectangular one. We can provide some radius to our container so that it can have a rounded border. You can use this property many times to provide some uniqueness to our UI.
3. Image: As the name suggests if we want to add some images to our container we can use it with the Decoration Image constructor. You can add images in 2 ways. One by adding into our assets and another by fetching from the internet.
4. Box Shadow: To provide some shadow to our container this can be used. Actually, it accepts a list of objects of type Box Shadow. We can provide some color and blur radius to it.
5. Shape: If for some reason we do not want to hard code the value of radius inside Border Radius property we can use this property by assigning it circle value. (Note: You can’t use simultaneously.)
6. Gradient: If we wish to provide some multiple or combinations of colors to our container we can use this property. You can assign a gradient of type Linear Gradient to it and colors are provided in form of a list.
Below is the complete code of the app:
import 'package:flutter/material.dart';

void main(){
runApp(MyApp());
}

class MyApp extends StatelessWidget {
  @override
  Widget build(BuildContext context) {
    return MaterialApp(
      home: HomePage(),
    );
  }
}

class HomePage extends StatelessWidget {
  @override
  Widget build(BuildContext context) {
    return Scaffold(
      body: Center(
        child: Container(
          height: 200.0,
          width: 200.0,
          decoration: BoxDecoration(
            color: Colors.blueAccent,
            border: Border.all(
              color: Colors.black,
              width: 2.0,
            ),
            borderRadius: BorderRadius.circular(10.0),
            gradient: const LinearGradient(
              colors: [
                Colors.black,
                Colors.greenAccent
              ]
            ),
            boxShadow: const [
              BoxShadow(
                color: Colors.grey ,
                blurRadius: 2.0,
                offset: Offset(2.0,2.0)
              )
            ]
          ),
        ),
      ),
    );
  }
}
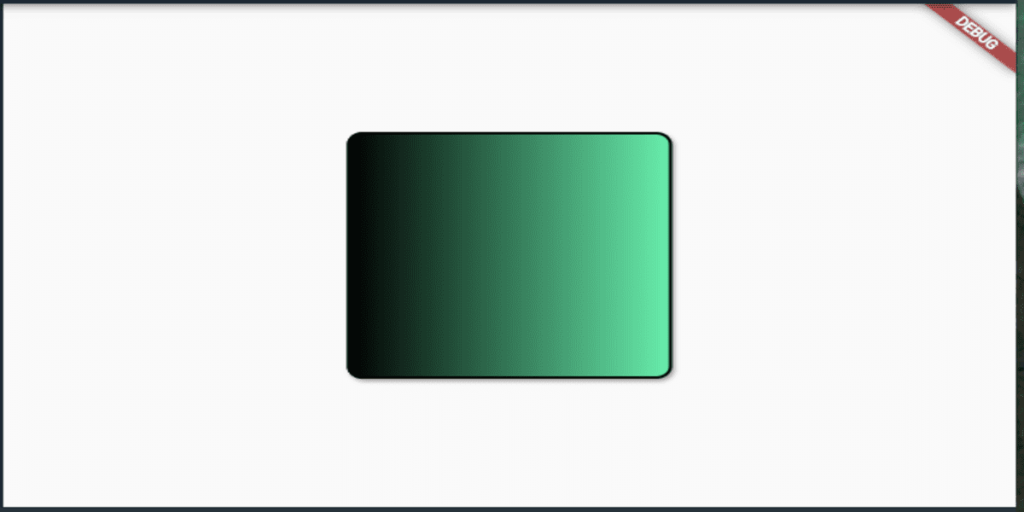
Output:
Conclusion:
Thanks for being with us on a Flutter Journey!
So, in this article, we have seen how to style a Container in Flutter. Also, feel free to comment and provide any other suggestions regarding Flutter.
Flutter Agency is our portal Platform dedicated to Flutter Technology and Flutter Developers. The portal is full of cool resources from Flutter like Flutter Widget Guide, Flutter Projects, Code libs and etc.
Flutter Agency is one of the most popular online portals dedicated to Flutter Technology. Daily thousands of unique visitors come to this portal to enhance their knowledge of Flutter.

Contemporary ventures
Recent blog


Join our newsletter
Read and share new topics about all things Tech.
ready to get started?
Fill out the form below and we will be in touch soon!
"*" indicates required fields