


Navigation Drawer – Flutter Widget Guide By Flutter Agency
Earlier, we have discussed Navigation Drawer in Scaffold article. In this article, we will get into detail for it and it’s page routing through the article.
Its concept comes from android native applications. In Native application, we were using Fragments and Drawer files for managing navigation but in a flutter, there is quite different to create page routes. This article will help you to understand the same.
What is Navigation Drawer in Flutter?
It is a is one type of ListView Widget which is used for switch pages in the application as a user will select an option.
Different ways to create Drawer is as listed below :
1. Add only the body section with a list of actions.
2. Divide drawer into two sections: Header and body
3. Divide drawer into three sections: header, body, and footer.
We will understand the same by example.
In this article, we will understand how to add Left Navigation Drawer where the Drawer opens from the start side or right side and Right Navigation Drawer Where the Drawer layout which slides from the end or left side of the screen.
We would require the following Widgets to Create it.
- Scaffold Widget.
- ListView Widget.
- Divider Widget.
- ListTile Widget.
- Text Widget.
- Icon Widget.
- UserAccountsDrawerHeader Widget.
- Creating Scaffold.
Scaffold Widget :
The Scaffold Widget is used to implement Drawer, Snackbar, App Bar, Bottom Sheet, Bottom Navigation Bar and Floating Action Button.
Scaffold Widget has 2 properties for Drawer layouts in Flutter.
- drawer (for Left to Right Navigation Drawer): Drawer layout which expands from the left side.
- endDrawer(for Right to Left Navigation Drawer): Drawer layout which opens/expands from the Right side.
Scaffold(
drawer:  // Here we will add Drawer Layout.
);
Adding List Items in Drawer :
Now we will add ListView Widget as children of Drawer Widget. Code Snippet will look like below :
Scaffold(
  drawer: Drawer(
      elevation: 20.0,
      child: ListView(
        padding: EdgeInsets.zero,
        children: <Widget>[
        ],
      )),
)
Adding Header Layout in Drawer
For this purpose, we have added UserAccountsDrawerHeader Widget. We can add the user name, user email, and user profile picture in our Drawer header.
Scaffold(
  drawer: Drawer(
      elevation: 20.0,
      child: ListView(
        padding: EdgeInsets.zero,
        children: <Widget>[
          UserAccountsDrawerHeader(
            accountName: Text('Kalpesh Khandla'),
            accountEmail: Text('[email protected]'),
            currentAccountPicture:
            Image.assets("assets/road.jpg"),
            decoration: BoxDecoration(color: Colors.blueAccent),
          ),
        ],
      )),
)
Now to add an item in a Drawer we will be using ListTile. Code Snippet for it is as below :
ListTile(
                leading: const Icon(Icons.home),
                title: const Text("Home"),
                onTap: () {
                  print("Home Clicked");
                  // Navigator.push(
                  //   context,
                  //   MaterialPageRoute(builder: (context) => HomeScreen()),
                  // );
                  /// Uncomment this code snippet to enable navigation to the HomeScreen by creating HomeScreen.
                },
              ),
Complete Code Snippet for Drawer is as below :
import 'package:flutter/material.dart';

void main() => runApp(const MyApp());

class MyApp extends StatelessWidget {
  const MyApp({Key? key}) : super(key: key);

  @override
  Widget build(BuildContext context) {
    return MaterialApp(
      title: 'Material App',
      home: Scaffold(
        appBar: AppBar(
          title: const Text('Material App Bar'),
        ),
        drawer: Drawer(
          child: ListView(
            padding: const EdgeInsets.all(0),
            children: [
              const UserAccountsDrawerHeader(
                accountEmail: Text("[email protected]"),
                accountName: Text("Kalpesh Khandla"),
                currentAccountPicture: CircleAvatar(
                  child: Text("KK"),
                ),
              ),
              ListTile(
                leading: const Icon(Icons.home),
                title: const Text("Home"),
                onTap: () {
                  print("Home Clicked");
                  // Navigator.push(
                  //   context,
                  //   MaterialPageRoute(builder: (context) => HomeScreen()),
                  // );
                  /// Uncomment this code snippet to enable navigation to the HomeScreen by creating HomeScreen.


                },
              ),
              ListTile(
                leading: const Icon(Icons.dashboard),
                title: const Text("Categories"),
                onTap: () {
                  print("Categories Clicked");
                  // Navigator.push(
                  //   context,
                  //   MaterialPageRoute(builder: (context) => CategoryScreen()),
                  // );
                  /// Uncomment this code snippet to enable navigation to the Categoryscreen by creating Categoryscreen.

                },
              ),
              ListTile(
                leading: const Icon(Icons.add_to_photos),
                title: const Text("Add Items"),
                onTap: () {
                  print("Add Clicked");
                  // Navigator.push(
                  //   context,
                  //   MaterialPageRoute(builder: (context) => AddItemScreen()),
                  // );
                  /// Uncomment this code snippet to enable navigation to the additemscreen by creating additemscreen.

                },
              ),
              ListTile(
                leading: const Icon(Icons.info),
                title: const Text("About Us"),
                onTap: () {
                  print("About Clicked");

                  // Navigator.push(
                  //   context,
                  //   MaterialPageRoute(builder: (context) => AboutScreen()),
                  // );
                  /// Uncomment this code snippet to enable navigation to the AboutScreen by creating AboutScreen.
                },
              ),
              ListTile(
                leading: const Icon(Icons.share),
                title: const Text("Share with Friends"),
                onTap: () {
                  print("Share Clicked");
                  // Navigator.push(
                  //   context,
                  //   MaterialPageRoute(builder: (context) => ShareScreen()),
                  // );
                  /// Uncomment this code snippet to enable navigation to the sharescreen by creating sharescreen.

                },
              ),
              ListTile(
                leading: const Icon(Icons.rate_review),
                title: const Text("Rate and Review"),
                onTap: () {
                  print("Rate Clicked");
                  // Navigator.push(
                  //   context,
                  //   MaterialPageRoute(builder: (context) => RateScreen()),
                  /// Uncomment this code snippet to enable navigation to the ratescreen by creating ratescreen.

                  // );
                },
              ),
              ListTile(
                leading: const Icon(Icons.flag),
                title: const Text("Privacy Policy"),
                onTap: () {
                  print("Privacy Clicked");
                  // Navigator.push(
                  //   context,
                  //   MaterialPageRoute(builder: (context) => PrivacyScreen()),
                  // );
                  /// Uncomment this code snippet to enable navigation to the privacy screen by creating privacyscreen.

                },
              ),
            ],
          ),
        ),
      ),
    );
  }
}
Which will give us output like below :
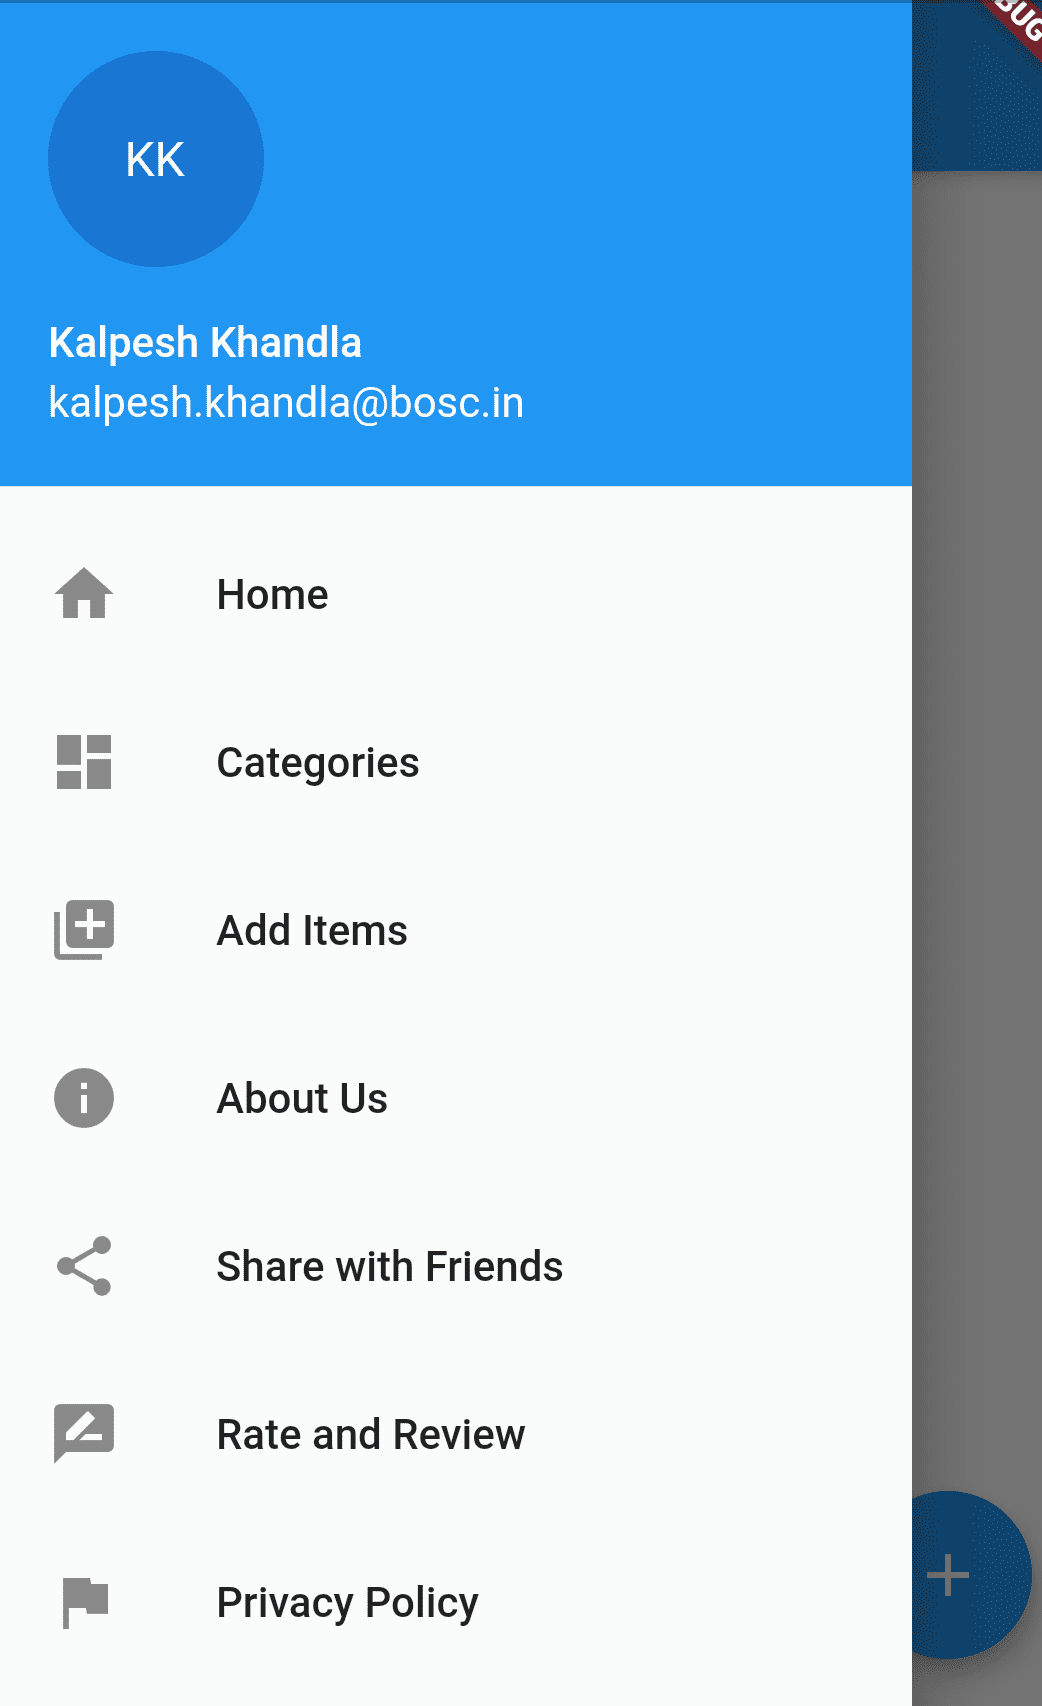
drawer in Flutter
Conclusion:
In this article, we have been through What is Navigation Drawer in Flutter along with how to implement it in a Flutter.
Hope you like this article.
Feel free if you need any assistance regarding flutter.
We would be love to assist you.
FlutterAgency.com is our portal Platform dedicated to Flutter Technology and Flutter Developers. The portal is full of cool resources from Flutter like Flutter Widget Guide, Flutter Projects, Code libs and etc.
FlutterAgency.com is one of the most popular online portal dedicated to Flutter Technology and daily thousands of unique visitors come to this portal to enhance their knowledge on Flutter.

Contemporary ventures
Recent blog


Join our newsletter
Read and share new topics about all things Tech.
ready to get started?
Fill out the form below and we will be in touch soon!
"*" indicates required fields