


Missing Console Output in IntelliJ Plugin of Flutter?
Flutter is the most popular platform for designing a web application for android and ios devices. Many developers rely on cross-platform to create a high-performance app. If you are an app developer, you can switch to Flutter and build a perfect application with an impressive feature.
Installing the proper plugin in the system is mandatory for developers to show content. Creating a new flutter becomes easy by using the flutter starter application template. It is necessary to view problems with source code. No console output is a significant issue for many developers.
You can use the flutter run on command run and access the print statement in such a case. You can get it back and run the app in a debug mode. Apart from that, you may also view the log and run it again in a run mode.
Check the file:
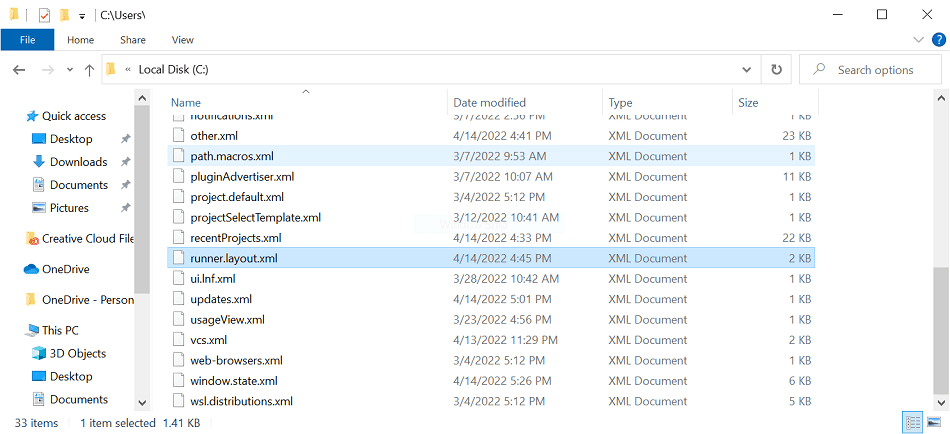
When you minimize the console output mistakenly, you can click and restore the file. It is mandatory to restore /…/runner.layout.xml. You can go to the run tab and click the file under the setting.
Windows:
Go to: C:\Users\\AppData\Roaming\Google\AndroidStudio2021.1/options/
Find “runner.layout.xml”
Restart Android studio
MacOS:
Go to: /Users//Library/Preferences/AndroidStudio2021.1/options/
Find “runner.layout.xml”
Change the name of this file for ex: runner01.layout.xml
Restart Android studio
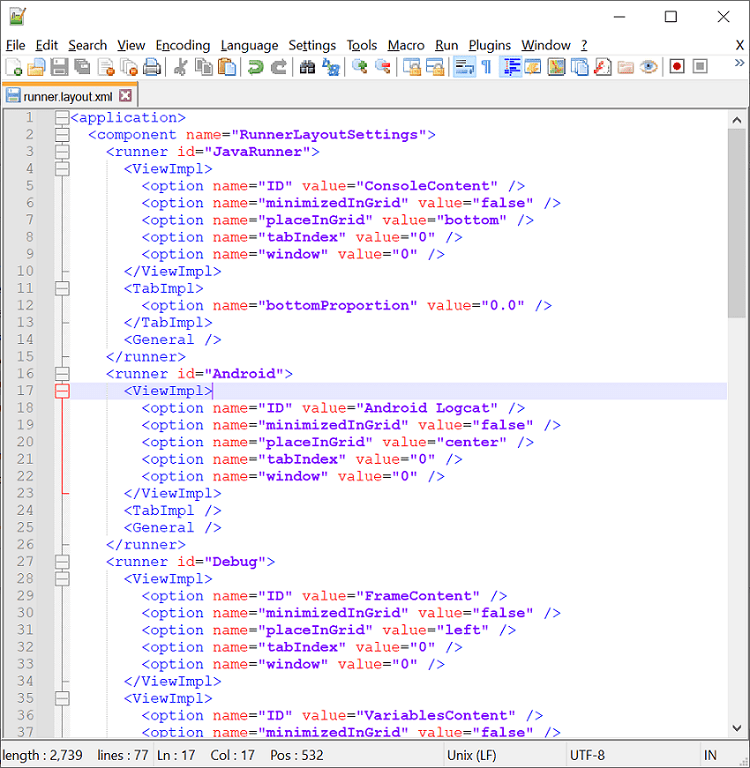
You can check options like replacing run and debug console output with a custom flutter logging view. You can consult with Flutter Expert and get guidelines to display the console output. You can check the file and relaunch the application.
<application>
  <component name="RunnerLayoutSettings">
    <runner id="JavaRunner">
      <ViewImpl>
        <option name="ID" value="ConsoleContent" />
        <option name="minimizedInGrid" value="false" />
        <option name="placeInGrid" value="bottom" />
        <option name="tabIndex" value="0" />
        <option name="window" value="0" />
      </ViewImpl>
      <TabImpl>
        <option name="bottomProportion" value="0.0" />
      </TabImpl>
      <General />
    </runner>
    <runner id="Android">
      <ViewImpl>
        <option name="ID" value="Android Logcat" />
        <option name="minimizedInGrid" value="false" />
        <option name="placeInGrid" value="center" />
        <option name="tabIndex" value="0" />
        <option name="window" value="0" />
      </ViewImpl>
      <TabImpl />
      <General />
    </runner>
    <runner id="Debug">
      <ViewImpl>
        <option name="ID" value="FrameContent" />
        <option name="minimizedInGrid" value="false" />
        <option name="placeInGrid" value="left" />
        <option name="tabIndex" value="0" />
        <option name="window" value="0" />
      </ViewImpl>
      <ViewImpl>
        <option name="ID" value="VariablesContent" />
        <option name="minimizedInGrid" value="false" />
        <option name="placeInGrid" value="center" />
        <option name="tabIndex" value="0" />
        <option name="window" value="0" />
      </ViewImpl>
      <ViewImpl>
        <option name="ID" value="OverheadMonitor" />
        <option name="minimizedInGrid" value="false" />
        <option name="placeInGrid" value="right" />
        <option name="tabIndex" value="0" />
        <option name="window" value="0" />
      </ViewImpl>
      <ViewImpl>
        <option name="ID" value="ThreadsContent" />
        <option name="minimizedInGrid" value="false" />
        <option name="placeInGrid" value="left" />
        <option name="tabIndex" value="0" />
        <option name="window" value="0" />
      </ViewImpl>
      <ViewImpl>
        <option name="ID" value="ConsoleContent" />
        <option name="minimizedInGrid" value="false" />
        <option name="placeInGrid" value="bottom" />
        <option name="tabIndex" value="1" />
        <option name="window" value="0" />
      </ViewImpl>
      <TabImpl>
        <option name="displayName" value="Debugger" />
        <option name="leftProportion" value="0.19965477" />
        <option name="rightProportion" value="0.19965477" />
      </TabImpl>
      <TabImpl>
        <option name="bottomProportion" value="0.0" />
        <option name="defaultIndex" value="1" />
        <option name="index" value="1" />
      </TabImpl>
      <General />
    </runner>
  </component>
</application>
Print console message in flutter app:
Flutter is the most popular cross-platform for many developers to establish the project. Proper guidance is vital to creating an app if you want to work with a cross-platform. When it comes to mobile app development, you must understand different in-built debugging methods like debugPrint () and print ().
It is the best way to print the debug message command prompt window. The role of print () is to print object strings to the window when a developer needs them. DebugPrint () aims to print flutter tools log on the terminal screen.
Methods are beneficial to print a console message in-app. Sample code for printing the console message in the Flutter like:
import 'package:flutter/material.dart';

void main() => runApp(MyApp());

class MyApp extends StatelessWidget {
 void showConsoleUsingPrint() {
   print('Console Message Using Print');
 }

 void showConsoleUsingDebugPrint() {
   debugPrint('Console Message Using Debug Print');
 }

 @override
 Widget build(BuildContext context) {
   print('Widget Build Start');
   return MaterialApp(
       home: Scaffold(
           body: Center(
               child: Column(
                   mainAxisAlignment: MainAxisAlignment.center,
                   children: [
         Container(
             margin: const EdgeInsets.fromLTRB(10, 10, 10, 10),
             child: RaisedButton(
               onPressed: () => showConsoleUsingPrint(),
               child: Text(' Print Console Message using Print '),
               textColor: Colors.white,
               color: Colors.green,
               padding: EdgeInsets.fromLTRB(12, 12, 12, 12),
             )),
         Container(
             margin: const EdgeInsets.fromLTRB(10, 10, 10, 10),
             child: RaisedButton(
               onPressed: () => showConsoleUsingDebugPrint(),
               child: Text(' Print Console Message using Debug Print '),
               textColor: Colors.white,
               color: Colors.green,
               padding: EdgeInsets.fromLTRB(12, 12, 12, 12),
             )),
       ]))));
 }
}
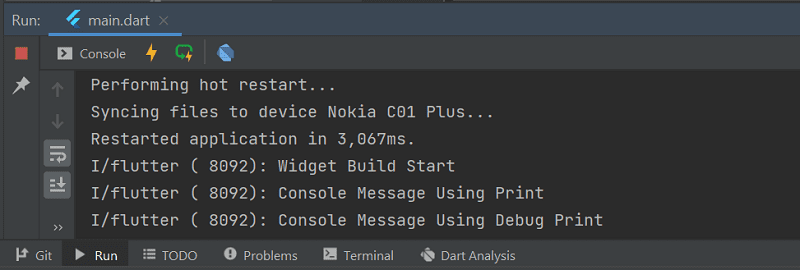
Output:
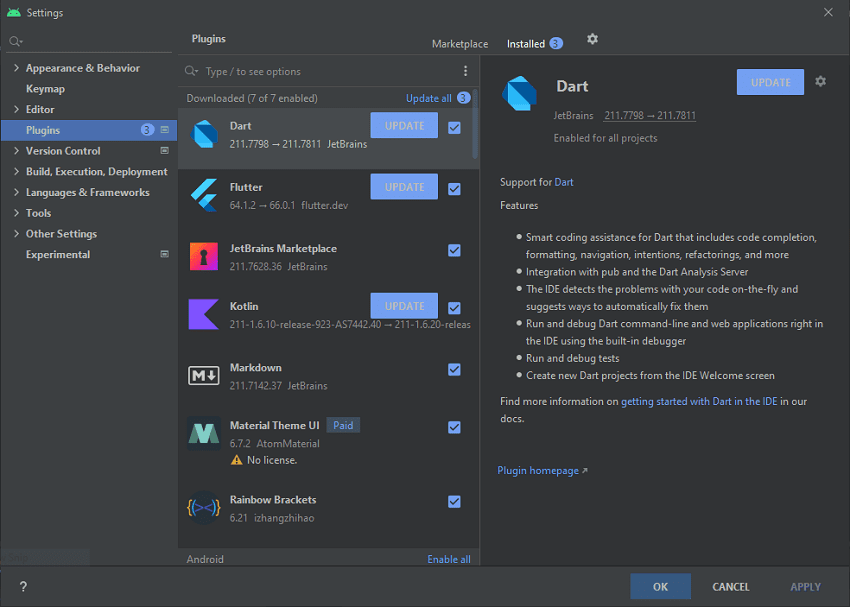
Update plugins:
Plugins are essential things in a flutter project. You must update the plugin regularly and prompt in IDE. If you want to check for updates, for MacOS, you can go to open preference android studio and check updates or access help for checking updates, and for Windows, you can go to File-> Settings-> Plugins and update outdated plugins.
Build projects:
Once you set up an android studio and IntelliJ, you can get ready for the project. Developers use Flutter and create a project in different ways. A Flutter starter app template is better to develop a new flutter project.
- Click on a new project from the welcome window or file under the latest project from the main IDE.
- It is mandatory to identify the flutter SDK path and click next.
- Now, enter the project name, description, and project location.
- Whether you need to publish an app, you can set up a company domain.
- Finally, click Finish to complete the process.
While creating a new application, the flutter IDE plugin requests the organization name in domain order. It may be used as a package name for android and bundle ID. You can never change anything once it is released.
Flutter also allows you to develop a new project with existing source code. You can choose Flutter in the menu and click next. Now, you can enter or browse the directory holding existing code under project location. After that, click Finish to finish the process.
Conclusion:
The above guide is beneficial for developers to get the idea and deal with no console output in a flutter. Before running code, you must check essential things in the application. Agencies aid you in understanding the problem and overcoming them easily.
You can get in touch with them and print the statement on the window. At Flutter Agency, we have a team of experienced Flutter developers for hire, where we will clear everything and guide you to build a project properly when you have doubts about plugins and others. Hire us to get the best Flutter development services. We offer consistent support to start and complete the project development on time.
Consult Now

Contemporary ventures
Recent blog


Join our newsletter
Read and share new topics about all things Tech.
ready to get started?
Fill out the form below and we will be in touch soon!
"*" indicates required fields