


How to Implement Custom Radio Button In Flutter?
RadioButton Widget itself does not maintain any state. when one radio button in a group is selected, the others are un-selected. This means only one option is accepted at the same time So, in this article, we will go through how to implement Custom Radio Button in flutter?
In this blog post, we’ll explore the process of implementing custom radio buttons in Flutter. If you’re looking to add a touch of uniqueness and personalization to your app’s UI, this comprehensive guide is here to help you create custom radio buttons that align with your design aesthetic. We’ll delve into various techniques for implementing custom radio buttons, including custom widget creation, customization of existing radio button widgets, and integration of packages for enhanced customization options. You’ll learn how to customize the button’s appearance, handle user interactions, and maintain state.
Implement Custom Radio Button In Flutter
Consider a code snippet like the below:
class CustomRadio extends StatefulWidget {
  @override
  createState() {
    return new CustomRadioState();
  }
}

class CustomRadioState extends State<CustomRadio> {
  List<RadioModel> sampleData = new List<RadioModel>();

  @override
  void initState() {
    // TODO: implement initState
    super.initState();
    sampleData.add(new RadioModel(false, 'A', 'April 18'));
    sampleData.add(new RadioModel(false, 'B', 'April 17'));
    sampleData.add(new RadioModel(false, 'C', 'April 16'));
    sampleData.add(new RadioModel(false, 'D', 'April 15'));
  }

  @override
  Widget build(BuildContext context) {
    return new Scaffold(
      appBar: new AppBar(
        title: new Text("ListItem"),
      ),
      body: new ListView.builder(
        itemCount: sampleData.length,
        itemBuilder: (BuildContext context, int index) {
          return new InkWell(
            //highlightColor: Colors.red,
            splashColor: Colors.blueAccent,
            onTap: () {
              setState(() {
                sampleData.forEach((element) => element.isSelected = false);
                sampleData[index].isSelected = true;
              });
            },
            child: new RadioItem(sampleData[index]),
          );
        },
      ),
    );
  }
}

class RadioItem extends StatelessWidget {
  final RadioModel _item;
  RadioItem(this._item);
  @override
  Widget build(BuildContext context) {
    return new Container(
      margin: new EdgeInsets.all(15.0),
      child: new Row(
        mainAxisSize: MainAxisSize.max,
        children: <Widget>[
          new Container(
            height: 50.0,
            width: 50.0,
            child: new Center(
              child: new Text(_item.buttonText,
                  style: new TextStyle(
                      color:
                          _item.isSelected ? Colors.white : Colors.black,
                      //fontWeight: FontWeight.bold,
                      fontSize: 18.0)),
            ),
            decoration: new BoxDecoration(
              color: _item.isSelected
                  ? Colors.blueAccent
                  : Colors.transparent,
              border: new Border.all(
                  width: 1.0,
                  color: _item.isSelected
                      ? Colors.blueAccent
                      : Colors.grey),
              borderRadius: const BorderRadius.all(const Radius.circular(2.0)),
            ),
          ),
          new Container(
            margin: new EdgeInsets.only(left: 10.0),
            child: new Text(_item.text),
          )
        ],
      ),
    );
  }
}

class RadioModel {
  bool isSelected;
  final String buttonText;
  final String text;

  RadioModel(this.isSelected, this.buttonText, this.text);
}
Use it like the below text:
void main() {
  runApp(new MaterialApp(
    home: new CustomRadio(),
  ));
}
We will get output like a below:
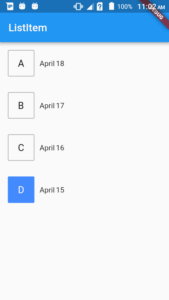
There is the code snippet below which will show you how you can maintain the state of each ListView item.
Flutter Radio button tile and dynamic radio button can also be used.
So now you can play with it and make it the way you want.
If you want only one selected item you can write the logic that way.
void main() {
  runApp(new MaterialApp(
    home: new ListItemDemo(),
  ));
}

class ListItemDemo extends StatelessWidget {
  @override
  Widget build(BuildContext context) {
    return new Scaffold(
      appBar: new AppBar(
        title: new Text("ListItem"),
      ),
      body: new ListView.builder(
          itemCount: 10,
          itemBuilder: (BuildContext context, int index) {
            return new MyListItem(
              title: "Hello ${index + 1}",
            );
          }),
    );
  }
}

class MyListItem extends StatefulWidget {
  final String title;

  MyListItem({this.title});

  @override
  _MyListItemState createState() => new _MyListItemState();
}

class _MyListItemState extends State<MyListItem> {
  bool isSelected;

  @override
  void initState() {
    super.initState();
    isSelected = false;
  }

  @override
  Widget build(BuildContext context) {
    return new Row(
      children: <Widget>[
        new Text("${widget.title} ${isSelected ? "true" : "false"}"),
        new RaisedButton(
          onPressed: () {
            if (isSelected) {
              setState(() {
                isSelected = false;
              });
            } else {
              setState(() {
                isSelected = true;
              });
            }
          },
          child: new Text("Select"),
        )
      ],
    );
  }
}
So now, your RadioButton widget will look like the below:
import 'package:flutter/foundation.dart';
import 'package:flutter/material.dart';
import 'package:flutter/widgets.dart';

class RadioButton<T> extends StatefulWidget {
  RadioButton({
    Key key,
    @required this.value,
    @required this.caption,
    @required this.groupValue,
    @required this.onChanged,
  })  : assert(value != null),
        assert(caption != null),
        assert(groupValue != null),
        assert(onChanged != null),
        super(key: key);

  final T value;
  final T groupValue;
  final String caption;
  final Function onChanged;

  @override
  State<StatefulWidget> createState() => _RadioButtonState();
}

class _RadioButtonState extends State<RadioButton> {
  @override
  Widget build(BuildContext context) {
    final bool selected = widget.value == widget.groupValue;

    return GestureDetector(
      onTap: () {
        widget.onChanged(widget.value);
      },
      child: Container(
        width: double.maxFinite,
        decoration: BoxDecoration(
            borderRadius: BorderRadius.circular(8),
            color: selected ? Colors.red : Colors.white),
        child: Padding(
          padding: const EdgeInsets.all(16),
          child: Text(
            widget.caption,
            textAlign: TextAlign.center,
            style: Theme.of(context)
                .textTheme
                .button
                .copyWith(color: selected ? Colors.white : Colors.red),
          ),
        ),
      ),
    );
  }
}
Conclusion:
So we hope you learned from this article !!!
So in this article, we have been through how to implement Custom Radio Button in flutter ??
Do not forget to drop your valuable suggestions/feedback. We would love to assist you.
And Stay tuned for the flutter radio button with text🙂
FlutterAgency.com is our portal Platform dedicated to Flutter Technology and Flutter Developers. The portal is full of cool resources from Flutter like Flutter Widget Guide, Flutter Projects, Code libs and etc.
FlutterAgency.com is one of the most popular online portals dedicated to Flutter Technology and daily thousands of unique visitors come to this portal to enhance their knowledge of Flutter.

Contemporary ventures
Recent blog


Join our newsletter
Read and share new topics about all things Tech.
ready to get started?
Fill out the form below and we will be in touch soon!
"*" indicates required fields